Dinner · Part 2 of 3: Instructions
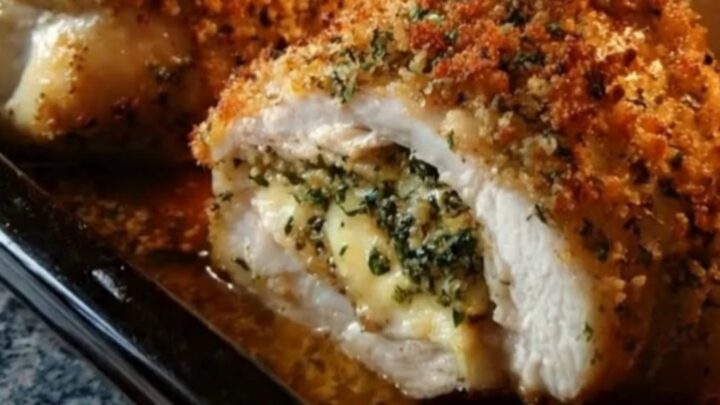
Oven-Baked Stuffed Chicken Breasts for a Crispy and Cheesy Dinner Step-by-step instructions
- Prep
- Cook
- Total
- Serves
- 4
Before you start
Before beginning, ensure that all chicken breasts are thoroughly patted dry with paper towels. Excess surface moisture can cause the breadcrumbs to become soggy rather than crispy. Set up a clean workspace and have a meat thermometer ready to check for doneness, as this is the most reliable way to monitor the cooking process without relying on visual cues alone.
Ingredients at a glance (4)
- 4 chicken breasts, boneless and skinless
- 1 cup shredded cheese, such as mozzarella or monterey jack
- 1 tbsp dried herbs, such as Italian seasoning
- 1 cup breadcrumbs
Instructions
Filling and stuffing
- Prepare the chickenUsing a sharp knife, carefully cut a pocket into the side of each chicken breast, being mindful not to cut all the way through. Combine the shredded cheese and dried herbs in a small bowl. Stuff each chicken pocket generously with the cheese and herb mixture, securing the opening with toothpicks if necessary to prevent the filling from escaping during the baking process.Look for The pockets are evenly filled and the cheese is tucked inside the chicken flesh.Tip Ensure the chicken breasts are of similar thickness so they cook at the same rate.
The chicken breasts should be carefully sliced to create a pocket that can hold the cheese mixture without tearing. Check that the opening is small enough to hold the filling securely.
The cheese should be evenly distributed so that every breast is well-filled, and the exterior of the chicken should be dry to ensure the breadcrumb coating adheres perfectly during the next stage of the process.
Breading and baking
- Coat and bakePress the exterior of the stuffed chicken breasts into the breadcrumbs, ensuring an even coating on all sides. Place the breaded chicken into a glass baking dish. Bake in a preheated oven at 400°F (200°C) until the crust is golden brown and the internal temperature of the chicken reaches 165°F (74°C).Look for The crust is golden and crispy, and the cheese is visibly bubbling from the sides.Safe temperature 165°F (74°C) internal temperature (poultry)Tip Press the breadcrumbs firmly into the chicken to help them adhere better during the baking process.
The chicken should be evenly coated with breadcrumbs, with no bare spots visible on the surface. During the baking phase, the chicken must be placed in a single layer in the baking dish.
Look for a deep golden-brown color on the crust and listen for the sound of bubbling cheese. The smell should be savory and toasted, indicating the breadcrumbs have reached the desired level of crispness.
Resting and final check
- Rest and serveOnce the chicken is fully cooked, remove the baking dish from the oven and allow the breasts to rest for at least 5 minutes before serving. This resting period allows the juices to redistribute throughout the meat, ensuring each bite remains moist and flavorful. Carefully remove any toothpicks used before plating the chicken for service.Look for The chicken is firm and the internal temperature is maintained at 165°F (74°C) after resting.Safe temperature 165°F (74°C) internal temperature (poultry)Tip Use a meat thermometer to verify the temperature to avoid overcooking the chicken.
After removing the dish from the oven, ensure the chicken rests undisturbed for at least 5 minutes. The meat should remain firm and the crust should stay crisp.
Check the internal temperature once more to confirm it has reached 165°F (74°C). The cheese should be soft and flowing when the chicken is finally sliced, indicating that the filling has reached the perfect temperature for serving.
Common mistakes
A common error is cutting the pocket too large, which allows the cheese to leak out into the baking dish rather than staying inside the chicken.
Another mistake is failing to let the chicken rest after it comes out of the oven; skipping this step causes the juices to spill out immediately when cut, resulting in a dry and less flavorful experience. Always allow the full resting time to ensure the best possible texture.
How to tell it’s done
The chicken is done when the internal temperature reaches 165°F (74°C) at the thickest part of the breast. The crust should be deep golden brown, and the cheese filling should be hot and liquid. Always use a digital meat thermometer inserted into the thickest part of the meat, avoiding the cheese pocket, to ensure an accurate reading that guarantees the chicken is safe to consume.
- Poultry: 165°F (74°C) in the thickest part
Up next · Part 3 of 3
2 variations · storage & make-ahead · 3 answers · printable card
Tips, FAQ & printable recipe (Part 3)← Back to the ingredients (Part 1)