Desserts · Part 2 of 3: Instructions
Oreo Cheesecake with Dark Chocolate Ganache Topping Step-by-step instructions
- Prep
- Cook
- Total
- Serves
- 12
Before you start
Set out the cream cheese, sour cream and eggs about an hour before you begin so they blend smoothly without lumps. Chop the sandwich cookies and dark chocolate, and melt the butter. Line the base of a 9-inch springform pan with foil on the outside if you plan to set it in a water bath.
Have the heavy cream, confectioners' sugar and piping bag ready for the decoration. Preheat the oven to 325°F (165°C) and position a rack in the center so the cake bakes evenly. Keeping everything measured and at hand makes the rest of the method move quickly and keeps the filling smooth.
Ingredients at a glance (10)
- 30 cream-filled chocolate sandwich cookies, such as Oreo-style cookies, divided
- 4 tbsp unsalted butter, melted
- 24 oz cream cheese, softened to room temperature
- 3/4 cup granulated sugar
- 1/2 cup sour cream
- 3 large eggs, at room temperature
- 1 tsp vanilla extract
- 4 oz dark chocolate, finely chopped, plus more for grating
- 1/2 cup heavy cream
- 1 cup cold heavy cream, whipped to stiff peaks with 2 tbsp confectioners' sugar
Instructions
Crust set and filling built
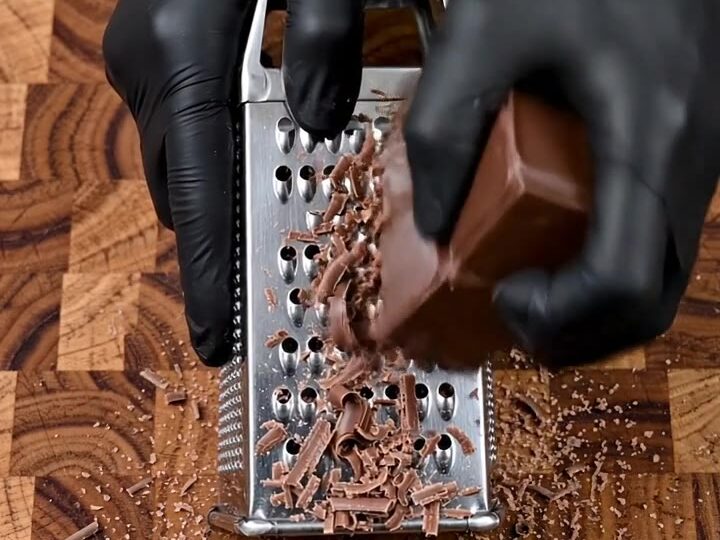
- Chop the cookies and chocolateSet a wooden board on the counter and put on gloves. Chop 20 of the sandwich cookies into rough pieces with a large chef's knife, keeping some larger chunks. Break up the dark chocolate and grate part of it on a box grater so fine curls and shavings fall onto the board.Look for Cookie pieces range from small crumbs to chunks about the size of a dime, and the chocolate shavings are fine and feathery.Tip Chill the chocolate for ten minutes before grating so it shaves cleanly instead of smearing.
- Make the chocolate cookie crustCrush the remaining 10 cookies in a bag or food processor until fine. Stir them with the melted butter until evenly moistened. Press the mixture firmly into the base of a 9-inch springform pan and chill until firm.Look for The crumbs hold together when pinched and the base feels firm and compact.Tip Press the crust with the flat bottom of a glass to get an even, tight layer.
At the end of phase one, the cookie crust should be firm and compact when pressed, and the chopped cookies and grated chocolate should be ready on the board. Pinch a small amount of crust between your fingers; it should hold together without crumbling. The chocolate shavings should be fine and light.
Check that the crust sits level in the pan and is chilled, because a cold base keeps the filling from soaking in and helps the cheesecake bake evenly. If the crust feels loose, press it again with the flat of a glass before adding the batter, since a stable base makes the slices hold their shape later on.
Glossy ganache poured
- Beat the cheesecake fillingBeat the softened cream cheese and sugar in a mixer until smooth and fluffy. Add the sour cream and vanilla, then beat in the eggs one at a time, scraping the bowl between additions. Fold in the chopped cookie pieces until evenly distributed.Look for The batter is smooth, thick and glossy, with no lumps of cream cheese.Tip Mix on low speed once the eggs go in to avoid trapping extra air.
- Fill and bake the cheesecakeSpread the filling over the chilled crust and smooth the surface flat. Press a few cookie chunks into the top. Bake at 325°F (165°C) until the edges are set and the center barely jiggles, about 55 to 60 minutes. Turn off the oven, crack the door and cool for one hour.Look for The outer ring is set and the center moves only slightly when the pan is tapped.Safe temperature 160°F (71°C) internal temperature (egg dishes)Tip Set the pan in a larger pan of hot water to bake the cake gently.
- Pour the ganache toppingHeat the heavy cream until steaming but not boiling, then pour it over the finely chopped dark chocolate. Let it stand two minutes, then stir until smooth and glossy. Pour the ganache in a slow, thick stream over the center of the cooled cheesecake and let it spread to the edges.Look for The ganache is smooth, glossy and pourable, and it spreads outward in an even layer.Tip Tilt the pan gently to help the ganache reach the edges without drips.
At the end of phase two, the cheesecake should have set around the edges, with the center only slightly wobbly when the pan is tapped. The ganache should be smooth, glossy and spread evenly to the rim. Look at the surface: it should be level, with no cracks running through the center.
Before moving on, let the cake cool completely at room temperature, then pour the ganache slowly and check that it reaches all edges. If it has thickened too much, warm it briefly over low heat, stirring gently, until it pours again. This keeps the top smooth and shiny for the final step.
Sliced into clean wedges
- Chill until the topping setsRefrigerate the cheesecake uncovered until the ganache is firm and shiny, at least 4 hours or overnight. Keep the cake away from strong-smelling foods so the topping stays clean.Look for The ganache is firm to a light touch and shines evenly across the top.Tip Loosely cover the cake once the topping has fully set to protect it.
- Release, decorate and sliceRun a thin knife around the inside of the pan, then release the springform ring and lift the cheesecake onto a serving plate. Whip the cold cream with confectioners' sugar to stiff peaks. Pipe rosettes around the edge, set whole cookies between them and add a half cookie on the side. Slice into wedges with a clean, hot knife.Look for The cake releases cleanly and the piped rosettes hold their shape with firm peaks.Tip Wipe the knife between cuts for neat, clean wedges that show each layer.
- Serve the cheesecakeKeep the cheesecake chilled until serving. Let slices stand for a few minutes before eating so the filling softens slightly and the flavor opens up.Look for Slices look dense and creamy, with clear layers of crust, filling and glaze.Tip Dip the knife in hot water between slices for the cleanest edges.
At the end of phase three, the ganache should be firm and shiny, the sides of the cake should release cleanly from the pan, and the whipped cream rosettes should hold their peaks. Lightly touch the topping; it should feel firm and not leave a mark. Slide a thin knife along the edge to confirm the cake releases freely. When you slice, the wedges should show crust, filling and glaze in clean layers. Check that the knife is clean between cuts so each slice keeps its edge and the layers stay sharp.
Common mistakes
The most common problem is overbaking, which makes the filling dry, crumbly and prone to cracking. Stop baking when the edges are set and the center barely moves, then let residual heat finish the cake. Overmixing the batter after adding the eggs traps air and can cause the cake to puff and then sink.
Pouring the ganache while it is too hot makes it run off the sides, and pouring it too cold makes it thick and streaky. Warm cream to steaming, then let it stand before stirring. Finally, cutting the cake before it has chilled fully can cause the layers to smear, so give it at least four hours in the refrigerator.
How to tell it’s done
The cheesecake is done when the outer ring is set and the center moves only slightly when you gently shake the pan. The filling should be creamy and smooth, not wet. Because the batter contains eggs, the filling should reach 160°F (71°C) in the center for the eggs to be fully cooked. Use an instant-read thermometer near the middle of the cake without touching the pan. Once it reaches that temperature, turn off the oven and let the cake cool gradually. The ganache is ready when it is firm to a light touch and shines evenly across the surface.
- Egg dishes: 160°F (71°C) in the thickest part
Up next · Part 3 of 3
4 variations · storage & make-ahead · 5 answers · printable card
Tips, FAQ & printable recipe (Part 3)← Back to the ingredients (Part 1)