Dinner · Part 2 of 3: Instructions
One-Skillet Crispy Birria Chimichanga with Consomé Step-by-step instructions
- Prep
- Cook
- Total
- Serves
- 1
Before you start
Before the skillet goes on the burner, everything should be within arm's reach, because assembly moves fast once the tortilla is warm. Shred the braised beef birria if it is not already shredded, picking out any large pieces of fat.
Have the Mexican red rice and refried pinto beans ready to spoon — warm the beans briefly so they spread smoothly. Shred the Chihuahua cheese from a block; pre-shredded cheese is coated and will not seal the seam properly. Warm the guajillo consomé in a small saucepan so it is ready the moment the chimichanga leaves the oil.
Ingredients at a glance (9)
- 1 (12-inch) large flour tortilla
- 1/3 cup refried pinto beans, warmed (store-bought or made ahead)
- 1/2 cup Mexican red rice, cooked (store-bought or made ahead)
- 5 oz braised beef birria, shredded (store-bought or made ahead)
- 3 oz Chihuahua cheese, shredded
- 1 inch avocado oil, for pan-frying
- 1/2 cup guajillo consomé, hot (store-bought or made ahead)
- Mexican crema, to taste, for drizzling
- Cotija cheese, to taste, crumbled for sprinkling
Instructions
Phase 1: Build and roll
- Warm the tortillaHeat a dry skillet or comal over medium heat and warm the flour tortilla about 20 seconds per side, until pliable and faintly toasty. A warm tortilla bends without cracking, which matters because a stiff one tears under the weight of the filling and spills everything into the hot oil.Look for The tortilla should flop over your hand with no resistance at the fold and no pale, stiff spots.Tip Slide the warmed tortilla into a clean kitchen towel so trapped steam keeps it soft while the filling is assembled.
- Spread the bean layerSpread the refried pinto beans in a shallow band across the lower third of the tortilla, leaving a 2-inch border on all sides. The beans keep the rice and beef from drying out during the fry, and their slight stickiness helps glue the layers together so the finished roll holds its shape in the oil.Look for A thin, even band, thin enough to see tortilla through it in places — never a thick paste.Tip Warm the beans first; cold beans drag and tear the tortilla instead of spreading in one smooth pass.
- Layer rice, beef, and cheeseSpoon the Mexican red rice over the beans, lay the shredded braised beef birria in a line down the center, and finish with the Chihuahua cheese. Keep everything within the middle third of the tortilla; overfilling is the main reason chimichangas split open in the oil and lose their filling.Look for The filling should sit in a compact ridge, not mound toward the edges of the tortilla.Tip Cheese on top is deliberate: as it melts it runs toward the seam and welds the roll shut from inside.
- Roll it tight, seam downFold the two sides inward over the filling, then roll the tortilla away from you into a tight cylinder, ending seam-side down. Press gently so it keeps its shape. If the seam gapes, pinch it closed or dab it with a little of the bean layer; a sealed seam keeps oil out of the filling.Look for A snug cylinder with no visible filling and a seam lying flat against the work surface.Tip Roll on a cutting board and lift with two hands or a wide spatula; a loose roll slumps and fries unevenly.
At the end of this phase there is a tight, sealed cylinder resting seam-side down on the cutting board, heavy for its size and uniform along its length. No filling should be visible at either open end — if rice or beef peeks out, push it back in and pinch the tortilla closed.
The tortilla should still feel warm and pliable, and the seam should lie flat with no gaps. Give the roll a gentle press: it should hold its shape without slumping.
Phase 2: Fry to a blistered crust
- Heat the oil to 365°FPour avocado oil into the cast-iron skillet to a depth of 1 inch and set it over medium heat. Bring it to 365°F (185°C), checking with a deep-fry thermometer. This temperature crisps the tortilla quickly enough that the filling heats through before the crust darkens; cooler oil soaks in and turns everything greasy.Look for The oil should shimmer freely and a shred of tortilla dropped in should sizzle hard within two seconds.Tip Clip the thermometer to the pan rim and watch it; cast iron holds heat, so nudge the burner down once it hits temperature.
- Fry seam-side downLower the chimichanga into the oil seam-side down and fry undisturbed for 2 1/2 minutes. Leave it alone; moving it early tears the crust while it is still setting. The seam seals as the cheese beneath it melts, and the underside turns deep golden with raised, crackled blisters.Look for Steady, lively sizzling the whole time, and edges turning from pale gold to deep amber at the 2-minute mark.Tip If the oil spits hard, the heat is too high; lift the pan off the burner for a few seconds and lower the flame slightly.
- Flip, finish, and drainTurn the chimichanga with tongs or a spider and fry the second side for another 2 1/2 minutes, until evenly golden and blistered all over and the beef filling reaches at least 145°F (63°C) at the center. Lift it out, let the oil drip back, and set it on a wire rack to rest at least 3 minutes so steam escapes instead of softening the bottom crust.Look for Uniform deep golden color on both ends and sides, with an audible crackle when tapped with tongs.Safe temperature 145°F (63°C) internal temperature (steaks, chops and roasts)Tip Drain on a wire rack, never paper towels laid flat; trapped steam under the chimichanga softens the very crust worked for.
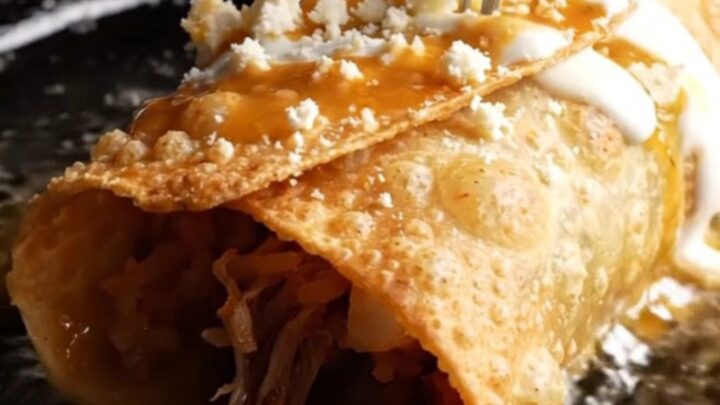
The chimichanga comes out of the oil deep golden across its whole surface, with raised, crackled blisters like a good fried taco, and it crackles audibly when tapped with tongs. The sizzle should have been steady but never violent through both two-and-a-half-minute sides.
Lift it and listen: a crisp shell sounds hollow; a greasy one sounds dull. Rest it on the wire rack for a minute — you should see steam escaping from the ends, which means the filling is hot throughout and the cheese has melted to seal the interior.
Phase 3: Smother and serve
- Smother hot and serveWarm the guajillo consomé in a small saucepan until it steams. Set the chimichanga on a warm plate, ladle about 1/2 cup of the hot consomé over the top, then drizzle with Mexican crema and shower with crumbled cotija cheese. Cut in with a fork — the crust should crackle — and serve immediately while the consomé is still hot and the top still crisp.Look for Steam rising off the consomé the moment it hits the plate, and a distinct crunch as the fork breaks the crust.Tip Sauce at the table, not the kitchen counter, if there is any wait; a few minutes under consomé is all it takes to soften the crust.
The finished plate looks dramatic and it should: a blistered, golden chimichanga half-drowned in glossy, brick-red consomé, with white ribbons of crema and a snowfall of crumbled cotija across the exposed crust. Steam should rise off the sauce the instant it lands. Before serving, run the fork test: the crust should crackle where the fork breaks it, and the cheese inside should pull in strings as the two halves separate.
Common mistakes
The three failures that ruin this dish are all preventable. First, underfilled or overstuffed rolls: more than the listed amounts of beef, rice, and beans and the tortilla cannot seal, and the filling escapes into the oil, where it burns and turns bitter. Second, oil that is too cool — below about 350°F — which produces a pale, fat-soaked shell; always let the oil climb back to 365°F between batches. Third, saucing too early.
How to tell it’s done
The chimichanga is done when the entire surface — both ends, the bottom, and every visible side — is deep golden and blistered, with no pale, doughy patches left anywhere.
Tapped with tongs, it should sound hollow and crisp, and it should feel light for its size, a sign the crust fried rather than soaked. The filling must be heated through: the beef was fully braised beforehand, so the goal is steaming hot all the way to the center, with the cheese entirely melted.
- Steaks, chops and roasts: 145°F (63°C) in the thickest part, then a 3-minute rest
Up next · Part 3 of 3
4 variations · storage & make-ahead · 5 answers · printable card
Tips, FAQ & printable recipe (Part 3)← Back to the ingredients (Part 1)