Desserts · Part 2 of 3: Instructions
No-Bake Cookie Truffle Cauldrons for Halloween Step-by-step instructions
- Prep
- Cook
- Total
- Serves
- 12
Before you start
Before you begin, ensure your workspace is clean and clear of clutter. Line your baking sheet with parchment paper to prevent sticking. Take the cookie dough out of the refrigerator about ten minutes before you plan to start, as dough that is too cold can be difficult to roll into smooth balls.
Have your microwave-safe bowls ready, and make sure you have a clean spoon or a small fork available for dipping the truffles. Keeping everything organized beforehand will make the dipping and decorating process much smoother and more enjoyable.
Ingredients at a glance (3)
- 2 cups cookie dough, prepared
- 1 cup dark chocolate, melted
- 1/4 cup green candy melts, melted
Instructions
Shaping the truffles
- Shape the trufflesScoop the cookie dough into uniform portions and roll them into smooth, round balls using your palms. Place the prepared balls onto a parchment-lined baking sheet, ensuring they are spaced evenly apart to allow for easy coating later.Look for The dough should be shaped into smooth, round balls of equal size.Tip Chill the dough for fifteen minutes before rolling to make it easier to handle.
At the end of this phase, you should have perfectly round and uniform cookie dough balls ready for coating. They should be firm enough to handle and neatly arranged on your parchment-lined tray. If the balls seem misshapen or too soft, return them to the refrigerator for a few extra minutes before proceeding to the next step. A consistent size is important for both the aesthetic appeal and even cooking, ensuring that every truffle is ready for the dipping process.
Coating the truffles
- Coat in chocolateMelt the dark chocolate in a microwave-safe bowl in thirty-second intervals, stirring until smooth. Spoon the melted chocolate over each cookie ball, ensuring even coverage. Allow the excess chocolate to drip off before returning the balls to the parchment-lined sheet.Look for The chocolate should be completely smooth and glossy without any lumps.Tip Use a fork to lift the balls and let excess chocolate drain away.
By the end of this phase, every cookie ball should be completely encased in a smooth layer of dark chocolate. The coating should be uniform, covering the entire surface without any large gaps or pooling at the bottom. The chocolate should begin to set as it sits on the parchment paper. Check that the truffles are well-spaced to prevent them from sticking together as the chocolate solidifies, and ensure no dough is peaking through the dark chocolate shell.
Adding the final touch
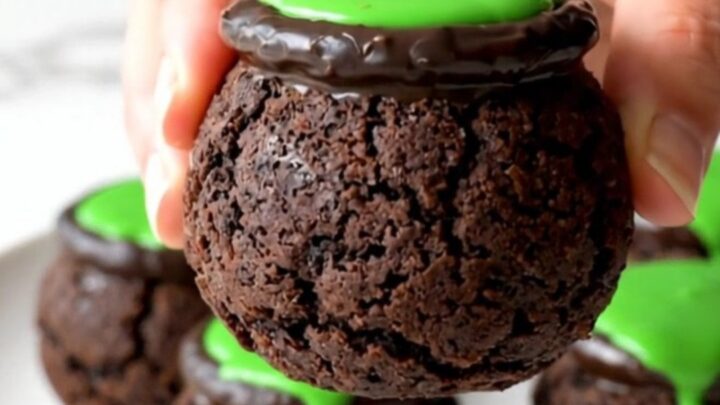
- Add the green toppingMelt the green candy melts in a separate bowl until smooth. Carefully spoon a small amount of the green candy onto the top of each chocolate-coated truffle, letting it pool slightly to create a cauldron effect. Place the finished treats on a serving plate and allow them to set completely before serving.Look for The green candy should be thick enough to hold its shape as it pools.Tip Work quickly once the green candy is melted as it may harden if left too long.
Once the green candy has been added, the cauldrons should look complete and festive. The green topping should have a distinct, slightly raised appearance that mimics the look of a bubbling potion.
Ensure the candy has set completely before moving the truffles to a serving platter. The final result should be a tray of uniform, spooky, and delicious treats that are ready to be displayed and enjoyed by your guests during your Halloween celebration or any festive event.
Common mistakes
A common mistake is using chocolate that is too hot, which can cause the dough balls to soften and lose their shape. Always let the melted chocolate cool slightly before dipping. Another error is failing to tap off excess chocolate, which can lead to messy, uneven bases.
Finally, ensure the green candy is not too runny, or it will slide off the top of the truffle rather than pooling nicely. Patience during the setting phase is key to achieving the perfect final look.
How to tell it’s done
The truffles are done when the chocolate coating has fully hardened and no longer feels tacky to the touch. The green candy topping should also be firm and set firmly against the dark chocolate base.
There is no need for internal temperature checks as this recipe does not involve raw proteins or cooking. Simply observe the visual appearance: the chocolate should be matte or glossy depending on the type used, and the entire structure should feel solid when lifted from the plate.
Up next · Part 3 of 3
2 variations · storage & make-ahead · 3 answers · printable card
Tips, FAQ & printable recipe (Part 3)← Back to the ingredients (Part 1)