Desserts · Part 2 of 3: Instructions
No-Bake Chocolate Caramel Crunch Dessert Step-by-step instructions
- Prep
- Cook
- Total
- Serves
- 8
Before you start
Before starting the assembly, clear a flat workspace on the counter and set out an 8-inch square glass dish. Ensure that the dark crumb crust mixture and fluffy cream layer are properly prepped and ready for immediate layering.
Check refrigerator space to guarantee a level, undisturbed shelf where the assembled dessert can chill flat for at least two full hours before slicing and serving.
Ingredients at a glance (4)
- 2 cups dark crumb crust, store-bought or made ahead
- 3 cups fluffy cream layer, store-bought or made ahead
- 1/2 cup caramel drizzle
- 1/2 cup chocolate chunks
Instructions
Crust Compacting
- Press the crust baseTransfer the prepared dark crumb crust mixture into the bottom of an 8-inch square glass dish. Press down evenly and firmly across the entire bottom surface to establish a dense, flat, and supportive foundational layer for the dessert.Look for The crust forms a compact, uniform, and flat base across the bottom of the dish.Tip Use the smooth, flat bottom of a measuring cup to compact the crumbs tightly into all edges.
The dark crumb crust should appear flat, uniform, and deeply compacted across the bottom of the glass dish. There should be no visible gaps, loose particles, or uneven mounds.
When lightly pressed with a fingertip, the surface feels solid, stable, and ready to receive the cream without shifting.
Cream Layering
- Spread the cream layerSpoon the fluffy cream layer over the compacted dark crumb base. Use an offset spatula to smooth the surface evenly from edge to edge, ensuring a level, cloud-like layer with consistent thickness across the dish.Look for The cream layer is smooth, flat, and reaches all edges of the glass dish.Tip Spread gently to prevent disturbing or pulling up loose crumbs from the base layer.
The fluffy cream layer should sit smoothly on top of the crust, filling out the dish evenly from corner to corner. The surface is level, white, and airy, showing no crumb specks dragged through from the bottom. The layer exhibits soft body without pooling or running along the glass edges.
Topping and Setting
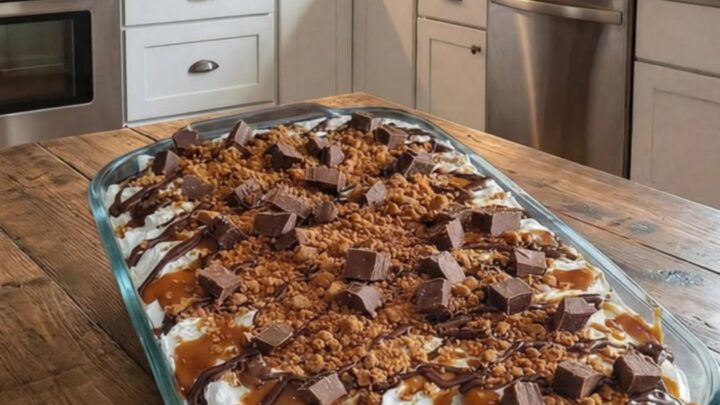
- Add toppings and chillDrizzle the caramel drizzle generously over the smoothed cream layer in an even pattern. Scatter the crunchy chocolate chunks over the top. Chill the dessert in the refrigerator for at least two hours until fully set before slicing.Look for The cream is firm to the touch, the caramel is glossy, and the chunks are set.Tip Chill thoroughly so the slices lift out cleanly with sharp, defined edges.
The golden caramel drizzle covers the cream in balanced ribbons, and the chocolate chunks are evenly distributed across the surface. After two hours of chilling, the entire pan feels cold, set, and sturdy. A spatula inserted along the edge cuts cleanly without collapsing the soft cream filling.
Common mistakes
Avoid spreading the fluffy cream too aggressively, which can drag loose crumbs upward and muddy the sharp visual distinction between the dark and white layers.
Another common misstep is cutting into the dessert before it has chilled for the full two hours. Slicing too early causes the cream to collapse and lose its clean, sliceable edge.
How to tell it’s done
The dessert is done when the cream layer feels firm to a gentle touch and holds its structure without slumping.
When a metal spatula cuts and lifts a square from the glass dish, the dark crumb crust should release in one solid piece while the cream maintains clean vertical sides. The caramel should remain glossy without running excessively into the crust.
Up next · Part 3 of 3
2 variations · storage & make-ahead · 3 answers · printable card
Tips, FAQ & printable recipe (Part 3)← Back to the ingredients (Part 1)