Desserts · Part 2 of 3: Instructions
No-Bake Chocolate Banana Biscuit Discs with Pistachios Step-by-step instructions
- Prep
- Cook
- Total
- Serves
- 12
Before you start
Before starting, ensure the biscuits are processed into fine crumbs using a food processor. Peel the bananas and have them ready. Chop the roasted hazelnuts and pistachios if they aren't already chopped.
Measure out the cocoa powder and milk. Line a baking sheet with parchment paper for the dipped discs. Clear space in the refrigerator for chilling the log.
Ingredients at a glance (8)
- 2 packages cocoa tea biscuits (petibör), processed into fine crumbs
- 2 ripe bananas, peeled
- 2 tbsp roasted hazelnuts, chopped
- 2 tbsp roasted pistachios, chopped
- 2 tbsp dark cocoa powder
- 3 tbsp milk
- 200 g dark chocolate, melted
- Crushed pistachios, for garnish, to taste
Instructions
Dough Formation
- Make the doughProcess the cocoa tea biscuits in a food processor until they form fine crumbs. Transfer the crumbs to a large glass bowl. Add the peeled bananas and mash them with a fork directly into the crumbs. Add the chopped roasted hazelnuts, chopped roasted pistachios, dark cocoa powder, and milk. Knead everything together with your hands until a smooth, cohesive chocolate dough forms.Look for The dough should be moist and hold together when pressed, with no dry crumbs.Tip If the dough feels too dry, add an extra tablespoon of milk. If too sticky, add a few more biscuit crumbs.
- Shape and chill the logTurn the dough out onto a clean surface and shape it into a log about 2 inches in diameter. Wrap the log tightly in plastic wrap and refrigerate for at least 30 minutes, or until firm enough to slice cleanly.Look for The log should be firm to the touch and hold its shape when unwrapped.Tip Chilling longer, up to 2 hours, makes slicing easier and the discs cleaner.
After kneading, the dough should be smooth, slightly sticky, and hold together when pressed. The banana should be fully incorporated, and the nuts should be evenly distributed. The dough will have a rich chocolate aroma with hints of banana and roasted nuts. It should be soft but not wet, and easy to shape into a log.
Slicing and Dipping
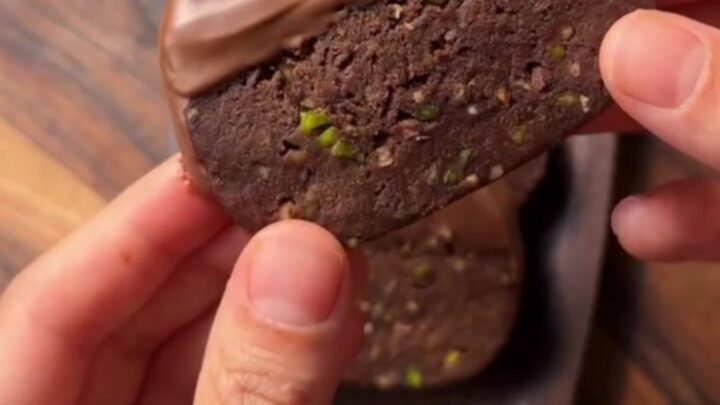
- Slice the discsUnwrap the chilled log and place it on a cutting board. Using a sharp chef's knife, slice the log into 1.5 cm thick rounds. Wipe the knife between cuts if it gets sticky.Look for Each disc should be uniform in thickness and show a mosaic of nut specks throughout the chocolate dough.Tip If the knife sticks, dip it in hot water and dry it before each cut.
- Dip in chocolateMelt the dark chocolate in a heatproof bowl set over simmering water, or in the microwave in 30-second bursts, stirring until smooth. Dip half of each disc into the melted chocolate, letting the excess drip off. Place the dipped discs on a parchment-lined baking sheet.Look for The chocolate should coat the discs evenly and start to set slightly.Tip Use a fork to hold the discs while dipping to keep your fingers clean.
The chilled log should be firm enough to slice cleanly into 1.5 cm thick rounds. The discs will show a mosaic of dark dough with lighter nut specks. When dipped, the chocolate should coat each disc evenly and start to set. The chocolate should be glossy and smooth, without air bubbles.
Finishing Touches
- Garnish and setWhile the chocolate is still wet, sprinkle the crushed pistachios over the chocolate-dipped half of each disc. Allow the chocolate to set completely at room temperature, or place the baking sheet in the refrigerator for about 10 minutes to speed up the process.Look for The chocolate should be firm and shiny, and the pistachios should stick securely.Tip For a cleaner look, sprinkle the pistachios immediately after dipping so they adhere well.
The pistachios should stick to the wet chocolate, creating a beautiful green contrast against the dark chocolate.
Once set, the chocolate will be firm to the touch, and the discs can be lifted without leaving fingerprints. The finished discs should look professional, with a shiny chocolate coating and a crunchy nut topping.
Common mistakes
A common mistake is over-processing the biscuits into too fine a powder, which can make the dough dry. Conversely, under-processing leaves large chunks that make slicing difficult. Another issue is not chilling the log long enough—if it's too soft, the discs will squash.
Also, dipping the discs in chocolate that's too thick can result in a heavy coating; thin it with a teaspoon of coconut oil if needed. Finally, don't skip the pistachio garnish—it adds essential texture and visual appeal.
How to tell it’s done
The discs are done when the chocolate coating has fully set and the discs are firm to the touch. If you've refrigerated them, they should be cold and hold their shape.
There is no internal temperature to check since this is a no-bake recipe. The dough should be sliceable without crumbling, and the chocolate should snap when broken. The nuts should be visible in the cross-section.
Up next · Part 3 of 3
4 variations · storage & make-ahead · 5 answers · printable card
Tips, FAQ & printable recipe (Part 3)← Back to the ingredients (Part 1)