Dinner · Part 2 of 3: Instructions
Nashville Hot Chicken Mac and Cheese Burrito, Crispy in 20 Minutes Step-by-step instructions
- Prep
- Cook
- Total
- Serves
- 1
Before you start
Get everything in place before the first flame, because the assembly moves fast. Take the mac and cheese, chicken tenders, pickles, honey ranch and cayenne hot oil out of the refrigerator — the fillings warm through quickly, and cold spots slow the whole build. Dice the pickles finely and press them between paper towels to remove surface brine.
Cut the chicken tenders into strips about an inch wide so they layer flat instead of mounding. Set out a large cutting board for rolling, a sharp knife for the final slice, and the press or skillet where it can reach 375°F (190°C). Butter the press plates or the skillet now, while everything is cold to the touch.
Ingredients at a glance (7)
- 1 cup ultra-creamy cheddar-Gouda mac and cheese, warm (store-bought or made ahead)
- 5 oz crispy cayenne-glazed chicken tenders, warm (store-bought or made ahead)
- 1 (14-inch) large flour tortilla, warm
- 2 tbsp diced dill pickles, patted dry
- 2 tbsp honey ranch dressing
- 1 tbsp unsalted butter, for the press
- Cayenne hot oil, warmed, for brushing (optional)
Instructions
Warm and prep
- Warm the mac and cheeseSpoon 1 cup of mac and cheese into a small saucepan over low heat, stirring often so the sauce stays smooth and glossy. If it tightens as it warms, loosen it with a splash of milk, a tablespoon at a time. The goal is a thick, spoonable, ultra-creamy consistency that will not run once it hits the tortilla.Look for The sauce should coat every elbow and cling to the spoon without pooling.Tip Warm the mac gently; high heat can break the cheese sauce and turn it grainy.
- Warm the tortillaHeat the 14-inch flour tortilla in a dry skillet over medium heat for about 20 seconds per side, or drape it over the pan for a few seconds, until it is supple and steaming. A warm tortilla folds without cracking and seals itself far more easily than a cold one straight from the package.Look for The tortilla should feel floppy and flexible, with faint toasted spots.Tip Keep the warmed tortilla under a clean towel so it stays soft while the fillings come together.
- Prep the toppings and chickenDice the dill pickles finely and pat them dry with a paper towel so they do not weep into the mac. Warm the cayenne-glazed chicken tenders in the same skillet for a minute per side, until heated through to 165°F (74°C) on an instant-read thermometer, then cut them into thick strips. Stir the cayenne hot oil if using, and have the honey ranch standing by.Look for The chicken should be heated through with the glaze just beginning to shine.Safe temperature 165°F (74°C) internal temperature (poultry)Tip Patting the pickles dry is the single best defense against a soggy burrito.
By the end of the first phase, everything on the board should be warm and ready to layer. The mac and cheese stirs up glossy and thick, clinging to the spoon with no thin, watery ring around the edge of the pan. The tortilla comes off the skillet supple and steaming, folding over a finger without cracking or springing back. The chicken strips are heated through, their glaze just starting to shine, and the pickles sit dry and glistening on their paper towel.
Layer and roll
- Layer the mac and cheeseLay the warm tortilla flat and spoon the mac and cheese down the center in a thick, even band, leaving at least 2 inches clear at the top and bottom edges. Spread it with the back of the spoon so every bite will carry cheese, but keep the layer contained — a wide band means leaks at the seam.Look for A neat, contained band of mac running the length of the tortilla.Tip Leave the edges clean; cheese on the rim keeps the fold from sealing shut.
- Add the hot chicken and picklesArrange the warm chicken strips in a single layer directly over the mac, letting the crispy coating press into the cheese. Scatter the diced dill pickles evenly over the chicken so their tang hits every slice. Work quickly here — the warm fillings should still be steaming when the burrito closes.Look for Crispy strips visible over the cheese, pickles scattered across the top.Tip One layer of chicken only; stacking it high makes the roll bulge and split.
- Drizzle and fold tightDrizzle the honey ranch in a thin line down the length of the filling. Fold the bottom edge up and over, tuck in both sides snugly, then roll away from you into a tight cylinder, keeping steady pressure so the burrito holds its shape. Place it seam-side down and press gently to seal.Look for A firm, evenly thick cylinder with no visible gaps at the ends.Tip Roll it as tight as a burrito shop would — slack rolls steam instead of crisping.
The second phase ends with a tight, evenly thick cylinder sitting seam-side down on the board. Look along its length: the edges should taper smoothly with no bulges where the chicken stacked, and no cheese visible at the open seam. Pick it up gently — it should feel solid, not sagging, and hold its shape without flexing open.
When pressed lightly with a palm, the roll should give slightly and spring back, a sign the filling is packed rather than loose. If either end looks thin or hollow, that is normal; the filling concentrates in the middle. If the seam gapes, roll it back over itself once more with steady pressure.
Press and finish
- Butter the press and toastHeat a panini press or large skillet to 375°F (190°C) and brush the surface with the butter. Lay the burrito seam-side down, close the press, and toast for 2 1/2 minutes, until the tortilla is deeply golden and crisp. If using a skillet, press firmly and turn once, about 3 minutes per side.Look for Deep golden blisters and a faint crackle when the surface is tapped.Tip Butter the press, not the tortilla, so the outside fries evenly without going pale.
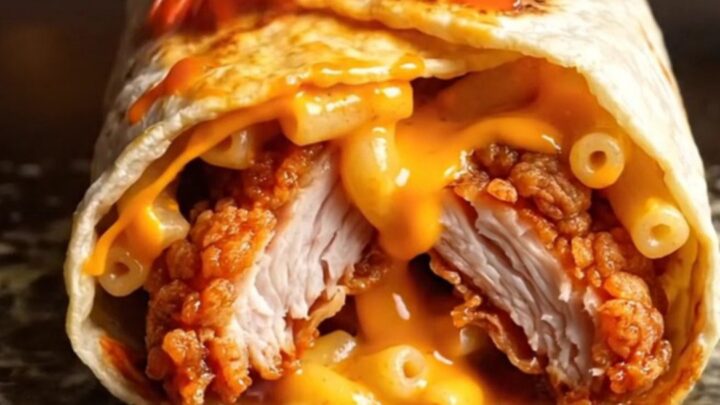
- Slice and finish with hot oilTransfer the burrito to a cutting board and let it stand for one minute so the molten mac settles. Slice it in half on the diagonal to expose the steaming core, then brush the exposed chicken with the warmed cayenne hot oil. Serve immediately, while the outside is still crackling.Look for A glossy, steaming cross-section of mac and crispy chicken.Tip Brush the oil on after slicing so the heat lands right where the first bite does.
The final phase should produce a burrito with a deep golden, blistered shell that crackles faintly when tapped, smelling of browned butter and toasted flour. Lift one half after slicing: the cross-section shows a steaming mac-and-cheese core clinging to crispy chicken, with pickles scattered through, and no liquid pooling on the board. The cheese should pull in long strings at the cut — that stretch is the sign the center is properly hot. The brushed cayenne oil sits glossy on the exposed chicken, brightening the color without flooding the cut.
Common mistakes
The most common failure is a loose roll: slack burritos steam in their own moisture and come out of the press pale and floppy, so pull the tortilla snug at every turn. The second is overfilling — more than about a cup and a half of total filling makes the cylinder impossible to seal, and it will burst under pressure.
Soggy bottoms usually trace back to wet pickles or mac sauce that was too thin; pat the pickles dry and keep the mac thick. A cold tortilla cracks instead of folding, so warm it first. And resist pressing harder than the press already does — crushing the burrito squeezes the cheese out through the seam.
How to tell it’s done
The burrito is done when the tortilla is deeply golden with scattered darker blisters, feels firm and crackly under a light tap, and smells of toasted butter and toasted flour — about two and a half minutes on a 375°F (190°C) press. Slice it and look for a steaming, contained mac core with no pooled liquid at the cut, and chicken that is heated through with a glossy glaze.
Because the chicken tenders are fully cooked before they go in, there is no raw-protein concern here; the goal is simply piping hot from edge to center. If the cut filling steams vigorously and the first bite pulls long cheese strings, it is ready.
- Poultry: 165°F (74°C) in the thickest part
Up next · Part 3 of 3
4 variations · storage & make-ahead · 5 answers · printable card
Tips, FAQ & printable recipe (Part 3)← Back to the ingredients (Part 1)