Desserts · Part 2 of 3: Instructions
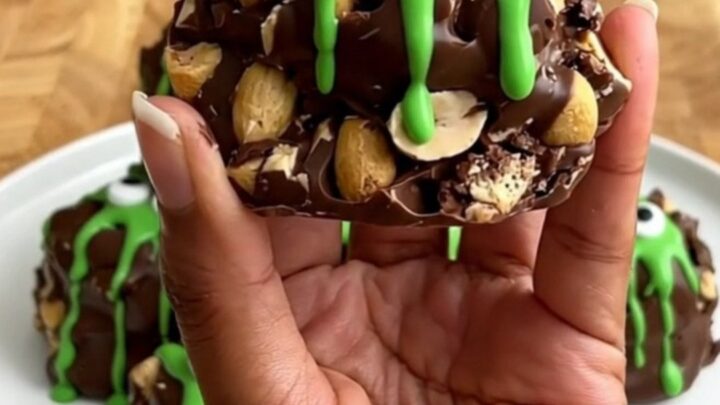
Easy Monster Peanut Clusters for Halloween Step-by-step instructions
- Prep
- Cook
- Total
- Serves
- 12
Before you start
Before beginning, ensure all ingredients are measured and ready on your countertop. Clear enough space in your refrigerator to accommodate a full baking sheet, as this will help the chocolate set faster if the room temperature is warm.
Have your parchment paper cut to size and ready to line your baking sheet. Ensure the candy eyes are within reach so they can be added immediately after drizzling the green candy, as the chocolate sets quickly once removed from the heat.
Ingredients at a glance (4)
- 12 oz semi-sweet chocolate chips
- 1 cup roasted peanuts
- 1/4 cup green candy melts
- 24 candy eyes
Instructions
Melting and Mixing
- Prepare the chocolate basePlace the chocolate chips in a microwave-safe bowl. Heat in 30-second increments, stirring in between, until the chocolate is fully melted and smooth. Once melted, stir in the roasted peanuts until they are thoroughly coated in the chocolate mixture.Look for The chocolate should be glossy and smooth with no lumps remaining.Tip Do not overheat the chocolate to avoid seizing.
The chocolate mixture should be smooth, glossy, and fully combined with the peanuts. Ensure there are no clumps of un-melted chocolate at the bottom of the bowl. The peanuts should be evenly coated, looking like a thick, cohesive mixture that is ready to be scooped onto the baking sheet.
Scooping and Shaping
- Form the clustersLine a baking sheet with parchment paper. Use a spoon to drop small mounds of the chocolate and peanut mixture onto the prepared sheet, spacing them evenly apart. Allow them to set slightly at room temperature or in the refrigerator.Look for The mounds should hold their shape once placed on the parchment.Tip Use two spoons to easily drop the mixture.
The clusters should be uniform in size and spaced evenly on the parchment paper. They should look like small, craggy mounds. If they appear too flat, use a spoon to gently push the edges inward to create a more compact and appealing shape before they begin to firm up.
Decorating
- Decorate the monstersMelt the green candy melts until smooth. Use a spoon or piping bag to drizzle the green candy over the top of each chocolate cluster. Immediately press two candy eyes into the top of each cluster while the chocolate is still tacky so they adhere properly.Look for The candy eyes should stick firmly to the chocolate.Tip Work quickly before the chocolate fully hardens.
The green candy should be drizzled in thin lines across the clusters for a fun, monster-like appearance.
The candy eyes must be securely pressed into the chocolate, creating a clear, expressive look. Once finished, the entire tray should be moved to a cool place or the refrigerator to set completely.
Common mistakes
Avoid overheating the chocolate in the microwave, as it can seize and become grainy or scorched, which ruins the texture and flavor. Stirring the chocolate consistently at 30-second intervals is crucial to prevent this.
Another common mistake is waiting too long to add the candy eyes; if the chocolate sets too much before you apply them, they will not adhere properly and may fall off once the clusters are moved. Ensure you work in small, manageable batches if you are making a large quantity.
How to tell it’s done
The clusters are ready when the chocolate has fully solidified and no longer feels tacky to the touch. This typically takes about 30 minutes in the refrigerator. When lifted, the clusters should be firm and hold their shape completely.
The candy eyes should be firmly embedded in the chocolate, and the green candy drizzle should be set hard, creating a smooth and finished appearance for these festive treats.
Up next · Part 3 of 3
2 variations · storage & make-ahead · 3 answers · printable card
Tips, FAQ & printable recipe (Part 3)← Back to the ingredients (Part 1)