Desserts · Part 2 of 3: Instructions
Peanut Butter Cup Stuffed Monster Cookies Step-by-step instructions
- Prep
- Cook
- Total
- Serves
- 12
Before you start
Before starting, take the butter out of the refrigerator and let it soften at room temperature for about 30 minutes. Measure all ingredients accurately, especially the flour and oats, to ensure the dough comes together properly.
Line a baking sheet with parchment paper or a silicone mat. Preheat the oven to 350°F (175°C) so it is ready when the dough is shaped. Have the miniature peanut butter cups unwrapped and ready to go, and clear a space in the freezer if you plan to chill the dough balls.
Ingredients at a glance (11)
- 1/2 cup creamy peanut butter
- 1/2 cup unsalted butter, softened
- 3/4 cup packed brown sugar
- 1 large egg
- 1 tsp vanilla extract
- 1 cup all-purpose flour
- 1/2 tsp baking soda
- 1/2 tsp salt
- 1 1/2 cups old-fashioned rolled oats
- 3/4 cup candy-coated chocolate candies (M&M's)
- 12 whole miniature peanut butter cups
Instructions
Mix and Shape
- Mix the Cookie DoughHeat the oven to 350°F (175°C). Line a baking sheet with parchment paper. In a large bowl, beat the softened butter and creamy peanut butter together with an electric mixer until smooth and creamy. Add the brown sugar and beat until light and fluffy, about 2 minutes. Beat in the egg and vanilla extract until well combined. In a separate bowl, whisk together the flour, baking soda, and salt. Gradually add the dry ingredients to the wet mixture, mixing until just combined.Look for The dough should hold together when pressed, with oats and candies evenly distributed.Tip For even baking, use a cookie scoop to portion the dough into equal balls.
- Portion the DoughScoop about 2 tablespoons of dough and flatten it into a disc in your palm. Place one miniature peanut butter cup in the center. Wrap the dough around the cup, sealing the edges completely so no chocolate peeks through. Roll gently into a ball. Repeat with the remaining dough and peanut butter cups, placing the balls on the prepared baking sheet about 2 inches apart.Look for Each ball should be round and smooth, with the peanut butter cup fully enclosed.Tip Chill the dough balls for 10 minutes if they seem too soft to handle.
The dough should be thick, slightly crumbly, and hold together when pressed. The oats and candy-coated chocolates are evenly distributed throughout. When you wrap a portion of dough around a peanut butter cup, it should form a smooth ball with no cracks or exposed chocolate. The dough should feel cool and slightly sticky but manageable. If it becomes too soft, chill it for a few minutes before continuing.
Bake to Golden
- Bake the CookiesBake the cookies in the preheated oven for 11 minutes, or until the edges are set and lightly golden. The centers will still look slightly soft and underdone, but they will continue to set as they cool. The hidden peanut butter cups will melt completely during baking, creating a molten center.Look for The edges are golden and the tops are just set; the cookies look slightly puffed.Safe temperature 160°F (71°C) internal temperature (egg dishes)Tip Do not overbake, as the cookies will continue to cook from residual heat on the baking sheet.
After 11 minutes, the cookies are puffed and the edges are a deep golden brown. The tops are set and slightly cracked, while the centers still look soft and pale. The kitchen fills with the aroma of toasted oats and peanut butter.
The cookies have spread slightly and the candy-coated chocolates have softened but not melted completely. They look glossy and inviting, with a visible molten center when you peek at the edges.
Cool and Serve
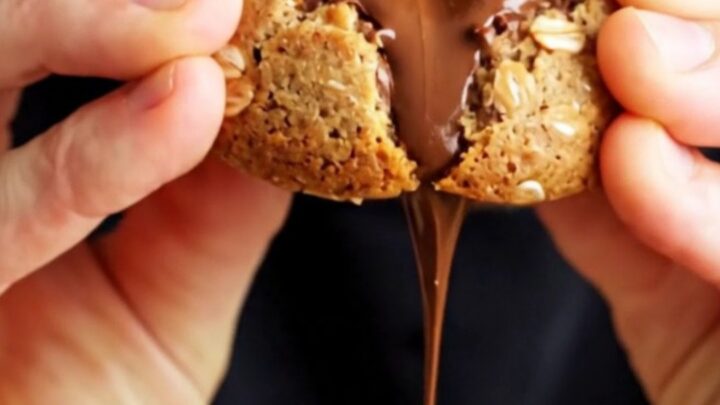
- Cool and ServeRemove the baking sheet from the oven and let the cookies cool on the sheet for 5 minutes. The centers will be very soft and the melted peanut butter cup will be molten. Use a spatula to transfer the cookies to a wire rack to cool slightly. Serve warm for the full molten effect, or let cool completely for a firmer texture.Look for The cookies are fragrant, with a glossy molten center visible when broken.Tip For the best molten pull, serve within 15 minutes of baking.
The cookies are fragrant and warm, with a glossy, molten center that pulls when you break one apart. The edges are crisp and hold their shape, while the center is soft and gooey. The melted peanut butter cup is a rich, dark chocolate-peanut butter sauce that oozes out slowly. The cookies are best enjoyed warm, within 15 minutes of baking, when the contrast between the crisp exterior and molten interior is at its peak.
Common mistakes
One common mistake is overmixing the dough, which can make the cookies tough. Mix just until the flour is incorporated, then fold in the oats and candies. Another issue is not sealing the peanut butter cup properly—if the dough isn't wrapped completely, the melted chocolate can leak out during baking.
Use enough dough to fully encase the cup. Overbaking is also a risk; the cookies should look slightly underdone in the center when you pull them out, as they will finish setting on the hot baking sheet.
How to tell it’s done
The cookies are done when the edges are set and lightly golden, and the tops look dry and slightly cracked. The centers will still appear soft and slightly underdone, which is exactly what you want—they will continue to set as they cool on the baking sheet.
The internal temperature of the cookie should reach 160°F (71°C) to ensure the egg is fully cooked. If you insert a toothpick into the center, it may come out with a bit of melted chocolate, but not raw batter. Let them cool for 5 minutes before moving them.
- Egg dishes: 160°F (71°C) in the thickest part
Up next · Part 3 of 3
4 variations · storage & make-ahead · 5 answers · printable card
Tips, FAQ & printable recipe (Part 3)← Back to the ingredients (Part 1)