Desserts · Part 2 of 3: Instructions
Molten Nutella Lava Cookies Step-by-step instructions
- Prep
- Cook
- Total
- Serves
- 8
Before you start
Before starting, set out the butter to chill if it is not already cold. Measure all ingredients accurately, especially the flour—spoon it into the measuring cup and level it off. Line a baking sheet with parchment paper.
Prepare a small plate lined with parchment for the Nutella. Preheat the oven to 350°F (175°C) when you are ready to bake. Have a cookie scoop or spoon ready for portioning the dough. The Nutella needs at least 30 minutes to freeze, so begin that step first.
Ingredients at a glance (14)
- 6 tbsp Nutella or chocolate-hazelnut spread
- 1 cup cold cubed butter
- 1 cup dark brown sugar
- 3 tbsp granulated sugar
- 1 large egg
- 1 egg yolk
- 1 tsp vanilla paste
- 1 tsp espresso powder
- 2 1/4 cups all-purpose flour
- 1 tsp baking soda
- 1/2 tsp baking powder
- 1 tsp cornstarch
- 1/2 tsp salt
- 1 cup semisweet chocolate chips
Instructions
Freeze and Cream
- Freeze the NutellaLine a small plate with parchment paper. Scoop 6 tablespoons of Nutella onto the parchment, spacing them apart. Place the plate in the freezer for 30 minutes, until the Nutella is completely firm and holds its shape.Look for The Nutella should be solid and not stick to your finger when touched.Tip Use a cookie scoop for even, round portions that will be easy to wrap.
- Cream Butter and SugarsIn a large mixing bowl, beat the cold cubed butter with the dark brown sugar and granulated sugar until creamy and well combined, about 2 minutes. Add the egg, egg yolk, vanilla paste, and espresso powder, and beat until smooth.Look for The mixture should look light and fluffy, with no visible butter chunks.Tip Cold butter creates a chewier texture; don't soften it beforehand.
At the end of this phase, you should have firm Nutella pucks on the parchment-lined plate, and a creamy, well-combined butter-sugar mixture that is light and fluffy. The wet ingredients should be fully incorporated with no streaks of egg. The mixture should smell buttery and sweet, with a hint of vanilla and espresso. The Nutella should be solid enough to hold its shape when lifted, and the dough base should be smooth and ready for the dry ingredients.
Mix and Assemble
- Mix Dry IngredientsIn a separate bowl, whisk together the flour, baking soda, baking powder, cornstarch, and salt. Gradually add the dry mixture to the wet ingredients, mixing until just combined. Fold in the semisweet chocolate chips.Look for The dough should be thick and chunky, with no streaks of flour.Tip Avoid overmixing to keep the cookies tender.
- Assemble the CookiesScoop out large portions of dough, about 1/4 cup each. Flatten each portion slightly in your palm. Place a frozen Nutella puck in the center, then wrap the dough around it, sealing the edges. Roll into a tall ball, making sure the Nutella is completely enclosed.Look for Each dough ball should be smooth and free of cracks.Tip Chill the dough balls for 15 minutes if they become too soft to handle.
- Bake the CookiesPreheat the oven to 350°F (175°C). Place the dough balls on a parchment-lined baking sheet, spacing them at least 3 inches apart. Bake for 25 minutes, until the edges are golden and the centers are just set. The cookies will look slightly underdone in the middle.Look for The edges should be golden brown, and the centers should be slightly puffed but still soft.Safe temperature 160°F (71°C) internal temperature (egg dishes)Tip For even baking, rotate the baking sheet halfway through.
The dough should be thick, chunky, and cohesive, with chocolate chips evenly distributed. When you form the dough balls, they should be smooth and free of cracks, with the frozen Nutella completely hidden inside.
The dough should feel slightly cold and firm to the touch. If the dough starts to stick to your hands, chill it briefly. The assembled balls should be uniform in size and placed on the baking sheet with enough space to spread. The oven should be preheated and ready.
Bake and Serve
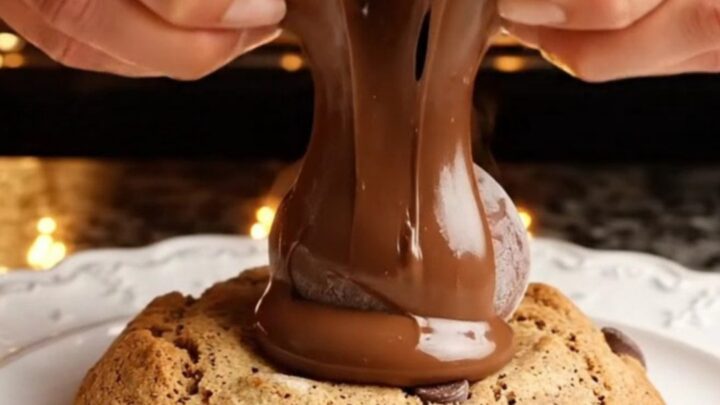
- Cool and ServeLet the cookies cool on the baking sheet for 5 minutes. Then transfer to a wire rack. Serve warm, breaking open a cookie to reveal the molten Nutella lava center.Look for The Nutella should flow slowly and be warm, not boiling.Tip If the Nutella is too runny, let the cookies cool a few more minutes before serving.
The cookies should emerge from the oven with golden-brown edges and slightly puffed centers. The aroma of toasted butter, chocolate, and hazelnut should fill the kitchen. When you break one open, the Nutella should be thick and flowing, with a glossy, molten texture. The cookie itself should be crisp at the edges and chewy in the middle. Serve warm, and watch the lava effect in action.
Common mistakes
A common mistake is using room-temperature Nutella, which will melt and blend into the dough instead of creating a distinct lava center. Another pitfall is overmixing the dough after adding the flour, which develops gluten and makes the cookies tough.
Be careful not to overbake—the cookies will continue to set as they cool, and overbaking will cause the Nutella to become too thick and lose its oozing quality. Also, ensure the dough balls are tall and rounded, not flat, so they spread properly in the oven. Finally, let the cookies cool on the baking sheet for a few minutes before transferring, as they are delicate when hot.
How to tell it’s done
The cookies are done when the edges are deep golden brown and the centers are just set but still soft. They will look slightly underdone in the middle, which is exactly what you want—the residual heat will finish baking the centers while the Nutella remains molten.
To check, gently press the edge of a cookie; it should be firm, while the center gives slightly. If you insert a toothpick into the dough (not the Nutella), it should come out with a few moist crumbs, not wet batter. The cookies will firm up as they cool, so do not overbake.
- Egg dishes: 160°F (71°C) in the thickest part
Up next · Part 3 of 3
4 variations · storage & make-ahead · 5 answers · printable card
Tips, FAQ & printable recipe (Part 3)← Back to the ingredients (Part 1)