Desserts · Part 2 of 3: Instructions
Moist Wacky Cake – One-Bowl Chocolate Classic Step-by-step instructions
- Prep
- Cook
- Total
- Serves
- 9
Before you start
Before mixing anything, confirm the pantry basics: all-purpose flour, granulated sugar, unsweetened cocoa powder, fresh baking soda, kosher salt, white vinegar, vanilla extract and a neutral vegetable oil, plus chocolate frosting — store-bought or made ahead — for the top. Set the butter out? There is no butter; that is the point. Take the frosting out of the refrigerator so it softens while the cake bakes and cools.
Ingredients at a glance (10)
- 1 1/2 cups all-purpose flour
- 1 cup granulated sugar
- 1/4 cup unsweetened cocoa powder
- 1 tsp baking soda
- 1/2 tsp kosher salt
- 1 cup water, cool
- 1/3 cup vegetable oil
- 1 tbsp white vinegar
- 1 tsp vanilla extract
- chocolate frosting, store-bought or made ahead, optional, for serving
Instructions
Mix the batter in one bowl
- Preheat the oven and prepare the panHeat the oven to 350°F (175°C) and position a rack in the center. Grease an 8-inch square glass baking dish with a thin film of vegetable oil and set it aside. Wacky cake batter is thin, so a well-greased pan keeps every square lifting cleanly when it is time to serve.Look for The oven should reach full temperature before the batter is mixed, since the leavening starts the moment the liquids meet the dry ingredients.Tip Glass dishes bake a touch slower than metal; with a metal pan, start checking for doneness about five minutes earlier.
- Whisk the dry ingredients togetherWhisk the all-purpose flour, granulated sugar, unsweetened cocoa powder, baking soda and kosher salt in a large mixing bowl for a full minute. Whisking this long matters: it distributes the cocoa and the baking soda evenly, so no bitter streaks of cocoa or concentrated pockets of soda survive in the finished crumb.Look for The mixture should look uniformly brown, with no pale patches of flour visible anywhere in the bowl.Tip If the cocoa feels clumpy in the bag, sift it first; older cocoa often packs into hard little bits that refuse to whisk out.
- Make wells and add the liquidsCarve three shallow wells in the dry mixture with a spoon — one large, two small. Pour the cool water into the big well, the vegetable oil into the second, and the white vinegar and vanilla extract into the smallest. Keeping the vinegar apart until this moment preserves the fizz that makes the cake rise so well.Look for The liquids should sit visibly on top of the drys before any stirring begins.Tip Pour the water slowly and into the center so it does not wash the drys up the sides of the bowl.
- Stir into a smooth, thin batterStir with a whisk or a sturdy fork until the batter looks smooth and glossy, about a minute, scraping the corners of the bowl so no dry pockets survive. The batter will be thin — closer to chocolate sauce than typical cake batter — and that loose consistency is exactly what keeps the baked crumb so moist.Look for A few tiny lumps are fine, but any large pocket of dry flour means another ten seconds of stirring.Tip Work quickly but calmly: the leavening reaction begins the instant the vinegar meets the baking soda.
At the end of this phase the batter should be smooth, glossy and noticeably thin, closer to warm chocolate sauce than to classic cake batter, with no streaks of dry flour and no clumps of cocoa anywhere. Small lumps are acceptable; dry pockets at the corners of the bowl are not, so scrape them out with the whisk. The surface should show a few faint bubbles from the vinegar-soda reaction starting to work.
Bake and cool completely
- Bake until a toothpick comes out cleanPour the batter into the prepared glass dish, slide it onto the center rack and bake for 30 to 35 minutes, rotating once halfway through if the oven bakes unevenly. The cake is ready when a toothpick poked into the center comes out clean or with one or two moist crumbs clinging to it.Look for The top should look matte and gently domed, with the edges just beginning to pull away from the sides of the dish.Tip Resist opening the oven before the twenty-minute mark, or the still-rising cake may slump in the middle.
- Cool the cake completelySet the pan on a wire cooling rack and let the cake cool completely, at least an hour. Warm cake frosts badly: the topping softens, slides and turns greasy against the crumb. A fully cooled wacky cake slices into the clean, moist squares that make this dessert so easy to lift and serve one at a time.Look for The bottom of the glass dish should feel completely cool to a fingertip before any frosting goes on.Tip Cooling fully also concentrates the chocolate flavor; the cake tastes deeper the next day.
The baked cake should look matte and gently domed, with the edges just pulling from the sides of the dish and the center springing back slowly under a fingertip. A toothpick in the middle should come out clean or with one or two moist crumbs.
The kitchen will smell strongly of chocolate at this point. Before moving on, let the pan rest on a wire rack until the glass feels completely cool to the touch — at least an hour.
Frost, cut and serve
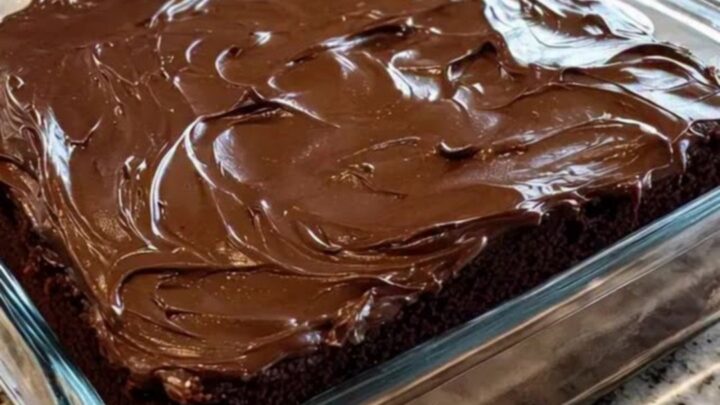
- Frost with soft swirlsSpoon the chocolate frosting over the cooled cake and spread it with the back of a spoon or an offset spatula, working from the center outward and finishing with soft swirls on top. Keep the stroke light so the frosting sits in an even layer instead of dragging crumbs up from the dark surface beneath it.Look for The frosting should hold its swirls and look glossy, not melt or slump into the crumb.Tip If the frosting feels stiff, let it rest at room temperature for ten minutes before spreading.
- Cut into squares and lift them outCut the frosted cake into nine equal squares, wiping the knife between cuts for tidy edges. Slide a metal spatula under the first square and lift it onto a plate. Glass dishes release cleanly, but a gentle nudge of the spatula keeps the delicate bottom crust intact and the square looking bakery-neat.Look for Each square should hold its shape with straight sides and a soft, even layer of frosting on top.Tip A short, sharp knife or a bench scraper gives the cleanest lines through the frosted top.
- Serve at room temperatureServe each square at room temperature with a fork, cutting off tender bites straight from the plate the way the best chocolate cakes are eaten. The crumb should feel moist and springy and the frosting soft and fudgy. Cover any leftovers and move them to the refrigerator within two hours of frosting.Look for A fork should slide through the crumb with almost no pressure, leaving a clean, moist bite behind.Tip Room temperature is where this cake tastes best; chilling dulls the chocolate until the square warms again.
The finished cake should carry an even layer of chocolate frosting with soft swirls on top, the frosting glossy and holding its shape rather than melting into the crumb. Cut into nine squares, the sides should look straight and tidy, with no crumbs dragged through the frosting.
Lift the first square with a metal spatula and it should come away whole, bottom crust intact. A fork should slide through the crumb with almost no pressure, showing a moist, springy interior.
Common mistakes
The most common failure is a stale box of baking soda — with no eggs and no other leavener, old soda means a flat, heavy cake, so check the date or do a quick fizz test in vinegar.
Overmixing is the second trap: once the batter is smooth and glossy, stop, or the flour builds gluten and the crumb toughens. Frosting a warm cake is the classic mistake with this dessert; the topping softens, slides and looks greasy, so give the pan a full hour on the rack.
How to tell it’s done
Wacky cake is done when the top looks matte and softly domed, the edges have just pulled away from the sides of the glass dish, and a toothpick inserted in the center comes out clean or with only one or two moist crumbs attached.
The top should spring back slowly when pressed with a fingertip rather than denting and staying put. Total bake time is usually 30 to 35 minutes in a glass dish at 350°F (175°C); metal pans run faster, so begin checking at 25 minutes.
Up next · Part 3 of 3
4 variations · storage & make-ahead · 5 answers · printable card
Tips, FAQ & printable recipe (Part 3)← Back to the ingredients (Part 1)