Dinner · Part 2 of 3: Instructions
Miso Butter Seared Halibut with Mushrooms and Bok Choy Step-by-step instructions
- Prep
- Cook
- Total
- Serves
- 2
Before you start
Gather everything before you turn on the stove, because the fish cooks quickly and the glaze needs to be ready when the butter is foaming. Pat the halibut fillets dry with paper towels, cut shallow diagonal lines across the top of each one, and season both sides with the kosher salt and black pepper.
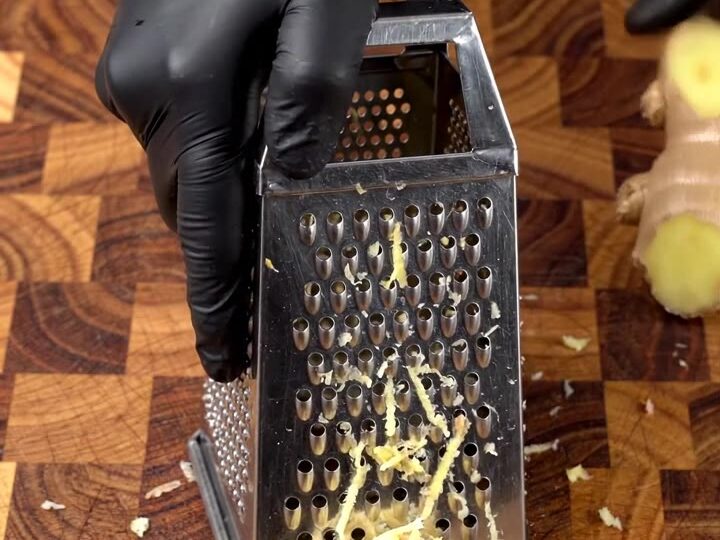
Keep the fish in the refrigerator until the pan is hot; raw fish should not sit at room temperature for more than 30 minutes. Trim the shiitake stems, leave the caps whole, slice the cremini mushrooms, halve the baby bok choy lengthwise, and thinly slice the garlic and scallions. Set the grater over the cutting board and grate the ginger, scraping the pulp into a small pile.
Ingredients at a glance (14)
- 2 skinless halibut fillets, thick cut (about 6 oz each), scored diagonally
- 1/2 tsp kosher salt, plus more to taste
- black pepper, freshly ground, to taste
- 6 fresh shiitake mushrooms, stems removed, caps left whole
- 4 oz cremini mushrooms, sliced
- 2 baby bok choy, halved lengthwise
- 3 tbsp unsalted butter
- 1 inch fresh ginger, peeled and grated on a fine box grater
- 3 cloves garlic, thinly sliced
- 2 tbsp white miso
- 1 tbsp soy sauce
- 2 tbsp mirin or water
- 2 scallions, thinly sliced, for serving
- 1 tbsp toasted sesame seeds, for serving
Instructions
Prep and season
- Score and season the halibutPat the halibut dry and cut shallow diagonal lines across the top of each fillet. Season both sides with the salt and black pepper. Keep the fish refrigerated until the pan is ready, and rinse nothing in the sink.Look for The fillet surface looks dry, with shallow diagonal cuts and an even seasoning.Tip Scoring helps the fillet stay flat and lets the glaze reach deeper into the flesh.
- Grate the ginger and prep vegetablesGrate the peeled ginger on a fine box grater set over the cutting board, so the pulp and juice fall onto the board. Thinly slice the garlic, slice the cremini, and halve the bok choy. Cut the scallions.Look for Fragrant ginger pulp and juice collect on the board and the garlic slices are thin and even.Tip Scrape the ginger pulp and juice from the board into the pan with the garlic so nothing is wasted.
The halibut is dry, scored and seasoned, and it is still cold from the refrigerator. The mushrooms, bok choy and garlic are cut and waiting on the board. The ginger pulp and juice have collected in a small pile, and the glaze is whisked in its bowl. Before you go on, check that the pan is set on the burner, the butter is measured and the tongs and spoon are within reach, so the fish goes in the moment the butter foams.
Melt and sear
- Melt the ginger garlic butterSet a 12-inch cast iron skillet over medium heat and add the butter. When it melts and foams, stir in the grated ginger with its juice and the sliced garlic. Cook until fragrant, about 1 minute.Look for The butter foams and the kitchen smells sharply of ginger and garlic.Tip Keep the heat moderate so the garlic turns golden, not dark and bitter.
- Sear the halibut with mushroomsLay the halibut fillets in the garlic butter, scored side up, and arrange the whole shiitake mushrooms and sliced cremini around them. Sear without moving the fish until the edges turn golden, about 4 minutes.Look for The fillet edges turn golden and the fish releases easily from the pan.Tip Resist the urge to move the fish; an undisturbed sear builds a crust.
- Baste and add the miso glazeTurn the fillets over and spoon the bubbling garlic butter over them. Whisk the white miso, soy sauce and mirin or water in a small bowl, then pour it into the pan. Add the bok choy, cut side down, and spoon the glaze over everything until it turns glossy.Look for The glaze bubbles, thickens slightly and coats the fish and mushrooms with a glossy sheen.Tip Spoon the sauce continuously so it caramelizes without scorching.
The butter has melted and foamed, and the ginger and garlic smell bright and sharp. The garlic has turned pale golden, with no dark spots. The pan is still at medium heat and the fish is ready to go in. Check the pan before you add the halibut: if the butter is smoking or the garlic is browning too fast, lower the heat slightly so the fish sears evenly without burning the aromatics. The mushrooms should go in next to the fish, with enough space for the bok choy later.
Baste and glaze
- Cook the halibut throughContinue basting the fish for 2 to 3 minutes, until the thickest part is opaque and the flesh flakes easily with a fork. Check the centre with an instant-read thermometer.Look for The flesh turns opaque and flakes easily when pressed at the thickest point.Safe temperature 145°F (63°C) internal temperature (fish)Tip Pull the fish from the heat as soon as it flakes, since residual heat keeps cooking it.
- Plate and finish the dishLift the halibut with tongs and set it over the glazed mushrooms and bok choy. Spoon the remaining pan glaze over the top, then scatter the sliced scallions and toasted sesame seeds before serving while hot.Look for The fillet sits on glossy mushrooms and bok choy, with bright green scallions on top.Tip Serve immediately so the crust stays golden and the glaze stays glossy.
The fish is glazed, the edges are golden and the sauce is bubbling and glossy around the mushrooms and bok choy. The fillets feel firm when you nudge them gently with tongs, and the glaze has thickened enough to cling.
Check that the glaze is caramelizing rather than burning, and lower the heat if the sugars darken too quickly. The bok choy should be tender at the stem but still bright green. Keep spooning the sauce over the fish until the flesh turns opaque at the centre, then move on to plating.
Common mistakes
The most common mistake is moving the halibut too early. The fish needs an undisturbed sear to form a crust; if you lift it before the edges turn golden, it sticks and tears. Another frequent error is using a pan that is too small, which crowds the mushrooms and bok choy and steams them instead of letting them caramelize.
Adding the miso glaze too soon, while the pan is still very hot, can scorch the sugars before the fish cooks through. Add it once the fish has seared and reduce the heat if it begins to darken. Finally, overcooking is the easiest error to make with a thick fillet, so start checking for doneness a minute before the time you expect, and remember that carryover heat continues to cook the fish after you remove it from the pan.
How to tell it’s done
Halibut is done when the flesh has turned from translucent to opaque all the way through and separates into flakes when you press the thickest part with a fork. The edges should be golden and crisp, and the centre should feel firm but still moist. For food safety, the fish must reach 145°F (63°C) at its thickest point, measured with an instant-read thermometer.
If the flesh still looks glossy or resists flaking, continue cooking for another minute and check again. Avoid cutting into the centre to check, because that releases the juices and dries the fillet. Once the fish reaches temperature, lift it from the pan and serve it straight away.
- Fish: 145°F (63°C) in the thickest part
Up next · Part 3 of 3
4 variations · storage & make-ahead · 5 answers · printable card
Tips, FAQ & printable recipe (Part 3)← Back to the ingredients (Part 1)