Appetizers · Part 2 of 3: Instructions
Mini Garlic Mushroom and Cheese Boat Pides: Crispy Pull-Apart Bites Step-by-step instructions
- Prep
- Cook
- Total
- Serves
- 4
Before you start
Before starting, measure out all the ingredients and set them at room temperature. Warm the milk to about 110°F (43°C)—it should feel comfortably warm to the touch, not hot. Slice the mushrooms and mince the garlic. Have the butter and olive oil ready for the skillet.
Line a baking sheet with parchment paper. If using active dry yeast, proof it in the warm milk with a pinch of sugar for 5–10 minutes until foamy; this ensures the yeast is alive and active. Clear a clean work surface for kneading, and have a damp kitchen towel on hand to cover the dough while it rises.
Ingredients at a glance (14)
- 1 cup warm milk
- 2 1/4 tsp active dry yeast
- 1 tsp salt
- 2 tbsp olive oil
- 2 1/2 cups all-purpose flour
- 8 oz button mushrooms, sliced
- 10 cloves garlic, minced
- 2 tbsp butter
- 1 tbsp olive oil
- 1 tbsp fresh thyme leaves
- 1/2 tsp black pepper
- 1 1/2 cups shredded mozzarella cheese
- 1 egg yolk
- 1 tbsp butter, melted
Instructions
Make the Dough and Filling
- Make the soft doughIn a small bowl, sprinkle the yeast over the warm milk and let stand for 5 minutes until foamy. In a large bowl, combine the flour and salt. Add the yeast mixture and olive oil, then stir until a shaggy dough forms. Turn out onto a floured surface and knead for 8–10 minutes until smooth and elastic. Place in a greased bowl, cover, and let rise in a warm spot for 1 hour or until doubled.Look for The dough should be soft, pillowy, and spring back when pressed gently.Tip If the dough is too sticky, add a little extra flour, one tablespoon at a time.
- Caramelize the mushroomsWhile the dough rises, melt the butter and olive oil in a large skillet over medium-high heat. Add the sliced mushrooms and cook without stirring for 3–4 minutes until browned on one side. Add the minced garlic, fresh thyme, salt, and black pepper. Sauté for another 3–4 minutes until the mushrooms are golden and the garlic is fragrant. Remove from heat and let cool slightly.Look for Mushrooms should be deep golden brown and the garlic aromatic but not burnt.Tip Don't crowd the pan—cook in batches if needed to get a proper caramelization.
The dough should be smooth, elastic, and doubled in size after rising—it should spring back when poked gently. The mushroom filling should be deeply browned and fragrant, with the garlic softened and sweet. Taste a bit of the filling to check seasoning; it should be savory and well-balanced.
If the dough hasn't risen in 1 hour, place it in a warmer spot (like an oven with the light on) and give it more time. The filling can be made ahead and refrigerated, but let it come to room temperature before using.
Shape and Fill the Boats
- Divide and shape the doughPunch down the risen dough and divide it into 8 equal pieces. On a lightly floured surface, roll each piece into an oval about 6 inches long and 4 inches wide. Transfer the ovals to a parchment-lined baking sheet, spacing them about 2 inches apart.Look for Each oval should be even in thickness, about 1/4 inch thick.Tip Keep the remaining dough covered with a damp towel while shaping the others.
- Fill and shape the boatsSpoon the cooled mushroom mixture down the center of each oval, leaving about 1 inch at each end. Top with a generous amount of shredded mozzarella. Pinch the two short ends together and pull them slightly upward to form pointed boat canoes. Press the edges gently to seal.Look for The ends should be pinched tightly to hold the filling during baking.Tip Use a fork to press the pinched ends for a decorative edge and a secure seal.
- Apply the egg washIn a small bowl, beat the egg yolk with 1 teaspoon of water. Brush the egg wash over the exposed dough edges and the pinched ends. This will give the crust a shiny, golden finish as it bakes.Look for The dough should be evenly coated but not dripping with egg wash.Tip Avoid brushing the filling—egg wash on cheese can make it tough.
The shaped pides should look like neat little canoes, with the ends pinched into points and the filling mounded in the center. The egg wash should be applied evenly, giving the dough a glossy sheen. Before baking, the pides should hold their shape without collapsing. If the dough is too sticky to shape, dust with a little flour. The filling should be cool enough to handle comfortably. At this stage, you can also cover the pides with plastic wrap and refrigerate for up to 2 hours before baking.
Bake and Finish
- Bake the pidesPreheat the oven to 410°F (210°C). Bake the pides for 15 minutes, or until the crust is deep golden brown and the cheese is bubbly and melted. The internal temperature of the egg wash on the crust should reach 160°F (71°C) to ensure the egg is fully set.Look for The crust should be golden and crisp, and the cheese should be molten and slightly browned in spots.Safe temperature 160°F (71°C) internal temperature (egg dishes)Tip Rotate the baking sheet halfway through for even browning.
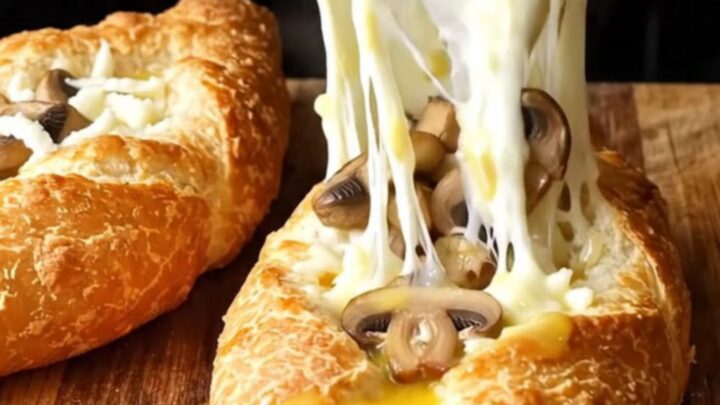
- Finish with butter and serveRemove the pides from the oven and immediately brush the hot crusts with melted butter. Let them cool on the baking sheet for 5 minutes before serving. Serve warm, pulling them apart to reveal the cheesy, garlicky center.Look for The butter should sizzle on contact and soak into the crust, making it glossy.Tip Serve with extra fresh thyme or a sprinkle of flaky sea salt if desired.
The pides should emerge from the oven with a deep golden crust, blistered in spots, and the cheese bubbling and lightly charred. The butter brushed on top should melt instantly, giving the crust a glossy, appetizing sheen. Let them cool for a few minutes before serving—the cheese will be molten and the crust crisp. The aroma of garlic, thyme, and butter should fill the kitchen. Serve them warm, pulling one apart to show the long cheese stretch.
Common mistakes
One common mistake is not browning the mushrooms properly. If you stir them too often or cook them over low heat, they'll release their moisture and steam instead of caramelizing. Let them sit undisturbed for a few minutes to develop a golden crust.
Another pitfall is overfilling the pides, which can cause the filling to spill out during baking and make a mess. Stick to about 2 tablespoons of filling per pide. Also, be careful not to overwork the dough when shaping; over-kneading can make it tough. Finally, don't skip the egg wash—it's what gives the crust that beautiful sheen and golden color.
How to tell it’s done
The pides are done when the crust is deep golden brown and the cheese is bubbly and lightly browned in spots. The dough should feel firm and crisp on the edges, and the bottom should be golden when lifted with a spatula.
If you have an instant-read thermometer, the internal temperature of the crust where the egg wash was applied should read at least 160°F (71°C) to ensure the egg is fully cooked. Let them cool for 5 minutes before serving—this allows the cheese to set slightly so it doesn't run out immediately, but it will still be gloriously stretchy.
- Egg dishes: 160°F (71°C) in the thickest part
Up next · Part 3 of 3
4 variations · storage & make-ahead · 5 answers · printable card
Tips, FAQ & printable recipe (Part 3)← Back to the ingredients (Part 1)