Desserts · Part 2 of 3: Instructions
Mexican Hot Chocolate Lava Cakes in Crispy Tortilla Cups Step-by-step instructions
- Prep
- Cook
- Total
- Serves
- 6
Before you start
Set the oven rack in the center position and heat the oven to 400°F (200°C) first, since the tortilla cups want to go in soon after filling. Melt the butter for brushing and let it cool a moment. Chop the chocolate if it is a bar, and separate out the half cup of butter for the batter so the two measurements do not blur. Have the muffin tin, a heatproof bowl, a saucepan for the water bath, two mixing bowls, a whisk, a brush and a small ladle on the counter.
Ingredients at a glance (11)
- 6 small flour tortillas (about 6 inches each)
- 3 tbsp unsalted butter, melted, for brushing the tortillas
- 1/4 cup cinnamon-sugar, for coating the tortilla cups
- 4 oz dark chocolate (60-70%), melted
- 1/2 cup unsalted butter
- 2 large eggs
- 1/3 cup granulated sugar
- 1 tsp ground cinnamon
- 1/4 tsp cayenne pepper
- Cocoa powder, for dusting, to taste
- Vanilla ice cream, for serving
Instructions
Build the cinnamon tortilla cups
- Heat the oven and coat the tortillasHeat the oven to 400°F (200°C) and brush six cups of a muffin tin with some of the melted butter. Brush both sides of each tortilla with the remaining butter, then sprinkle generously with cinnamon-sugar, pressing it in so it clings to the surface.Look for The tortillas glisten on both sides and the cinnamon-sugar sits in an even, sandy layer.Tip Mix the cinnamon-sugar ahead in a shaker; a wide, even coat is what turns glassy and crisp in the oven.
- Press the tortillas into the muffin tinPress one coated tortilla into each buttered cup, pleating the edges into loose petals that rise just above the rim. The folds look rustic on purpose; they become the crunchy rim that holds the cake and catches the chocolate river when it breaks.Look for Each tortilla sits snug in its cup with no slack along the bottom, petals standing tall.Tip If a tortilla springs back, hold it in place for five seconds; the butter softens it quickly.
At the end of this phase the oven is at 400°F and six muffin cups hold buttered, cinnamon-sugar-coated tortillas pleated into petals. The coating should look evenly sandy and slightly wet from the butter, with no dry flour-like patches, and the pleats should stand above the rim on their own.
Give the tin a gentle shake; nothing should slide or spring loose. If a tortilla relaxes flat, press it back and give it a few seconds to take the shape. The kitchen should already smell faintly of butter and cinnamon before anything hits the heat, a sign the coating is generous enough to crisp properly.
Make the spiced lava batter and fill
- Melt the chocolate and butterCombine the dark chocolate and the 1/2 cup butter in a heatproof bowl set over barely simmering water, stirring until glossy and smooth. Take the bowl off the heat and let it sit for two minutes so the mixture thickens slightly and stops steaming before the eggs go in.Look for The mixture pours in a slow, glossy ribbon with no streaks of unmelted butter.Tip Keep the water below a simmer; scorching chocolate turns it grainy and dull.
- Whisk the eggs, sugar and spicesIn a separate bowl, whisk the eggs with the sugar, cinnamon and cayenne for about a minute, until the mixture paleens slightly and the sugar has mostly dissolved. This builds the structure that sets the cake edges while the core stays molten.Look for The mixture looks creamy, light amber, and no granules of sugar rasp under the whisk.Tip Taste a drop on a fingertip; the heat should whisper now and bloom after baking.
- Fold the batter togetherPour the warm chocolate mixture into the egg mixture in a thin stream, whisking constantly so the eggs warm gradually instead of scrambling. Whisk until the batter is completely uniform, thick and shiny, with a satin surface that holds a trail for a second.Look for No streaks of light or dark remain; the batter coats the whisk in a glossy film.Tip If the chocolate was still hot, stream slower; curdled batter cannot be fixed later.
- Fill the tortilla cupsDivide the batter evenly among the six lined cups, filling each about three-quarters full. Spoon it toward the center so the pleated tortilla edges stay clean of batter, which keeps them crisp and gives the finished cakes their petal-shaped silhouette.Look for Each cup holds an equal share, batter centered, tortilla petals clean and buttered above the fill line.Tip A small ladle or ice-cream scoop portions six cups in under a minute with less mess.
The batter should now be thick, glossy and completely smooth, pouring in a slow ribbon and holding a brief trail on the surface. No streaks of butter, no graininess, and no flecks of cooked egg anywhere. Each tortilla cup holds an equal portion filled about three-quarters full, with the pleated edges clean of batter.
The cayenne should register as a faint warmth on the back of the tongue if a fingertip tastes the batter. If the batter looks split or oily at the edges, it sat too long; proceed anyway, as the oven usually pulls it back together.
Bake, unmold and serve molten
- Bake until the edges setBake for 11 minutes, until the tortilla petals are deep golden and crunchy and the cake edges look set around a still-molten chocolate core. For fully cooked eggs, bake until an instant-read thermometer reads 160°F (71°C) in the center; a shorter bake leaves the core molten.Look for The edges hold their shape and barely wobble; the very center shines and trembles as one piece.Safe temperature 160°F (71°C) internal temperature (egg dishes)Tip Rotate the tin at seven minutes if the oven runs hot on one side.
- Rest and unmold the cakesLet the tin rest for two minutes, then loosen each cake around the tortilla rim with a thin knife and lift it out. Work gently; the centers are still tender, and the crisp cups shatter if gripped hard. Set each cake on a warm plate, petal side up.Look for The cups release with a faint crackle and the cakes sit upright without slumping.Tip Two minutes is the limit; longer and the molten core steams itself set inside the cup.
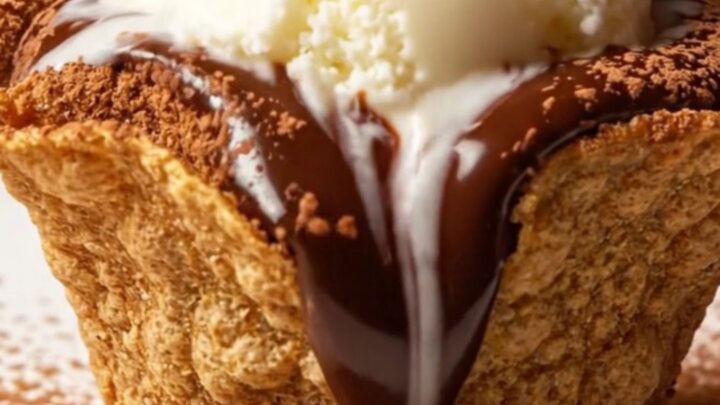
- Dust, scoop and break the coreDust each warm cake with cocoa powder through a fine-mesh sieve, then crown it with a scoop of vanilla ice cream. Serve immediately, breaking one open at the table so the molten chocolate flows over the ice cream and into the crunchy cinnamon cup.Look for Cocoa settles into the warm crevices; the ice cream holds its scoop for about a minute before softening.Tip Warm plates buy a minute of flow time; cold plates seize the chocolate against the ceramic.
The finished cakes come out with deep golden, crunchy petals and set edges around a glossy, trembling core. The cinnamon-sugar at the petal tips has caramelized into dark amber patches, and the smell is toasted spice and melted chocolate. After the two-minute rest, each cake lifts cleanly and stands upright on the plate.
Dust them with cocoa while warm so it clings, add the ice cream, and break one open: the chocolate should flow slowly, not pour like broth and not sit like frosting. If the core runs thin and watery, the bake ran short; if it holds a dome, it ran long.
Common mistakes
The most common failure is overbaking: two extra minutes turns a molten core into a moist but fully set cake, so trust the clock and the visual cues over instinct. The second mistake is hot chocolate meeting eggs too fast, which scrambles them into flecks; stream the chocolate slowly while whisking.
Undercoating the tortillas leaves pale, chewy cups, so brush butter on both sides and press the cinnamon-sugar in. Filling the cups too high makes the batter overflow onto the tin, where it burns.
How to tell it’s done
A finished lava cake has tortilla petals that are deep golden brown and audibly crisp when tapped with a knife, with caramelized cinnamon-sugar at the tips. The cake edges look matte and set, pulling slightly from the batter line, while the very center remains glossy and moves as a single soft mass when the tin is nudged. The aroma is toasted cinnamon and melted chocolate with no raw-flour smell.
- Egg dishes: 160°F (71°C) in the thickest part
Up next · Part 3 of 3
4 variations · storage & make-ahead · 5 answers · printable card
Tips, FAQ & printable recipe (Part 3)← Back to the ingredients (Part 1)