Desserts · Part 2 of 3: Instructions
Matcha Macadamia Bark with Yuzu White Chocolate Crunch Step-by-step instructions
- Prep
- Cook
- Total
- Serves
- 12
Before you start
Gather everything before you begin, because the chocolate and caramel move quickly once they are warm. Chill the green matcha white chocolate until it is firm enough to grate cleanly. Line the metal baking tray with parchment paper, leaving a little overhang on the sides so you can lift the slab out later.
Chop the macadamia nuts, pecans and dried fruit on the wooden cutting board and set them in a bowl within reach. Measure the sugar, yuzu juice, butter and heavy cream, and warm the cream so it blends smoothly into the hot caramel. Have a spoon ready for drizzling and a sharp knife nearby for the final cuts. Working in this order keeps the chocolate from softening before it is spread.
Ingredients at a glance (8)
- 1 cup macadamia nuts, roughly chopped
- 1/2 cup pecans, roughly chopped
- 1/2 cup dried fruit pieces, such as cranberries or apricots, chopped
- 8 oz green matcha white chocolate, chilled for grating and melted for spreading
- 1/3 cup sugar
- 2 tbsp yuzu juice
- 1 tbsp unsalted butter, cut into pieces
- 3 tbsp heavy cream, warmed
Instructions
Grate and spread the chocolate
- Chop the nuts and fruitPlace the macadamia nuts, pecans and dried fruit on a wooden cutting board. Chop them with a large chef's knife into irregular pieces, about the size of a fingernail, so they scatter evenly across the bark.Look for Pieces are roughly even, with no whole nuts left and no fine dust at the bottom of the board.Tip Chop the nuts just before using them so they stay crisp and fresh-tasting.
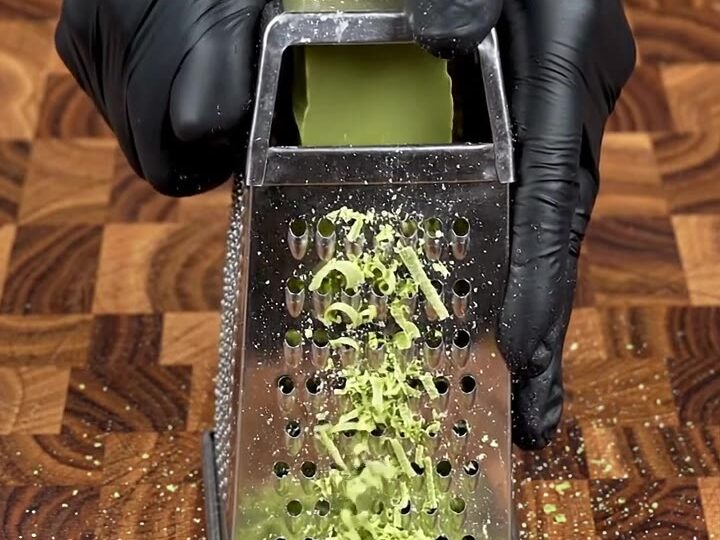
- Grate the matcha chocolateLine a metal baking tray with parchment paper. Run the green matcha white chocolate over the large holes of a box grater so it falls in fine green curls, then sprinkle and spread the curls over the tray in a smooth, even layer.Look for The curls fall lightly and cover the paper in an even green layer with no thick patches.Tip Keep the chocolate cool while grating so the curls hold their shape and do not smear.
At the end of this phase the baking tray should hold an even, pale green layer of fine chocolate curls spread across the parchment. The curls should look light and feathery, with no thick clumps or bare patches showing the paper underneath. Before going on, press a fingertip gently on the layer to check it is smooth and evenly covered.
If there are gaps, sprinkle a few more curls into them so the melted chocolate later will flow over an even base. The air around the tray should smell faintly sweet and milky, with a grassy note from the matcha. Working quickly here keeps the curls firm and easy to spread, and it prevents the chocolate from softening before the next step.
Build the nut and fruit layer
- Melt and scatter the nutsMelt the remaining green chocolate gently until smooth, spread it over the curls, then scatter the chopped macadamia nuts, pecans and dried fruit generously over the still-soft surface.Look for The melted chocolate is smooth and glossy, and the nuts sit on top without sinking out of sight.Tip Press the nuts in lightly with your fingertips so they stay anchored when the bark sets.
- Make the yuzu caramelMelt the sugar in a heatproof saucepan over medium heat, swirling until it turns a golden amber. Off the heat, whisk in the warm heavy cream, butter and yuzu juice, then let the caramel cool slightly until it is thick enough to drizzle.Look for The caramel is golden amber and smooth, and it falls from the spatula in thick ribbons.Tip Add the warm cream slowly, away from your face, as the caramel will bubble up.
- Drizzle in zigzag linesUsing a spoon, drizzle the golden yuzu caramel across the surface of the bark in zigzag lines, covering the chocolate and nuts evenly without letting the lines pool in one place.Look for Golden zigzag lines run across the whole surface with the green chocolate visible between them.Tip Drizzle from a short height so the lines stay thin and defined.
At the end of this phase the melted green chocolate should cover the curls in a smooth, glossy sheet, and the chopped macadamia nuts, pecans and dried fruit should sit generously across the top. The surface should look even, with nuts visible on every part of the tray and no large areas of bare chocolate. Check that the nuts are lightly pressed into the surface so they will not fall off later. The caramel should be finished and cooled just enough to hold its shape, with a rich golden colour and a buttery aroma. Before going on, confirm the caramel falls from the spoon in thick ribbons, because a runny caramel will spread and blur the zigzag pattern.
Drizzle, set and cut the bark
- Set the bark until firmLeave the tray to set at cool room temperature or in the refrigerator until the chocolate hardens fully into a firm slab speckled with nuts.Look for The surface looks matte and the slab lifts from the paper without any give.Tip Refrigerate for faster setting, then let the tray sit for a few minutes before cutting.
- Cut into neat piecesLift the parchment and slab onto a cutting board. Cut the bark with a sharp knife into neat rectangular pieces, wiping the blade between cuts so the green interior and macadamia nuts show clearly.Look for The pieces have clean edges, with green chocolate and studded nuts visible on each cut face.Tip Warm the knife briefly under hot water and dry it before each cut for crisp edges.
At the end of this phase the bark should be drizzled with golden yuzu caramel in clear zigzag lines, and the chocolate should have set into a firm, matte slab speckled with nuts. The surface should look neat, with each golden line distinct from the green chocolate and no pooling in one spot. Lift one corner gently to confirm the slab has released from the parchment and is solid all the way through. The bark should smell of toasted nuts, citrus and butter, and it should feel cool and firm to the touch. Before cutting, let the tray rest a few minutes so the knife glides through cleanly and the rectangles keep their shape.
Common mistakes
The most common mistake is working with chocolate that is too warm, which makes the grated curls melt into a flat, dull layer instead of a light base. Keep the chocolate cool until the moment you grate it, and do not rush the melting step. Another frequent error is scattering the nuts onto chocolate that has already begun to set, which leaves them sitting on top rather than anchored in the surface.
Spread the chocolate and add the nuts while it is still smooth. Caramel can also cause trouble if it is poured over chocolate that is too firm, because the lines will break rather than settle. Drizzle while the chocolate is still soft enough to take the caramel. Finally, avoid cutting the bark too early.
How to tell it’s done
The bark is ready to cut when the chocolate has set completely and the surface looks matte rather than glossy. Press a fingertip gently on an unnoticed corner: it should feel firm and cool with no softness or give. The slab should lift cleanly from the parchment without sticking. The yuzu caramel should look set and golden, with clear edges between the zigzag lines and the green chocolate.
When you cut through the slab, the knife should meet a firm interior speckled with nuts and fruit, and the pieces should hold their rectangular shape without crumbling at the edges. A well-set bark snaps cleanly when broken, showing even distribution throughout. If the chocolate still feels soft or leaves a fingerprint, return the tray to the refrigerator for another fifteen to twenty minutes before cutting.
Up next · Part 3 of 3
4 variations · storage & make-ahead · 5 answers · printable card
Tips, FAQ & printable recipe (Part 3)← Back to the ingredients (Part 1)