Desserts · Part 2 of 3: Instructions
Matcha Macadamia Bark with Yuzu White Chocolate Crunch Step-by-step instructions
- Prep
- Cook
- Total
- Serves
- 16
Before you start
Gather everything before you start, because the melting and swirling steps move quickly once the chocolate is warm. Line a metal sheet pan with parchment paper so the bark can be lifted out in one piece later. Chop the macadamia nuts, almonds, dried yuzu peel and dried orange slices so they are ready to scatter.
Have the white chocolate block cold but not frozen, and set the box grater, the matcha powder, the caramel sauce and the spatula within reach. Work in a cool room if you can, because warm kitchens soften the chocolate and make the caramel swirls harder to control. Wear clean gloves if you like, and keep the cutting board dry so that no moisture reaches the melting chocolate.
Ingredients at a glance (7)
- 1 cup macadamia nuts, roughly chopped
- 1/2 cup almonds, roughly chopped
- 2 tbsp dried yuzu peel
- 2 tbsp dried orange slices, chopped
- 12 oz white chocolate, from a block, finely grated
- 1 tbsp matcha powder
- 1/4 cup caramel sauce, thick
Instructions
Chopped, grated and melted
- Chop the nuts and fruitPlace the macadamia nuts, almonds, dried yuzu peel and dried orange slices on a wooden cutting board. Chop them roughly with a large chef's knife until the pieces are coarse and scattered across the board. Set the mixture aside.Look for Pieces are coarse and irregular, not powdery, with some larger chunks.Tip Keep the pieces fairly large so the crunch stays visible in the finished bars.
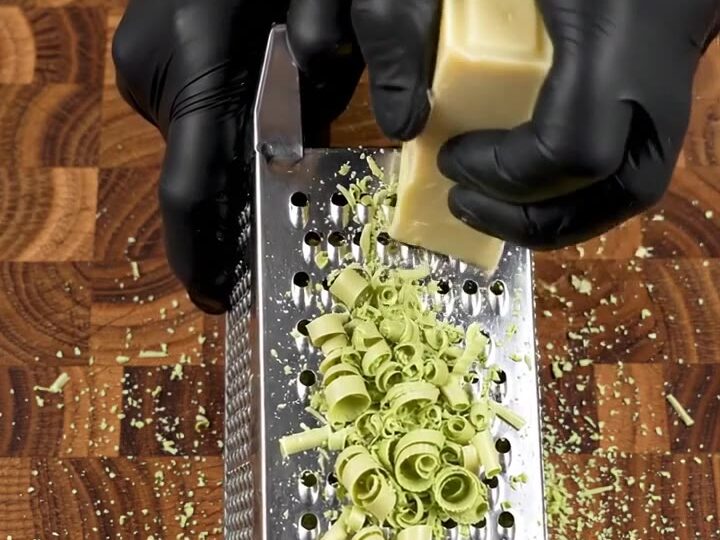
- Grate the white chocolateGrate the white chocolate over a box grater, letting the fine curls and pale shavings fall onto the board. Sprinkle the matcha powder over the grated chocolate and toss to combine evenly.Look for Fine curls and a light dusting of shavings with an even green tint.Tip Use a block of white chocolate, not chips, so it melts smoothly.
At the end of this phase, the nuts and fruit should be coarsely chopped, and the white chocolate should be melted into a smooth, bright green base. The chocolate should look glossy and feel fluid, with no grainy lumps and no dark specks of matcha.
If you see any lumps, stir them gently until they disappear. Do not continue until the base is completely smooth, because any unmelted bits will show up as streaks in the finished bark. Check that the base spreads easily with the spatula before moving on to the next step.
Spread, swirl and top
- Melt the green chocolate baseGently melt the grated white chocolate and matcha together until smooth and bright green, stirring between short intervals in the microwave or over barely simmering water. Avoid overheating so the chocolate stays glossy.Look for The base is smooth, glossy and an even bright green with no lumps.Tip Stop heating when a few pieces remain and stir them in off the heat.
- Spread the bark baseLine a metal sheet pan with parchment paper. Pour the melted green chocolate onto the pan and spread it evenly to the edges with a spatula.Look for The layer is even from edge to edge with no thick spots.Tip Tilt the pan gently to help the chocolate level out.
- Swirl in caramel ribbonsWhile the chocolate is still soft, drizzle the caramel sauce over the green layer in thick amber ribbons. Swirl them through the chocolate with a spatula, keeping some ribbons visible.Look for Amber ribbons are visible and marbled through the green chocolate.Tip Work quickly while the chocolate is still soft so the swirls hold their shape.
At the end of this phase, the green chocolate should cover the parchment in an even layer from edge to edge, with amber caramel ribbons marbled through it and the chopped nuts and fruit pressed lightly into the surface. The chocolate should still be soft enough to take the topping, but not runny. Look for even coverage with no thin or thick patches. If the chocolate starts to firm before the swirling is done, warm it briefly, then continue, so the ribbons keep their shape and the surface stays smooth.
Set and cut the bars
- Top and set the barkScatter the chopped nuts and fruit pieces over the top and press them lightly into the surface. Leave the bark at room temperature until it is firm, glossy and free of soft spots, about 2 hours.Look for The surface is firm, glossy and no longer soft when pressed lightly.Tip Refrigerate for about 30 minutes if the kitchen is warm, then let it come back to a cool temperature.
- Cut into barsLift the set slab out of the pan using the parchment paper. Cut it into rectangular bars with a sharp knife, wiping the blade between cuts for clean edges.Look for Bars are firm, with clean edges and nut and fruit pieces visible throughout.Tip Warm the knife slightly under hot water and dry it before each cut for neat edges.
At the end of this phase, the bark should be firm, glossy and free of soft spots when pressed gently, and the slab should lift out of the pan without sticking. The cut edges should look clean, with the nut and fruit pieces visible through the green. Check the surface for any remaining tacky or soft areas before cutting. If the bark still feels soft, let it rest longer at a cool room temperature rather than forcing it, since rushing the set can cause smudged surfaces and crumbly edges.
Common mistakes
The most common mistake is overheating the white chocolate. Heated too quickly or for too long, white chocolate can seize, turn grainy or lose its glossy finish, and the matcha can turn dull. Melt it gently in short intervals and stop while a few pieces still hold their shape. Another frequent problem is adding the caramel after the chocolate has firmed, which leaves the ribbons broken and patchy instead of swirled.
Work quickly once the caramel is down. Spreading the chocolate unevenly creates thick spots that take longer to set, while thin areas can crack. Finally, cutting the bark before it is fully set will smear the surface and tear the nuts loose, so wait until the bark is firm and glossy all the way through.
How to tell it’s done
The bark is done when the chocolate has set firm and glossy across the whole surface, with no soft or tacky spots when pressed gently with a fingertip. The bright green should look even, the caramel ribbons should be sharp and clearly defined, and the nut and fruit pieces should stay fixed in place.
When the slab lifts cleanly from the parchment and a sharp knife cuts through it without dragging, the bark is ready. Because this recipe has no meat, poultry or eggs, there is no safe internal temperature to check. Judge doneness by sight and touch alone, and cut only when the surface feels firm all the way across.
Up next · Part 3 of 3
4 variations · storage & make-ahead · 5 answers · printable card
Tips, FAQ & printable recipe (Part 3)← Back to the ingredients (Part 1)