Desserts · Part 1 of 3: Ingredients
Matcha Black Sesame Basque Burnt Cheesecake
- Prep
- Cook
- Total
- Serves
- 12
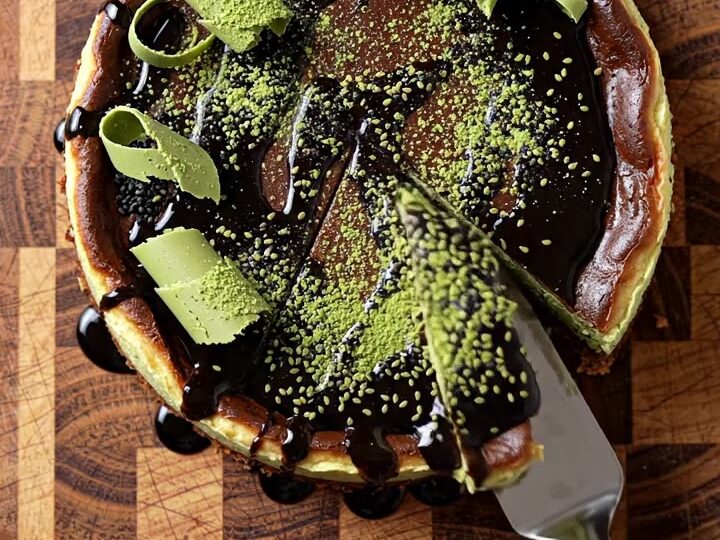
This matcha black sesame basque burnt cheesecake brings together the earthy bitterness of matcha, the nutty depth of black sesame, and the creamy, caramelized edges of a classic basque cheesecake. The dramatic marbled interior is crowned with crunchy black sesame brittle and emerald matcha chocolate curls, making every slice a visual and textural delight.
The recipe is straightforward, yet the result looks and tastes like a high-end patisserie creation. Perfect for celebrations or a special weekend treat, this cheesecake is sure to become a favorite.
Basque burnt cheesecake is beloved for its rustic, caramelized exterior and lusciously creamy center. This version takes that classic and gives it a Japanese-inspired twist with matcha and black sesame. The batter is split and flavored separately, then swirled together to create a beautiful marbled pattern.
After baking, the cheesecake is chilled until set, then topped with glossy black sesame cream, crunchy sesame brittle, and delicate matcha chocolate curls. The combination of flavors and textures is extraordinary: the bitter matcha balances the sweet cream cheese, while the sesame adds a toasty, nutty note. Serve it chilled for a dessert that is both elegant and indulgent.
Ingredients
- 24 oz cream cheese, softened
- 1 1/2 cups granulated sugar
- 4 large eggs, at room temperature
- 2 cups heavy cream
- 1/4 cup all-purpose flour
- 2 tbsp culinary-grade matcha powder
- 1/2 cup black sesame paste
Topping
- 1 cup black sesame brittle, chopped into fine shards
- 6 oz ceremonial matcha white chocolate, grated into curls
- 1/2 cup black sesame cream
Why this recipe works
The high baking temperature (400°F) creates a deeply caramelized top and edges while keeping the interior moist and creamy. This contrast between the burnt exterior and the silky center is the hallmark of a basque cheesecake. The cream cheese and heavy cream provide richness, while the eggs bind everything together and help the cheesecake set to a sliceable but still creamy texture.
Swirling the matcha and black sesame batters creates a visually stunning marbled effect without much effort. The matcha powder dissolves into the batter to give a vibrant green hue, while the black sesame paste adds a deep, almost black color and a robust flavor. The toppings—brittle and chocolate curls—add crunch and a contrasting texture, making each bite interesting.
Notes and substitutions
Use full-fat cream cheese for the best texture; low-fat versions can make the cheesecake gummy. The eggs and heavy cream should be at room temperature to ensure a smooth, lump-free batter.
Culinary-grade matcha is ideal for baking; ceremonial grade is more delicate and can become bitter when heated. Black sesame paste is available at Asian grocers or online; if unavailable, you can grind toasted black sesame seeds with a little oil to make a paste.
For the matcha chocolate curls, look for a bar of ceremonial matcha white chocolate; if you cannot find it, use a good-quality white chocolate and stir in a teaspoon of matcha powder after grating.
The black sesame brittle can be store-bought or homemade; any crunchy sesame candy will work. A 9-inch springform pan is essential for easy removal, and crumpling the parchment paper gives the cheesecake its signature rustic edges.
- black sesame paste: Use tahini mixed with toasted black sesame seeds for a similar nutty flavor.
- ceremonial matcha white chocolate: Use high-quality white chocolate and add 1 teaspoon matcha powder to it.
- black sesame brittle: Use store-bought black sesame candy or make a simple sesame brittle with sugar and sesame seeds.
- heavy cream: Use full-fat coconut cream for a dairy-free option, but note the texture will be slightly different.
Equipment
- 9-inch springform pan
- parchment paper
- box grater
- mixing bowls
- electric mixer
- rubber spatula
- metal cake server
Up next · Part 2 of 3
9 steps · 55 min of cooking · what to look for at each stage
Step-by-step instructions (Part 2)