Desserts · Part 2 of 3: Instructions
Marshmallow Eyeball Sandwich Cookies Step-by-step instructions
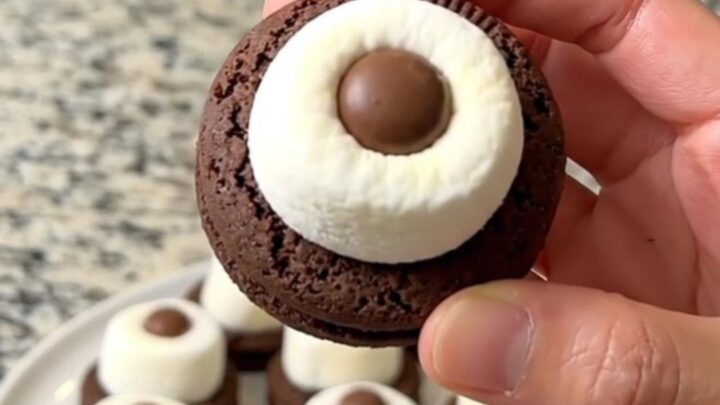
- Prep
- Cook
- Total
- Serves
- 12
Before you start
Before you begin assembling the cookies, ensure your workspace is clean and flat. Set out a baking sheet and line it with parchment paper for easy cleanup. Gather all your ingredients, including the chocolate sandwich cookies, large marshmallows, and brown candy-coated chocolates.
Have a sharp knife ready for cutting the marshmallows. Having everything prepped and within reach will make the assembly process smooth and efficient, allowing you to focus on placing the eyeballs precisely for the best visual impact.
Ingredients at a glance (3)
- 12 chocolate sandwich cookies
- 6 large marshmallows, halved crosswise
- 12 brown candy-coated chocolates
Instructions
Cookie base preparation
- Prepare the cookie baseLine a baking sheet with a piece of parchment paper to prevent sticking. Arrange twelve chocolate sandwich cookies in rows on the prepared baking sheet. Ensure the cookies are lying flat on the surface.Look for The cookies are arranged in neat rows.Tip Using parchment paper makes it easy to transfer the cookies to a serving plate later.
The cookies should be laid out in a single, even layer on the parchment-lined baking sheet. Ensure there is enough space between each cookie to facilitate easy handling during the assembly phase.
The surface of the cookies should be clean and ready to receive the marshmallow toppings, providing a stable and organized foundation for the rest of the project.
Marshmallow placement
- Assemble the marshmallow eyeballsCut each large marshmallow in half crosswise to create two flat, circular surfaces. Place one marshmallow half, cut side down, onto the center of each chocolate sandwich cookie. The sticky surface of the marshmallow will help it adhere to the cookie frosting.Look for The marshmallows are centered on each cookie.Tip If the marshmallows are too sticky to handle, lightly grease the knife blade with a tiny bit of vegetable oil.
The marshmallows should be cut cleanly into even halves, with the cut side facing down on each cookie. Check that every cookie has a marshmallow base that is centered and stable. The marshmallows should look uniform in size and height, which is essential for achieving the desired eyeball effect across the entire batch of cookies.
Adding the pupils
- Add the pupils and serveTake one brown candy-coated chocolate and press it firmly into the center of each marshmallow half to create the pupil. Once all twelve eyeballs are assembled, transfer them carefully to a serving plate for display. Serve immediately or keep at room temperature until needed.Look for The pupils are placed on the marshmallows.Tip Pressing down gently ensures the chocolate candy sticks well to the marshmallow surface.
The candy pupils should be positioned exactly in the center of each marshmallow half. Ensure they are pressed in securely so they do not fall off when the cookies are moved. The final assembly should look neat and consistent, with all twelve eyeballs ready for serving. Verify that the candies are centered for a realistic look.
Common mistakes
A common mistake is using marshmallows that are not fresh, which can make them difficult to cut cleanly and result in a messy appearance. Ensure the knife used for cutting is sharp to avoid squishing the marshmallows.
Another error is pressing the candy pupil too hard, which might cause the marshmallow to collapse or lose its shape. Always handle the marshmallows gently and ensure the cut side is placed firmly on the cookie to maintain stability throughout the serving process.
How to tell it’s done
These cookies do not require any cooking, so doneness is determined by the visual assembly. Each cookie should have a marshmallow half perfectly centered on top, with a candy pupil pressed firmly into the middle.
The marshmallows should look clean, and the candies should be secure. There is no internal temperature to monitor, as this is a simple assembly-based dessert. Once all twelve cookies are decorated, they are ready to serve immediately or can be set aside until your guests arrive.
Up next · Part 3 of 3
2 variations · storage & make-ahead · 3 answers · printable card
Tips, FAQ & printable recipe (Part 3)← Back to the ingredients (Part 1)