Desserts · Part 2 of 3: Instructions
Maple Walnut Toffee Dark Chocolate Butter Crunch Bark Step-by-step instructions
- Prep
- Cook
- Total
- Serves
- 12
Before you start
Gather everything before you melt any chocolate, because the chocolate must be spread while it is still warm. Set out the toffee sheet, the toasted walnut pieces, the flaky sea salt, the cold dark chocolate block and the box grater. Line a rimmed baking sheet with parchment paper and keep an offset spatula within reach.
Clear a wooden cutting board and keep a large sharp knife ready for chopping the toffee. Chill the chocolate block for about 10 minutes so it grates cleanly without smearing or gumming the grater. Have a microwave-safe bowl ready for melting. Working in this order keeps the chocolate workable and gives you a short, controlled window to press in the toppings before the layer firms.
Ingredients at a glance (4)
- 1 sheet toffee sheet, store-bought or made ahead
- 3/4 cup walnut pieces, toasted
- Flaky sea salt to taste
- 8 oz dark chocolate block, cold
Instructions
Prep the toffee and chocolate
- Chop the toffee and walnutsSet the toffee sheet on a wooden cutting board and chop it with a large knife into rough pieces of varying size. Scatter the walnut pieces over the toffee and sprinkle with flaky sea salt, then gently toss so they distribute evenly.Look for Toffee breaks into jagged shards with a clean, glassy crack.Tip Keep the largest shards around the size of a walnut for the most dramatic crunch.
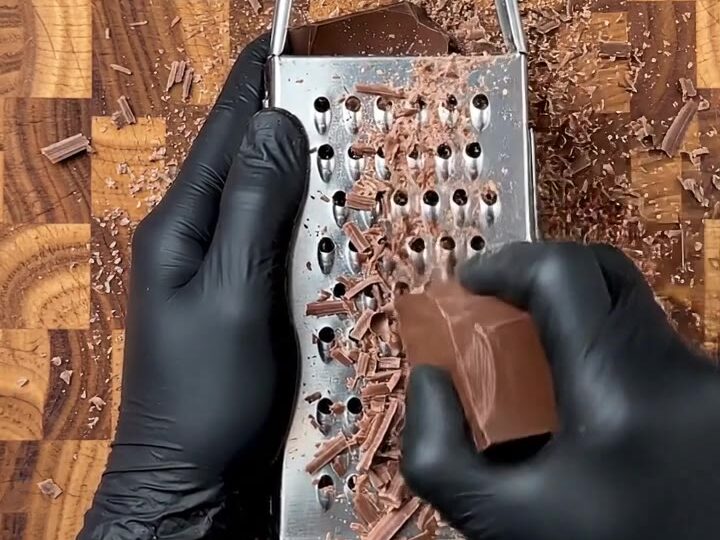
- Grate the dark chocolateHold a box grater over the cutting board and rub the cold dark chocolate block against the coarse side. The fine shavings will fall directly onto the board. Gather them into a small pile and set aside.Look for Fine, feathery shavings collect in a loose mound.Tip Chill the chocolate for 10 minutes first so it grates cleanly without smearing.
The toffee should be broken into rough, varied shards, the walnut pieces scattered evenly and the chocolate grated into a fine, feathery mound on the board. Nothing should be melted yet. Check that the tray is lined flat and the spatula is clean and dry.
Before moving on, confirm that the toppings are close at hand, because once the chocolate is spread you must add them quickly while the surface is still warm and soft enough to hold them.
Melt and spread the layer
- Melt the chocolateTransfer the grated dark chocolate to a microwave-safe bowl. Heat in 20-second bursts, stirring well after each, until the chocolate is fully melted and smooth.Look for The chocolate turns glossy and flows smoothly from the spoon.Tip Stop heating when a few small lumps remain, then stir them out with residual heat.
- Spread the chocolate layerLine a rimmed baking sheet with parchment paper. Pour the melted chocolate onto the sheet and spread it into a thick, even layer with an offset spatula, reaching all the corners.Look for The surface looks even, glossy and unbroken across the whole sheet.Tip Work quickly while the chocolate is still warm and spreadable.
- Press in the toffee and walnutsWhile the chocolate is still warm, scatter the chopped toffee, walnut pieces and sea salt evenly over the surface. Press them gently into the chocolate so they stay in place as it sets.Look for Toffee and walnuts sit partly embedded, with no bare chocolate patches.Tip Press lightly with your palm to anchor the toppings without cracking the toffee.
The grated chocolate should melt into a smooth, glossy liquid that flows from the spoon without lumps. Once spread on the parchment, the layer should look thick, even and unbroken right to the corners. Check the edges and fill any thin spots with a little extra chocolate. Keep the surface warm enough to accept the toppings, and move directly to the next phase rather than letting it stiffen on the counter.
Set and cut the slab
- Set the chocolate slabLeave the tray at cool room temperature, or refrigerate it for 20 to 30 minutes, until the chocolate is firm to the touch and no longer shiny-soft under a fingertip.Look for The chocolate feels firm and no longer marks under light pressure.Tip Avoid placing it in direct sun or near the oven, which can cause the chocolate to bloom.
- Cut and serve the barkLift the parchment and slab onto the cutting board. Using a large knife, cut the set chocolate into neat rectangles, wiping the blade between cuts for clean edges. Arrange the pieces on the board and serve.Look for Clean pieces show golden walnuts, toffee crunch and visible salt flakes.Tip Warm the knife briefly under hot water and dry it before each cut for tidy edges.
The slab is ready when the chocolate feels firm to a light fingertip press and no longer marks. It should look glossy and studded with golden walnuts, toffee shards and salt. Lift the parchment carefully to check that the underside is smooth and the toppings are anchored. Cut only when fully firm, using a large knife with a warm, dry blade for clean edges, so each rectangle keeps its walnuts and toffee crunch visible on top.
Common mistakes
The most common error is melting the chocolate too hot or too long, which can cause it to seize into a thick, grainy paste that will not spread smoothly. Heat it in short bursts and stop while a few lumps remain, then stir them out. Another mistake is waiting too long to add the toppings.
Once the chocolate cools and firms, the toffee and walnuts will sit on top rather than sinking in, and they can fall off when you cut. Work promptly. Finally, do not cut the slab before it is fully set. A soft layer will smear under the knife and tear the toffee. Use a warm, dry blade and wipe it between cuts so the rectangles keep their clean edges and the salt stays on the surface.
How to tell it’s done
The bark is done when the chocolate is firm to a light fingertip press and no longer shiny-soft or sticky. The surface should look glossy and unbroken, with the toffee shards and walnut pieces held firmly in place. Lift one corner of the parchment: the slab should release cleanly and feel solid rather than tacky.
When you cut, the knife should pass through with a crisp, clean line rather than dragging. This recipe contains no raw protein or eggs, so no internal temperature applies. If the chocolate still feels soft in the centre after standing, return the tray to the refrigerator for 15 minutes and check again before cutting.
Up next · Part 3 of 3
4 variations · storage & make-ahead · 4 answers · printable card
Tips, FAQ & printable recipe (Part 3)← Back to the ingredients (Part 1)