Desserts · Part 2 of 3: Instructions
Maple Walnut Toffee Dark Chocolate Butter Crunch Bars Step-by-step instructions
- Prep
- Cook
- Total
- Serves
- 12
Before you start
Gather everything before you melt the chocolate, because the process moves quickly once the toppings go on. Line a rimmed metal baking pan, about 8 by 8 inches, with parchment paper, leaving a small overhang on two sides so you can lift the finished slab out easily. Chill the block of dark chocolate for about 10 minutes so it grates cleanly on the box grater.
Set the cutting board, the chef's knife and the box grater within reach, and place the chopped walnuts and broken maple walnut toffee in small bowls. Have the flaky sea salt ready in a small dish. Check that the maple walnut toffee is store-bought or made ahead and broken into pieces that are roughly the same size as the walnuts.
Ingredients at a glance (4)
- 1 cup walnut halves or pieces, roughly chopped
- flaky sea salt, to taste, plus more for sprinkling
- 8 oz dark chocolate, chopped, plus a small block for grating
- 1/2 cup maple walnut toffee, store-bought or made ahead, broken into pieces
Instructions
Chop, grate and melt
- Chop the walnuts and salt themPlace the walnuts on a wooden cutting board and roughly chop them with a chef's knife until you have a pile of small, uneven pieces. Scatter a pinch of flaky sea salt across the walnuts and set them aside for the topping.Look for The walnuts look like a rough pile of small pieces with some larger chunks left.Tip Chop in a rocking motion and keep the pieces fairly even so they spread evenly across the chocolate.
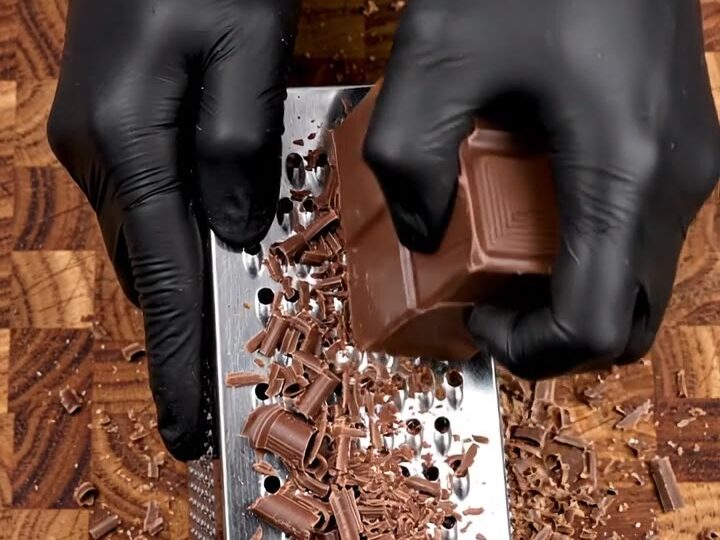
- Grate the dark chocolateHold a block of dark chocolate against the large holes of a box grater and grate it over the cutting board. The fine shavings will fall onto the board; gather them and set them aside for the top layer.Look for Fine, delicate shavings collect on the board and the block is grated down evenly.Tip Chill the chocolate block for 10 minutes first, so it grates cleanly without smearing.
At the end of this phase, the walnuts are chopped into a rough pile of small pieces, the chocolate is grated into fine shavings that have collected on the board, and the chopped dark chocolate is fully melted. The melted chocolate should look smooth, fluid and glossy, with no lumps and no bits of unmelted chocolate. Check that the melted chocolate is still warm and easy to pour before you move on to the pan. If it has started to thicken or seize, warm it briefly in short bursts until it loosens again. Keep the grated shavings separate, because you will use them on the top layer later in the process.
Spread and add the toppings
- Melt and spread the chocolateMelt the chopped dark chocolate in a microwave-safe bowl in 20-second bursts, stirring between each, or over a double boiler. Pour it into the rimmed metal pan lined with parchment paper and spread it into an even layer.Look for The chocolate is smooth, fluid and glossy with no lumps left.Tip Keep the heat gentle so the chocolate stays glossy and does not seize.
- Layer the walnuts and toffeeWhile the chocolate is still soft, scatter the chopped walnuts and the maple walnut toffee pieces over it. Press them gently into the surface so they stick, spreading them evenly across the pan.Look for The chocolate is still soft and the walnuts and toffee sit evenly across it.Tip Work quickly while the chocolate is still soft so the toppings bed into it.
- Add salt and let it setSprinkle more flaky sea salt over the top and sprinkle the reserved grated chocolate evenly across the surface. Leave the pan at room temperature or in the refrigerator until the chocolate is firm and set.Look for The surface is glossy and smooth and feels firm when lightly touched.Tip Refrigerate for about 1 hour to set faster; the slab is ready when it no longer feels tacky.
At the end of this phase, the melted dark chocolate covers the parchment-lined pan in an even layer, reaching the edges of the pan. The walnuts and maple walnut toffee pieces should be scattered evenly over the surface and gently pressed in, so they feel anchored and do not slide when you tilt the pan.
The chocolate should still be soft enough to take an imprint, and the toppings should look spread across the pan rather than clustered in one corner. Check the corners and edges so the slab will cut into even bars. If the chocolate has begun to firm up, add the toppings more gently to avoid tearing the surface, then move on to the salt and the grated chocolate.
Salt, set and cut
- Cut the butter crunch barsLift the set slab out of the pan using the parchment overhang and place it on the cutting board. Cut it with a chef's knife into neat rectangular bars, wiping the blade between cuts for clean edges.Look for The slab cuts cleanly, showing walnut pieces studded through the chocolate.Tip Warm the knife briefly under hot water and dry it before each cut for crisp edges.
- Plate and serve the barsArrange the butter crunch bars on a serving plate with the cut sides facing up. Serve them right away or store them as directed so the chocolate stays crisp.Look for The bars look neat, glossy and studded with walnuts and toffee.Tip Serve on a chilled plate so the chocolate stays firm and snaps cleanly.
At the end of this phase, the flaky sea salt and the reserved grated chocolate are sprinkled evenly over the top, and the slab has been allowed to set until firm. The surface should look glossy and smooth, and it should feel firm and no longer tacky when you lightly touch an edge. Lift the slab out of the pan by the parchment overhang and place it on the cutting board. Check that the chocolate breaks cleanly and that the walnuts and toffee are studded throughout. If the slab is still soft in the center, return it to the refrigerator for a few more minutes before cutting, so the bars keep their shape.
Common mistakes
The most common mistake is rushing the melting step. Chocolate that overheats becomes dull and may seize, which makes it hard to spread and leaves a streaky, uneven slab. Melt it slowly in short bursts and stir between each one. The second mistake is waiting too long to add the walnuts and toffee. If the chocolate has set before the toppings go on, they will sit on the surface and fall off when you cut.
Work while the chocolate is still soft and press the pieces in gently. A third mistake is cutting the slab before it has set fully. A soft center will smear and the bars will lose their neat edges. Let the slab set until it feels firm and no longer tacky, and wipe the knife between cuts for clean lines.
How to tell it’s done
The butter crunch is done when the dark chocolate has set into a firm, smooth, glossy slab that no longer feels tacky when you lightly touch it. The surface should look even, with the walnuts and toffee held firmly in place and the sea salt and grated chocolate lying on top. Press a fingertip gently on an edge: it should feel solid and not give.
When you lift the parchment, the slab should hold its shape without bending. This recipe contains no meat, poultry, fish or eggs, so there is no protein temperature to reach; the check is the texture and the glossy finish of the chocolate. If the slab is still soft, return it to the refrigerator and check again after a few minutes.
Up next · Part 3 of 3
4 variations · storage & make-ahead · 5 answers · printable card
Tips, FAQ & printable recipe (Part 3)← Back to the ingredients (Part 1)