Dinner · Part 2 of 3: Instructions
Loaded Bacon Cheeseburger Meatloaf with Tangy Glaze Step-by-step instructions
- Prep
- Cook
- Total
- Serves
- 8
Before you start
Before you begin, ensure that all ingredients are measured and ready on your workspace. Preheat your oven to 375 degrees Fahrenheit well in advance to ensure an even cooking environment. Prepare your baking pan by lightly greasing it or lining it with parchment paper for easy removal.
Have your meat thermometer calibrated and accessible, as it is the most reliable way to ensure the meatloaf reaches the safe internal temperature of 160 degrees Fahrenheit (71 degrees Celsius).
Clear your counter space and have your knife and cutting board ready for chopping the bacon into consistent, bite-sized pieces.
Ingredients at a glance (4)
- 2 lb ground beef
- 6 slices bacon, chopped
- 1/2 cup tangy glaze
- 1 1/2 cups shredded cheddar cheese
Instructions
Mixing and Shaping
- Prepare and shape the loafPreheat the oven to 375 degrees Fahrenheit. In a large mixing bowl, combine the ground beef with half of the chopped bacon. Form the mixture into a loaf shape and place it into a baking pan.Look for The mixture should be well combined and hold its shape easily when transferred to the baking pan.Tip Do not overwork the meat, as this can result in a dense and tough texture once cooked.
The meat mixture should be thoroughly combined with the bacon pieces without being overworked. It should hold a uniform loaf shape when placed into the baking pan, ready to be coated with the glaze.
Glazing and Initial Bake
- Glaze and bakeBrush the tangy glaze generously over the exterior of the meatloaf. Place the pan in the oven and bake until the internal temperature reaches 160 degrees Fahrenheit (71 degrees Celsius).Look for The glaze should be bubbling slightly around the edges and the meat should be cooked through.Safe temperature 160°F (71°C) internal temperature (ground meat)Tip Ensure the glaze covers the top and sides evenly for a caramelized finish.
The glaze should be evenly distributed over the surface of the meat. During this phase, the meatloaf will begin to release its juices and the glaze will start to thicken and caramelize in the heat.
Topping and Final Melt
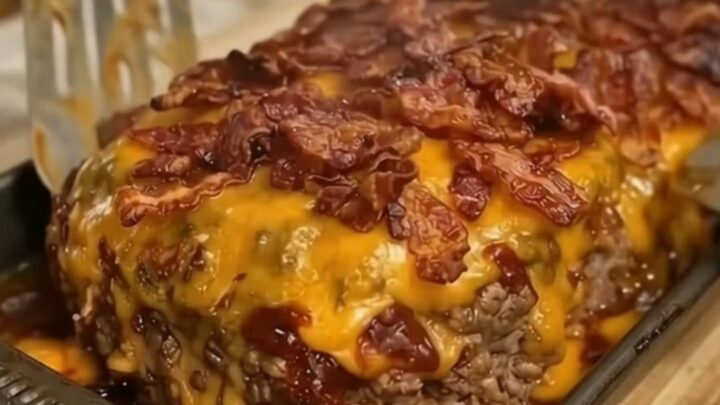
- Add topping and finishRemove the pan from the oven. Sprinkle the shredded cheddar cheese and the remaining chopped bacon over the top of the hot meatloaf. Return to the oven briefly until the cheese is melted and bubbly.Look for The cheese should be completely melted and the bacon on top should look crispy.Tip Keep a close eye on the oven during the final melting stage to prevent the bacon from burning.
The cheese should be completely melted and bubbling across the top of the loaf, with the final sprinkle of bacon looking golden and crispy. The meatloaf should be hot and fragrant throughout.
Common mistakes
A common mistake is packing the meat mixture too tightly into the pan, which leads to a dense, rubbery texture. Handle the meat gently when shaping the loaf to maintain a light, airy structure. Another frequent error is failing to let the meatloaf rest for at least 10 minutes after removing it from the oven.
Resting allows the internal juices to redistribute throughout the meat, ensuring that every slice is moist and flavorful rather than dry. Do not rush the cooling process, as this is essential for the structure of the finished dish.
How to tell it’s done
The meatloaf is considered done when it reaches an internal temperature of 160 degrees Fahrenheit (71 degrees Celsius) at the thickest part. The texture should be firm but tender to the touch, and the exterior should be nicely glazed and caramelized.
When sliced, the loaf should hold its shape without falling apart, showing a consistent distribution of the bacon throughout the beef mixture. If the center still feels soft or pink, continue baking for a few more minutes until the internal temperature is verified with a thermometer.
- Ground meat: 160°F (71°C) in the thickest part
Up next · Part 3 of 3
2 variations · storage & make-ahead · 3 answers · printable card
Tips, FAQ & printable recipe (Part 3)← Back to the ingredients (Part 1)