Desserts · Part 2 of 3: Instructions
Layered Chocolate Peanut Butter Banana Trifle Step-by-step instructions
- Prep
- Cook
- Total
- Serves
- 6
Before you start
Ensure all components are prepared and chilled before beginning the assembly process. The chocolate pudding and peanut butter mousse should be completely set and cold, which helps them hold their shape when layered.
Have your glass bowl cleaned and dried thoroughly to ensure the banana slices stick properly.
Slice your bananas just before assembly to prevent browning, or toss them in a tiny splash of lemon juice if you prefer to prepare them slightly in advance. Having your ingredients measured and within reach makes the layering process quick and efficient.
Ingredients at a glance (7)
- 3 medium bananas, sliced
- 1 1/2 cups graham crackers, crushed
- 2 cups peanut butter mousse, prepared
- 2 cups chocolate pudding, prepared
- 1 cup whipped cream
- 2 tbsp chocolate syrup
- 1/4 cup peanuts, crushed
Instructions
Creating the banana wall
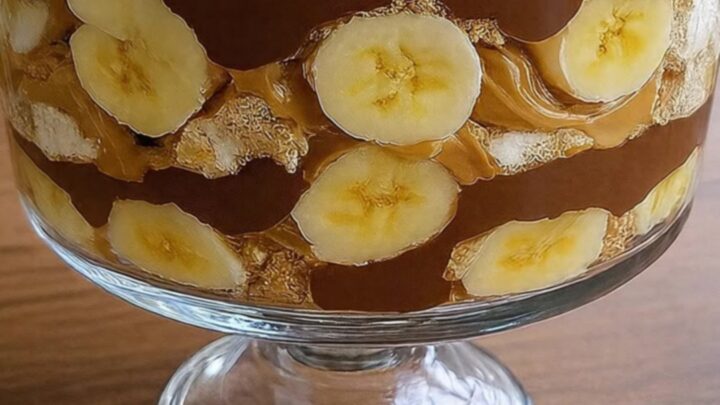
- Prepare the glass bowlArrange half of the sliced bananas against the inner walls of the footed glass bowl to create a decorative pattern. Press them firmly so they adhere to the glass surface.Look for The banana slices are evenly spaced and sticking to the glass.Tip Using slightly under-ripe bananas helps them stay in place better than very soft, over-ripe ones.
The banana slices should be pressed firmly against the glass, forming a clear, consistent pattern that encircles the bowl. Check that no slices are slipping or sliding down the sides before you proceed to add the first layer of ingredients.
Layering the mousse and pudding
- Layer the ingredientsAdd a layer of crushed graham crackers to the bottom of the bowl. Spoon the peanut butter mousse over the crackers, smoothing it out to the edges. Add a layer of chocolate pudding on top of the mousse, followed by the remaining banana slices.Look for The layers are distinct and clearly visible through the glass.Tip Use the back of a spoon to gently level each layer without mixing them together.
The layers should be visually distinct, with the graham crackers, mousse, pudding, and bananas forming crisp, even horizontal bands. Ensure the surface of each layer is relatively flat and reaches the edges of the glass for a polished look.
Applying the finishing touches
- Add the final toppingsTop the trifle with a generous layer of whipped cream. Drizzle the chocolate syrup over the surface in a zig-zag motion, then sprinkle with the crushed peanuts for added texture.Look for The whipped cream is fluffy and the chocolate drizzle is glossy.Tip Add the toppings just before serving to keep the whipped cream light and the peanuts crunchy.
The whipped cream should be mounded softly on top, with the chocolate syrup drizzled in an artistic pattern. The crushed peanuts should be evenly distributed, providing a final textural contrast that completes the presentation of the finished trifle.
Common mistakes
A common mistake is using warm or room-temperature pudding and mousse, which can cause the layers to bleed together and lose their visual impact. Another error is over-packing the layers, which makes it difficult to scoop the trifle without creating a mess.
Ensure that the whipped cream is whipped to stiff peaks so it remains stable on top of the trifle. Finally, avoid adding the final topping of peanuts too early, as they can soften if left in the refrigerator for extended periods before serving.
How to tell it’s done
This dessert does not require cooking in the traditional sense, but doneness is determined by the stability of the layers. The mousse and pudding should be thick enough that they do not slide or collapse when the trifle is moved.
When fully assembled and chilled, the trifle should appear firm and structured. A perfect trifle will hold its shape when a large spoon is plunged through to the bottom, pulling up a clean, multi-layered cross-section that includes every component from the base to the topping.
Up next · Part 3 of 3
2 variations · storage & make-ahead · 3 answers · printable card
Tips, FAQ & printable recipe (Part 3)← Back to the ingredients (Part 1)