Desserts · Part 2 of 3: Instructions
Layered Chocolate Marshmallow Dessert Step-by-step instructions
- Prep
- Cook
- Total
- Serves
- 8
Before you start
Before beginning assembly, clear a wide work area and gather all chilled components together on the counter. Make sure the glass casserole dish is completely clean and dry so the layers adhere cleanly to the sides.
If the chocolate cake was made ahead, trim it to fit the exact dimensions of the dish so it sits completely flat when layered.
Check that the chocolate ganache is slightly warm and pourable, yet not hot enough to melt the fluffy white cream or dissolve the delicate marshmallows upon contact.
Ingredients at a glance (6)
- 2 cups crumb crust, store-bought or made ahead
- 2 cups chocolate pudding, store-bought or made ahead
- 1 1/2 cups fluffy white cream
- 1 layer chocolate cake, store-bought or made ahead
- 2 cups marshmallows
- 1/3 cup chocolate ganache
Instructions
Crumb Foundation
- Press the crumb crustTransfer the crumb crust mixture into the bottom of an 8x8 inch glass casserole dish. Press the crumbs down firmly and evenly into a flat, compact bottom foundation across the entire surface of the dish.Look for The crumbs should form an even, flat layer that holds together firmly.Tip Use the flat bottom of a cup or spatula to compact the base evenly.
The crumb crust should be completely flat, tightly packed, and level across the entire bottom of the glass dish. Running the back of a flat measuring tool over the crumbs should reveal a uniform, solid surface without any loose patches, loose crumb piles, or gaps along the dish corners.
Internal Layer Assembly
- Layer the pudding, cream, and cakeSpoon the chocolate pudding over the crumb crust and smooth into a level layer. Spread a portion of the fluffy white cream over the pudding. Gently place the chocolate cake layer on top, then spread the remaining glossy cream smoothly across the surface to seal the edges.Look for Each layer should remain cleanly separated without mixing into the one beneath it.Tip Wipe the edges of the dish with a clean paper towel to maintain visible layers through the glass.
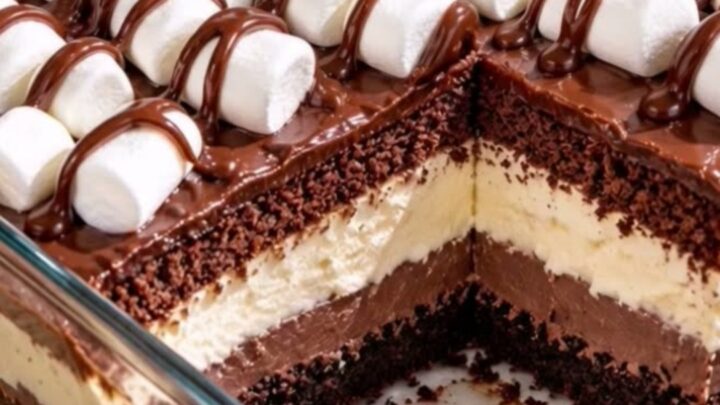
The chocolate pudding and initial cream layer should sit in distinct, level tiers directly beneath the chocolate cake. The top surface of the glossy cream should be smoothed out flat to the very edges of the glass, creating a secure, pristine bed ready to receive the marshmallow topping.
Topping and Chilling
- Top with marshmallows and ganacheArrange the marshmallows neatly in rows over the glossy cream layer. Drizzle the chocolate ganache generously over the puffy marshmallows. Chill the assembled dessert in the refrigerator for at least one hour until the layers are set and firm enough to slice cleanly.Look for The ganache forms glossy, neat ribbons across the marshmallow topping and the dish feels firm when chilled.Tip Warm the ganache slightly if it is too thick to drizzle in thin ribbons.
The marshmallows should cover the surface in an orderly, dense blanket, coated with glossy ribbons of chocolate ganache. After an hour in the refrigerator, the cream feels set to a gentle touch, the ganache is set yet shiny, and the dish shows clean horizontal lines through the glass walls.
Common mistakes
The most frequent error is rushing the assembly while components are too warm, which causes the fluffy white cream to liquefy and blend indiscriminately with the chocolate pudding.
Another pitfall is pressing the initial crumb crust too loosely, which leads to a powdery crumble that remains in the pan when serving. Finally, skipping the refrigeration period results in slices collapsing into an unstructured puddle rather than holding their distinct, beautiful edges.
How to tell it’s done
The dessert is fully ready when chilled thoroughly so the pudding and cream layers have set firmly into cohesive bands. A clean spatula inserted along the edge should lift a portion cleanly without the pudding running or the cake sliding off the base.
There is no raw meat or poultry involved, so doneness relies strictly on firmness, temperature, and visual separation of the cross-section.
Up next · Part 3 of 3
2 variations · storage & make-ahead · 3 answers · printable card
Tips, FAQ & printable recipe (Part 3)← Back to the ingredients (Part 1)