Dinner · Part 2 of 3: Instructions
Korean Corn Cheese Mac and Cheese with Torched Mozzarella Step-by-step instructions
- Prep
- Cook
- Total
- Serves
- 6
Before you start
Before starting, bring a large pot of salted water to a boil for the pasta. Shred the cheddar and mozzarella if not pre-shredded. Mince the garlic and dice the red bell pepper.
Have all ingredients measured and ready, as the cooking moves quickly. If using a blowtorch, make sure it is filled and ready. If using the broiler, position an oven rack about 6 inches from the heat source and preheat the broiler.
Ingredients at a glance (11)
- 300 g sweet yellow corn kernels (fresh or frozen, thawed)
- 45 g butter
- 60 g Kewpie Japanese mayonnaise
- 1 tbsp sugar
- 3 cloves garlic, minced
- 1 red bell pepper, diced
- 350 g elbow macaroni
- 150 g cheddar cheese, shredded
- 250 g low-moisture mozzarella, shredded
- Sliced scallions, for serving
- Red chili powder, for serving
Instructions
Sauté the corn and boil the pasta
- Sauté the corn mixtureHeat a large cast-iron skillet over medium heat. Add the butter and let it melt until foaming. Add the sweet corn kernels, Kewpie mayonnaise, sugar, minced garlic, and diced red bell pepper. Stir to coat everything evenly. Cook for 4 to 5 minutes, stirring occasionally, until the corn is tender and the mixture is fragrant and slightly golden at the edges.Look for The corn turns bright yellow and the butter and mayo create a glossy, sizzling coating.Tip Use frozen corn straight from the bag; no need to thaw first. Fresh corn works too—cut kernels from 3 to 4 ears.
- Boil the macaroniWhile the corn cooks, bring a large pot of salted water to a rolling boil. Add the elbow macaroni and cook according to package directions until just al dente, about 7 to 8 minutes. Drain well in a colander. Do not rinse; the residual starch helps the cheese sauce cling.Look for The pasta is tender but still has a slight bite in the center.Tip Salt the pasta water generously—it should taste like the sea. This is the only chance to season the pasta itself.
The corn mixture should be glossy and fragrant, with the butter and mayo coating each kernel. The garlic and bell pepper will have softened, and the corn will be tender with slightly golden edges.
The pasta should be al dente, with a slight bite. The skillet should be sizzling gently, and the aromas of butter, garlic, and sweet corn will fill the kitchen.
Combine and melt the cheeses
- Fold in cheddar and pastaReduce the heat under the skillet to low. Add the drained macaroni and the shredded cheddar cheese to the corn mixture. Stir gently with a wooden spoon until the cheddar melts and coats every piece of pasta and corn. The mixture should be thick, creamy, and uniform.Look for The cheddar melts into a smooth, golden sauce that clings to the pasta and corn.Tip Keep the heat low to avoid breaking the sauce. Stir continuously for a silky texture.
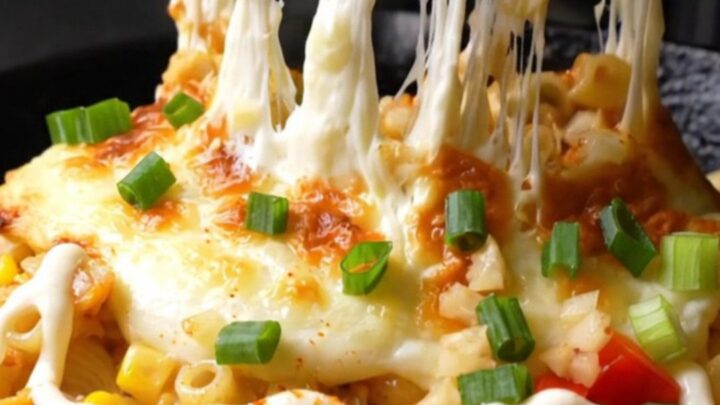
- Top with mozzarella and torchSpread the mac and cheese evenly in the skillet. Sprinkle the low-moisture mozzarella evenly over the top. Use a kitchen blowtorch to torch the mozzarella until it is blistered and golden brown in spots, about 2 to 3 minutes. Alternatively, place the skillet under a broiler for 2 to 4 minutes until the cheese is bubbly and charred.Look for The mozzarella melts, bubbles, and develops dark blistered spots with a nutty aroma.Tip If using a broiler, watch closely—it can go from golden to burnt in seconds. Torching gives more control and a deeper char.
The cheddar will melt into a smooth, golden sauce that clings to the pasta and corn. The mixture should be thick and creamy, with no dry spots. The mozzarella on top should be piled evenly, and the skillet should be hot enough to start melting it. The texture should be cohesive, with the pasta and corn evenly distributed.
Torch, garnish, and serve
- Garnish and serve hotRemove the skillet from the heat. Sprinkle the sliced scallions and red chili powder over the top. Serve immediately while the cheese is molten and stretchy. Use a large spoon to lift a portion and enjoy the long cheese pull.Look for The top is blistered and golden, with bright green scallions and red chili flakes for contrast.Tip Serve straight from the skillet for maximum drama and warmth. The cheese will set as it cools, so eat right away.
The mozzarella should be blistered and golden brown in spots, with a smoky, nutty aroma. The scallions and chili powder add a fresh, bright contrast. When you lift a spoonful, the cheese should stretch dramatically. The dish should be served hot, straight from the skillet, with the cheese pull visible and the top bubbly and charred.
Common mistakes
A common mistake is overcooking the pasta, which makes it mushy. Cook it just to al dente, as it will continue to cook slightly when folded into the hot corn mixture.
Another mistake is using fresh mozzarella, which releases water and makes the dish soggy. Stick with low-moisture mozzarella. Finally, do not skip the torching or broiling—that blistered top is what gives the dish its signature smoky flavor.
How to tell it’s done
The dish is done when the macaroni is tender, the cheddar is fully melted and coats the pasta, and the mozzarella on top is blistered and golden brown.
The internal temperature of the cheese should be at least 165°F (74°C) if you want to be precise, but the visual cues—bubbling, browning, and a stretchy pull—are the best indicators. Serve immediately while the cheese is molten.
Up next · Part 3 of 3
4 variations · storage & make-ahead · 5 answers · printable card
Tips, FAQ & printable recipe (Part 3)← Back to the ingredients (Part 1)