Dinner · Part 2 of 3: Instructions
Korean Bulgogi Smash Tacos with Kimchi Mayo in 25 Minutes Step-by-step instructions
- Prep
- Cook
- Total
- Serves
- 4
Before you start
Set the whole station up before the griddle gets hot, because once the beef hits the iron, this recipe moves fast. Grate the mozzarella and keep it near the stove.
Chop the kimchi, press it between paper towels, and divide it: some for the mayo, some for the topping. Slice the scallions, toast the sesame seeds in a dry skillet, and stir the mayo, sriracha, and kimchi together, then park the sauce in the refrigerator.
Ingredients at a glance (12)
- 1 lb ground beef (ribeye)
- 3 tbsp soy sauce
- 2 tbsp brown sugar, packed
- 1 tbsp toasted sesame oil, plus more for the griddle
- 1 tbsp grated fresh ginger
- 4 cloves garlic, minced
- 4 small flour tortillas (8-inch)
- 2 oz mozzarella, shredded (about 1/2 oz per taco)
- 1/2 cup kimchi sriracha mayo, chilled
- 2 tbsp chopped kimchi, squeezed dry, per taco
- 2 scallions, thinly sliced
- Toasted sesame seeds, for serving
Instructions
Phase 1: Sauce, Season, and Shape
- Chill the kimchi mayoStir the kimchi sriracha mayo until smooth and streaky, then park it in the refrigerator while the beef is seasoned. A cold drizzle against the hot taco is exactly what makes the contrast work, and a chilled sauce stays thick enough to hold its zigzag shape on top of the crust instead of melting into a greasy sheen.Look for The sauce should look uniformly pink-orange with visible kimchi flecks and no watery pooling at the bottom of the bowl.Tip If making the mayo from scratch, blot the kimchi dry first so the sauce stays thick and the drizzle holds its shape.
- Season the ground beefIn a bowl, combine the ground beef, soy sauce, brown sugar, sesame oil, grated ginger, and minced garlic. Mix with your hands just until the seasoning is evenly distributed, about 30 seconds; overworking makes the beef bouncy. Cover and refrigerate for 10 minutes so the meat firms up and absorbs the marinade.Look for The meat should smell sweet and garlicky, glisten with the marinade, and look evenly darkened with no dry pockets.Tip Keep the beef cold right up until it hits the griddle; colder fat smears less and crusts better.
- Press the beef onto the tortillasDivide the seasoned beef into 4 equal portions. Spread one portion in a thin, even layer over each flour tortilla, pushing it all the way to the edges so every bite carries crust. A thin layer is the whole point: meat-to-tortilla contact is what builds the smash-taco crust.Look for The beef layer should be about 1/4 inch thick, with no tortilla peeking through and no thick lumpy spots.Tip Wet your fingers lightly to press the sticky beef flat without it clinging to your hands.
By the end of this phase, three things are true. The kimchi mayo is chilled, thick, and streaked pink with kimchi flecks and sriracha. The seasoned beef smells intensely of garlic, ginger, and sweet soy, glistens with marinade, and has firmed up in the refrigerator for ten minutes.
And each tortilla carries a thin, even, edge-to-edge layer of beef about 1/4 inch thick, with no bare tortilla showing and no thick lumps that would steam instead of sear.
Phase 2: Smash, Sear, and Melt
- Heat the griddle to 425°FSet a cast-iron griddle or large skillet over medium-high heat and let it come to 425°F (218°C), checked with a surface thermometer. Brush on a thin film of sesame oil. A properly hot surface is non-negotiable: the sugars in the marinade need fierce heat to caramelize instead of steaming the meat gray.Look for The oil should shimmer and flow loosely, and a pinch of beef dropped on the surface should sizzle hard on contact.Tip If the oil starts smoking heavily, pull the pan off the heat for 30 seconds; dark smoke means bitter crust.
- Smash the tacos meat-side downLay two tortillas beef-side down on the hot griddle, then press firmly with a metal spatula for about 10 seconds to force full contact. Cook undisturbed for 2 minutes. Do not move them; the dark mahogany crust forms only where the beef sits still against the hot iron.Look for Listen for a steady aggressive sizzle, and look for the edges of the beef turning deep brown and lacy.Tip Cook in batches of two so the surface temperature does not drop and the crust stays crisp.
- Flip and melt the mozzarellaFlip each taco so the beef faces up, and scatter mozzarella over the hot crust. Cook 1 to 2 minutes more, until the cheese is fully melted and an instant-read thermometer in the thickest patch of beef reads at least 160°F (71°C), the safe temperature for ground meat. Transfer to a board and repeat with the remaining two tacos.Look for The cheese should slump and gloss over the crust, and the second side of the tortilla should show light golden spotting.Safe temperature 160°F (71°C) internal temperature (ground meat)Tip Cover the pan for the last 30 seconds to trap steam and help the cheese melt evenly over the crust.
This is the phase that makes or breaks the taco, and the signs are unmistakable. During the two-minute sear, the griddle should sizzle hard and steadily — a quiet pan means the heat dropped — and the edges of the beef turn lacy and deep brown.
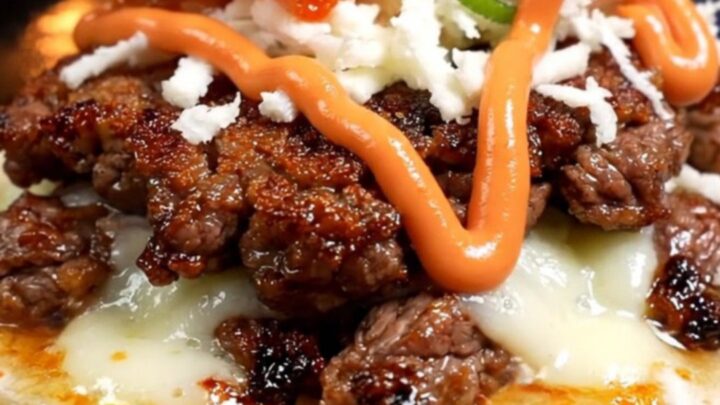
After the flip, the crust side should be mahogany and crackly, welding the meat to the tortilla, while the mozzarella slumps into a glossy blanket over the top.
Phase 3: Top, Drizzle, and Serve
- Pile on the kimchiWhile the cheese is still soft, spoon about 2 tbsp of chopped kimchi down the center of each taco. The residual heat takes the raw edge off the cabbage and wakes up its tang, and the crunchy pieces keep the rich, cheesy beef from feeling heavy.Look for The kimchi should sit in a bright red line down the middle, contrasting with the dark beef and pale cheese.Tip Chop the kimchi into small pieces so every bite gets some without pulling the filling out of the taco.
- Add scallions and sesame seedsScatter sliced scallions and a generous pinch of toasted sesame seeds over the kimchi. The scallions bring a fresh, sharp snap against the caramelized beef, and the seeds add a nutty toastiness that echoes the sesame oil in the marinade.Look for The toppings should look evenly scattered, with green scallion rings visible across the whole surface.Tip Toast the sesame seeds in a dry skillet for 1 minute until fragrant; raw seeds taste flat next to the hot beef.
- Drizzle the kimchi mayo and serveZigzag the chilled kimchi sriracha mayo over each taco, letting it fall in thin ribbons so it pools into the kimchi and crust rather than smothering the top. Serve immediately, straight from the board, while the crust is still audibly crisp and the cheese is glossy and warm.Look for The sauce ribbons should hold their zigzag shape for a few seconds before slowly relaxing into the toppings.Tip Serve with extra kimchi mayo on the side; the second half of each taco always deserves another drizzle.
The final phase is assembly at speed, and the checkpoint is textural. The kimchi should sit in a bright red, crunchy line down the center of each still-warm taco, its raw edge mellowed by the residual heat. Scallion rings and sesame seeds should be scattered evenly, visible against the dark beef.
Common mistakes
The most common failure is a griddle that is not hot enough, which steams the beef gray and leaves the sugars syrupy instead of caramelized — always wait for a true 425°F. The second is fussing: moving or flipping the taco early tears the crust away from the tortilla, so let it sit the full two minutes. Third, over-mixing the seasoned beef turns it tight and bouncy; stir only until combined.
How to tell it’s done
A finished bulgogi smash taco shows three doneness signals at once. The beef crust is dark mahogany with lacy, caramelized edges — deep brown, never black — and it crackles when tapped with a spatula. The tortilla has golden, toasted spotting on both sides and holds its shape when lifted without folding.
The cheese is fully melted and glossy, hugging the crust. The decisive check is internal: ground beef must reach 160°F (71°C) at its thickest point, measured with an instant-read thermometer at the flip-and-cheese stage.
- Ground meat: 160°F (71°C) in the thickest part
Up next · Part 3 of 3
4 variations · storage & make-ahead · 5 answers · printable card
Tips, FAQ & printable recipe (Part 3)← Back to the ingredients (Part 1)