Dinner · Part 2 of 3: Instructions
Juicy Mini Meatloaves with Caramelized Glaze Step-by-step instructions
- Prep
- Cook
- Total
- Serves
- 6
Before you start
Before beginning, ensure all ingredients are at room temperature to promote even cooking. Preheat the oven to 375°F (190°C) and prepare a large baking sheet with parchment paper to prevent sticking. Gather a mixing bowl, a pastry brush, and a meat thermometer.
Having everything ready at the start allows for a smooth assembly process, ensuring the meat mixture remains chilled until it is ready to be shaped and placed into the hot oven for the best results.
Ingredients at a glance (2)
- 1.5 lb ground beef
- 1/2 cup caramelized glaze, store-bought or made ahead
Instructions
Shaping the loaves
- Shape the meat loavesDivide the ground beef into six equal portions. Shape each portion into a small, uniform loaf and place them onto a baking sheet, ensuring they are spaced evenly for consistent cooking.Look for The loaves should hold their shape firmly on the pan.Tip Keep the loaves uniform in size to ensure they cook evenly in the oven.
The ground beef should be shaped into uniform, oval portions on the baking sheet. Ensure there is enough space between each loaf to allow hot air to circulate, which is critical for achieving a consistent crust on all sides of the mini meatloaves.
Glazing and baking
- Glaze and bakeUse a pastry brush to coat the top of each mini meatloaf generously with the caramelized glaze. Place the baking sheet in a preheated oven at 375°F (190°C) and bake for 25 minutes until the internal temperature reaches 160°F (71°C).Look for The glaze should be bubbling and slightly darkened on the edges of the loaves.Safe temperature 160°F (71°C) internal temperature (ground meat)Tip Ensure the thermometer is inserted into the center of the thickest loaf for an accurate reading.
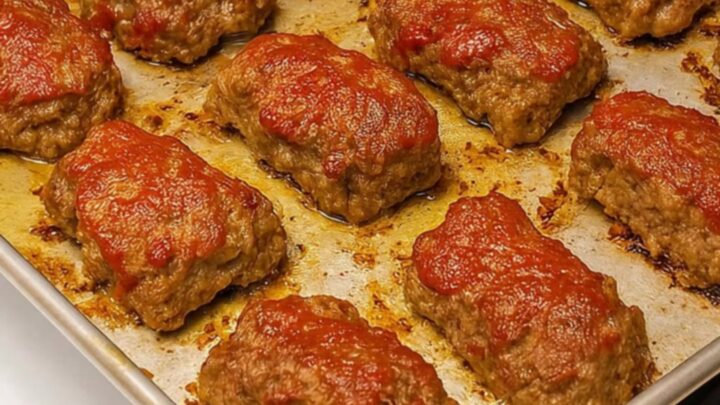
The glaze should be applied in an even layer across the top and sides of each loaf. As they bake, the kitchen will fill with the savory aroma of roasting beef and toasted sugars. The glaze will begin to thicken and darken, signaling that the sugars are caramelizing and creating that signature sweet and savory finish.
Resting for texture
- Rest and serveRemove the baking sheet from the oven and allow the mini meatloaves to rest for 5 minutes before serving. This rest period allows the juices to redistribute throughout the meat, ensuring every bite remains succulent and flavorful. Serve warm directly from the pan.Look for The loaves should be firm to the touch and the glaze should be set.Tip Resting is essential for maintaining the moisture content of the ground meat.
After removal from the oven, the meatloaves should look glossy and firm. The resting period is the final check for quality, allowing the surface temperature to stabilize and the interior moisture to redistribute.
Once the five-minute rest is complete, the loaves are ready to be transferred to plates and served while still warm and steaming.
Common mistakes
A common mistake is overworking the meat mixture, which results in a tough, rubbery texture instead of the desired tender crumb. Mix only until the ingredients are evenly incorporated.
Another frequent error is failing to allow the meatloaves to rest; skipping this step causes the juices to run out immediately upon slicing, leaving the meat dry. Finally, ensure the oven is fully preheated before placing the pan inside, as a cool oven prevents the glaze from properly caramelizing.
How to tell it’s done
The mini meatloaves are fully cooked when they reach an internal temperature of 160°F (71°C) as measured by a meat thermometer inserted into the center of the largest loaf. Visually, the glaze should appear dark, glossy, and slightly bubbling around the base of the meat.
The meat should feel firm to the touch and hold its shape perfectly when lifted with a spatula, indicating that the proteins have set and the internal juices are trapped inside.
- Ground meat: 160°F (71°C) in the thickest part
Up next · Part 3 of 3
2 variations · storage & make-ahead · 3 answers · printable card
Tips, FAQ & printable recipe (Part 3)← Back to the ingredients (Part 1)