Dinner · Part 2 of 3: Instructions
Japanese Wagyu Smash Burger with Wasabi Aioli Step-by-step instructions
- Prep
- Cook
- Total
- Serves
- 1
Before you start
Before you start, make sure the ground Wagyu is chilled and portioned into two 100-gram balls. Have all your ingredients measured and ready: the aioli ingredients in a small bowl, the cheese slices, the caramelized onion, and the brioche bun halved.
Preheat your cast iron griddle or heavy skillet over high heat for at least 5 minutes so it's thoroughly hot. Toast the brioche bun just before assembling. This is a fast-cooking recipe, so having everything within reach is essential for success.
Ingredients at a glance (10)
- 2 ground Wagyu beef balls (100 g each)
- salt to taste
- black pepper to taste
- 2 slices aged cheddar cheese
- 1 caramelized onion
- 1 brioche bun, toasted
- 3 tbsp Kewpie mayonnaise
- 1 tsp wasabi paste
- 1 tsp soy sauce
- 1 tsp furikake seasoning
Instructions
Prepare the Aioli and Bun
- Make the Wasabi AioliIn a small ramekin, combine the Kewpie mayonnaise, wasabi paste, soy sauce, and furikake seasoning. Whisk until the mixture is smooth and pale green. Set aside in the refrigerator while preparing the patties.Look for The aioli is creamy and evenly pale green with flecks of furikake.Tip For a spicier kick, add a little extra wasabi paste, but start with the listed amount.
- Toast the Brioche BunSlice the brioche bun in half. Toast the cut sides in a dry skillet over medium heat or in a toaster oven until golden and crisp. Set aside.Look for The bun is golden brown and crisp on the cut sides.Tip Toasting adds texture and helps the bun hold up to the juicy patties.
The aioli is smooth and pale green, with a balanced flavor of mayo, wasabi, and soy. The brioche bun is toasted to a golden brown, with crisp edges and a soft interior. Everything is ready for the cooking phase.
Sear and Stack the Patties
- Heat the GriddlePlace a cast iron griddle or heavy skillet over high heat. Let it get screaming hot—this is essential for a good sear. No oil is needed if the pan is well-seasoned, but a light brush of neutral oil can be used if desired.Look for The pan is smoking hot; a drop of water dances and evaporates instantly.Tip A heavy pan retains heat better, giving you those crispy lacy edges.
- Smash the Wagyu PattiesPlace the two chilled Wagyu beef balls on the hot griddle, spacing them apart. Immediately press each ball down with a heavy steel press or a flat spatula, flattening them into thin patties. Season generously with salt and black pepper.Look for The patties are paper-thin with ragged edges that begin to crisp.Safe temperature 160°F (71°C) internal temperature (ground meat)Tip Press firmly and quickly to get maximum browning and craggy edges.
- Sear the PattiesCook the patties without moving them for about 2 minutes, until the edges are deeply browned and crispy. The high heat creates a rich crust while the interior stays juicy.Look for The edges are dark brown and lacy; the patties sizzle vigorously.Safe temperature 160°F (71°C) internal temperature (ground meat)Tip Resist the urge to move the patties; the crust needs contact with the hot surface.
- Flip and Add CheeseCarefully flip each patty with a spatula. Immediately place one slice of aged cheddar cheese on each patty. The cheese will melt over the hot surface.Look for The cheese begins to melt and bubble over the patties.Safe temperature 160°F (71°C) internal temperature (ground meat)Tip Use a thin spatula to flip without breaking the delicate crust.
- Stack the PattiesTop one of the patties with the caramelized onion. Then place the other patty (cheese side up) on top to create a double-decker stack. Press down gently to meld the layers together.Look for The cheese from the top patty drapes over the onion and bottom patty.Safe temperature 160°F (71°C) internal temperature (ground meat)Tip Stacking while still on the griddle helps the cheese fuse the patties.
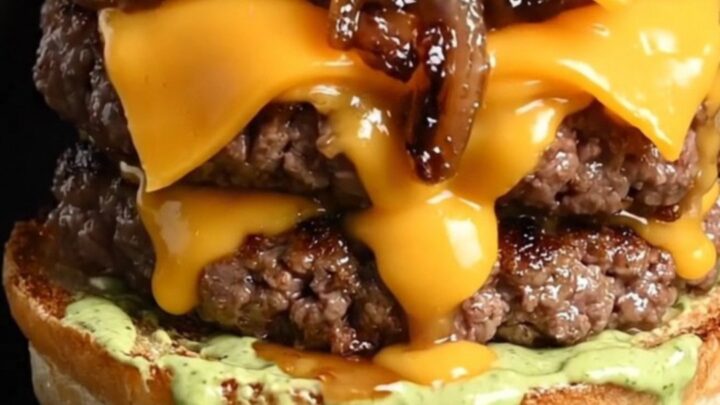
The patties are seared with deep brown, crispy edges and a juicy interior. The cheese is melted and draping over the edges, and the caramelized onions are piled high. The stack is tall and tempting.
Assemble and Serve
- Assemble the BurgerSpread a generous amount of wasabi aioli on the bottom half of the toasted brioche bun. Place the stacked patties with melted cheese and onions on top. Spread more aioli on the top half of the bun and place it over the patties.Look for The burger is tall, with melted cheese and aioli peeking out.Tip Slather both bun halves to ensure every bite has the zesty aioli.
- Squeeze and ServePress down gently on the top bun to slightly compress the burger. This allows the juices and melted cheese to mingle. Serve immediately while hot and crispy.Look for Juices and cheese drip out as the burger is pressed.Tip Serve right away to enjoy the crisp edges and molten cheese.
The burger is assembled on the toasted bun with a generous spread of wasabi aioli. When pressed, juices and cheese drip out. The burger is hot, crispy, and ready to eat.
Common mistakes
A common mistake is using a pan that isn't hot enough, resulting in patties that steam instead of sear.
Make sure the griddle is smoking hot before adding the beef. Another mistake is pressing the patties too gently or too slowly, which can cause them to fall apart.
Use firm, quick pressure. Avoid moving the patties once they're in the pan—let the crust develop. Finally, don't overload the burger with too much aioli; the balance of flavors is key.
How to tell it’s done
The patties are done when they reach an internal temperature of 160°F (71°C) as measured with an instant-read thermometer inserted into the center of a patty. The edges should be deeply browned and crispy, and the cheese should be fully melted.
Because the patties are thin, they cook quickly—about 2 minutes per side. The burger is best served immediately, while the crust is crisp and the cheese is molten.
- Ground meat: 160°F (71°C) in the thickest part
- Steaks, chops and roasts: 145°F (63°C) in the thickest part, then a 3-minute rest
Up next · Part 3 of 3
4 variations · storage & make-ahead · 5 answers · printable card
Tips, FAQ & printable recipe (Part 3)← Back to the ingredients (Part 1)