Dinner · Part 2 of 3: Instructions
Jalapeño Lime Hickory BBQ Chicken Drumsticks Step-by-step instructions
- Prep
- Cook
- Total
- Serves
- 4
Before you start
Before starting, measure all ingredients and have them ready. Drain the pineapple tidbits if using canned, and slice the jalapeños into rings (remove seeds for less heat). Pat the chicken drumsticks dry with paper towels. If you plan to serve over rice, start your rice cooker or pot of jasmine rice before assembling the slow cooker, so everything is ready at the same time. No other prep is needed—just layer, cover, and cook.
Ingredients at a glance (4)
- 8 chicken drumsticks
- 1 cup pineapple tidbits, drained
- 1/2 cup fresh jalapeño rings
- 1 1/2 cups hickory brown-sugar BBQ sauce
Instructions
Layer and Set
- Arrange the ChickenPlace the chicken drumsticks in the slow cooker, arranging them in a single layer as much as possible. If they overlap, that's fine, but try to keep them in a circle so they cook evenly.Look for The drumsticks should fit snugly in the bottom of the slow cooker.Tip Pat the drumsticks dry with paper towels before adding to help the sauce cling better.
- Add the Pineapple and JalapeñosScatter the pineapple tidbits and jalapeño rings evenly over the chicken. No need to stir; just let them sit on top so they can release their juices as they cook.Look for The pineapple and jalapeños should cover the chicken in a colorful layer.Tip For less heat, remove the seeds from the jalapeños before slicing.
- Pour Over the BBQ SaucePour the hickory BBQ sauce over the chicken and fruit, using a spatula to scrape every bit from the bottle. Spread it into an even coating, but don't stir—just let it settle.Look for The sauce should coat the top of the chicken and fruit, with some pooling at the bottom.Tip If the sauce is very thick, you can add 2 tablespoons of water to help it spread.
After the first phase, the slow cooker contains raw chicken drumsticks arranged in a single layer, topped with pineapple tidbits and fresh jalapeño rings, and covered with a thick layer of hickory BBQ sauce.
The ingredients are not stirred, creating distinct layers that will meld during cooking. The sauce should be evenly spread over the top, with some settling between the chicken pieces. The slow cooker is ready to be turned on.
Slow Cook
- Slow Cook on LowCover the slow cooker and cook on low for 4 hours. Resist the urge to lift the lid during cooking—each peek lets out heat and adds time.Look for After 4 hours, the chicken should be tender and easily pierced with a fork.Safe temperature 165°F (74°C) internal temperature (poultry)Tip If your slow cooker runs hot, check at 3 1/2 hours to avoid overcooking.
- Check for DonenessUsing tongs, lift one drumstick and check that the meat is pulling away from the bone and the internal temperature reads at least 165°F (74°C). If not, continue cooking for 30 more minutes.Look for The meat should be tender and nearly falling off the bone.Safe temperature 165°F (74°C) internal temperature (poultry)Tip An instant-read thermometer is the most reliable way to check.
During the slow cooking phase, the slow cooker will gradually heat up, and after a few hours, you'll notice the sauce beginning to bubble gently around the edges. The aroma of smoky BBQ and sweet pineapple will fill the kitchen.
When you lift the lid after 4 hours, the sauce should be bubbling and slightly thickened, the chicken should look glazed and caramelized, and the jalapeños will have softened. The chicken should be fork-tender and easily pull away from the bone.
Serve and Enjoy
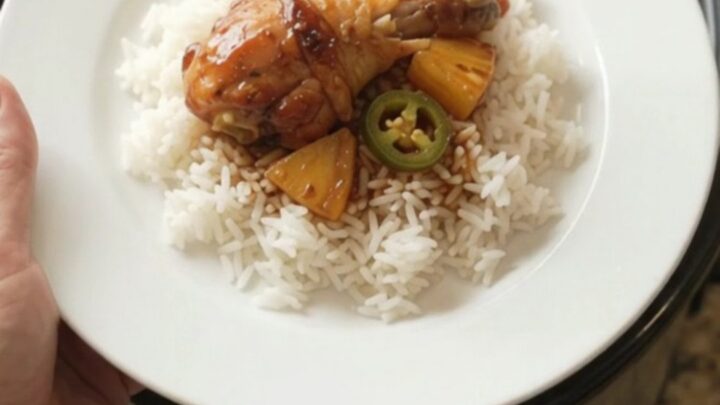
- Serve Over RiceSpoon steamed jasmine rice onto a plate, then use a slotted spoon to lift the chicken drumsticks out of the slow cooker and place them on the rice. Spoon extra sauce, pineapple, and jalapeños over the top.Look for The chicken should be glistening with sauce and the pineapple caramelized.Tip For a low-carb option, serve over cauliflower rice or with a side salad.
At the end of the final phase, the chicken is plated over steamed jasmine rice, with extra sauce, pineapple, and jalapeños spooned on top. The drumsticks should be glossy and sticky, with the meat falling off the bone. The sauce should be thick and clinging, with a deep mahogany color. The dish looks and smells irresistible—sweet, smoky, and slightly spicy. Serve immediately while hot.
Common mistakes
One common mistake is lifting the lid too often to check on the chicken. Every time the lid is removed, heat escapes and extends the cooking time. Another is using a BBQ sauce that is too thin or watery, which can result in a bland, runny sauce.
Look for a thick, molasses-based sauce. Also, avoid overcooking, as the chicken can become mushy if left for too long—check for doneness at the minimum time. Finally, don't skip draining the pineapple; excess liquid can dilute the sauce.
How to tell it’s done
The chicken is done when the internal temperature reaches at least 165°F (74°C) in the thickest part of the meat, away from the bone. The meat should be very tender and easily pull away from the bone with a fork.
If the drumsticks are still pink near the bone or the meat resists, continue cooking for 30-minute intervals until done. The sauce should be thickened and glossy, with the pineapple and jalapeños softened and caramelized.
- Poultry: 165°F (74°C) in the thickest part
Up next · Part 3 of 3
4 variations · storage & make-ahead · 5 answers · printable card
Tips, FAQ & printable recipe (Part 3)← Back to the ingredients (Part 1)