Desserts · Part 2 of 3: Instructions
Incredible Molten Nutella Center Truffles Step-by-step instructions
- Prep
- Cook
- Total
- Serves
- 12
Before you start
Before starting, clear space in your freezer for a baking tray. Line a tray with parchment paper. Measure out the chocolate hazelnut spread, and spoon 12 rounded teaspoons onto the tray. Freeze for 30 minutes. Meanwhile, crush the biscuits in a food processor until fine.
In a mixing bowl, combine the crumbs with labneh and cocoa powder, kneading until a smooth dough forms. Have all your ingredients and equipment ready before you begin assembly, as you’ll need to work quickly once the Nutella is frozen.
Ingredients at a glance (6)
- 12 tsp chocolate hazelnut spread (Nutella)
- 1 packet Petit Beurre tea biscuits
- 5 tbsp labneh cream cheese
- 2 tbsp cocoa powder
- 160 g milk chocolate
- 1/2 cup finely chopped roasted hazelnuts
Instructions
Freeze and Mix
- Freeze the Nutella CoresLine a small baking tray with parchment paper. Spoon 12 rounded teaspoons of chocolate hazelnut spread onto the tray, spacing them apart. Place the tray in the freezer for 30 minutes until the mounds are rock solid.Look for The Nutella mounds should be completely firm to the touch and hold their shape when pressed.Tip Use a cookie scoop for evenly sized cores, which helps the truffles look uniform.
- Make the Cocoa Biscuit DoughWhile the Nutella freezes, finely crush the Petit Beurre biscuits in a food processor until they resemble sand. Transfer the crumbs to a mixing bowl. Add the labneh cream cheese and cocoa powder, then knead everything together until a pliable, smooth dough forms.Look for The dough should come together into a cohesive ball without cracking when pressed.Tip If the dough feels too sticky, chill it for 10 minutes; if too dry, add a teaspoon of labneh.
After this phase, the Nutella mounds should be solid and hold their shape when touched. The biscuit dough should be smooth and pliable, without cracks. It should not stick to your hands; if it does, chill it briefly. The dough should have a rich cocoa aroma and a slightly sweet, buttery scent from the biscuits. The texture should be firm but workable, similar to a playdough. If the dough is too dry, add a teaspoon of labneh; if too sticky, dust with cocoa powder.
Shape and Coat
- Wrap the Dough Around the Frozen CoresTake a portion of dough (about 1 tablespoon) and flatten it into a disc in your palm. Place a frozen Nutella core in the center, then wrap the dough around it, sealing the edges completely. Roll between your palms to form a smooth sphere. Repeat with all cores.Look for Each ball should be perfectly round with no cracks; the dough should fully enclose the Nutella.Tip Work quickly to keep the Nutella frozen; if the dough softens, return the balls to the freezer for a few minutes.
- Melt the Chocolate and Add HazelnutsMelt the milk chocolate in a heatproof bowl set over a pan of simmering water, or in the microwave in 20-second bursts, stirring until smooth. Stir in the finely chopped roasted hazelnuts until well combined.Look for The chocolate should be glossy and fluid, with the hazelnuts evenly distributed.Tip Do not overheat the chocolate; it should be warm but not hot to avoid melting the dough.
- Dip the Truffles in the Rocher CoatingUsing a fork, dip each chilled truffle ball into the chocolate-hazelnut mixture, turning to coat completely. Lift it out, letting any excess chocolate drip off, then place it on a parchment-lined tray. Repeat with all truffles.Look for Each truffle should be evenly coated with a textured, crunchy shell.Tip Tap the fork gently on the bowl edge to remove excess chocolate and avoid thick pools at the base.
The truffle balls should be perfectly round and smooth, with no visible cracks or exposed Nutella. The chocolate coating should be evenly applied, with a crunchy, textured appearance from the hazelnuts. The truffles should look glossy and appetizing, with no bare spots.
When lifted on the fork, the chocolate should drip off easily, leaving a thin, even layer. The coated truffles should be placed on parchment paper without sticking. The kitchen should smell of warm chocolate and toasted nuts.
Chill and Reveal
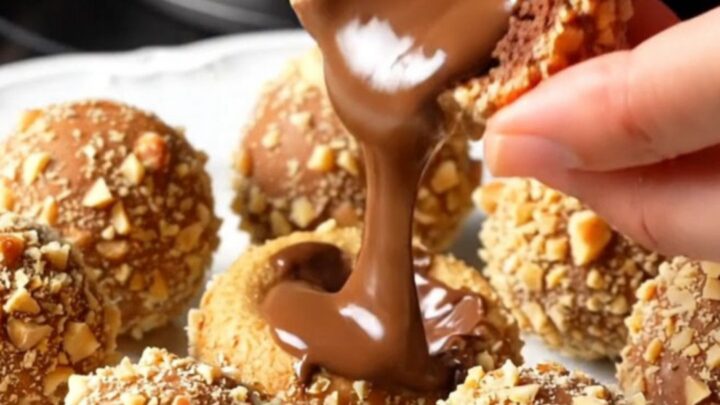
- Chill and Slice to Reveal the Molten CenterRefrigerate the coated truffles for 10 minutes to set the chocolate shell. To serve, slice one truffle in half with a sharp knife to reveal the crisp hazelnut shell, chewy cocoa biscuit ring, and molten Nutella lava core. Enjoy immediately.Look for The shell is firm but gives way to a soft, flowing Nutella center when sliced.Tip Use a thin, sharp knife and slice gently to keep the truffle intact while showing the molten core.
After the final chill, the chocolate shell should be firm and set, with a slight sheen. When sliced, the truffle should reveal a distinct ring of cocoa biscuit dough surrounding a glossy, molten Nutella center. The Nutella should flow slowly, not run out immediately. The texture should be crunchy on the outside, chewy in the middle, and silky in the center. The aroma is intensely chocolatey with hazelnut notes. The truffles are ready to serve and enjoy.
Common mistakes
A common mistake is not freezing the Nutella long enough; if it’s not rock solid, it will melt into the dough and lose the molten center. Another pitfall is overworking the dough, which can make it tough; knead just until it comes together.
When dipping, ensure the chocolate isn’t too hot, or it will melt the dough and cause cracks. Finally, don’t skip the final chill—it sets the shell and allows the truffles to be sliced cleanly. If the dough cracks, patch it with a little extra dough and chill again.
How to tell it’s done
The truffles are done when the chocolate shell is set and firm to the touch. To test, gently press the side of a truffle—it should feel firm but give slightly. For the signature molten center, slice one truffle in half with a sharp knife.
The Nutella should flow slowly, not be runny or solid. If the Nutella is too firm, let the truffle sit at room temperature for a few minutes before slicing. The ideal texture is a soft, glossy lava that contrasts with the crunchy shell.
Up next · Part 3 of 3
4 variations · storage & make-ahead · 5 answers · printable card
Tips, FAQ & printable recipe (Part 3)← Back to the ingredients (Part 1)