Dinner · Part 2 of 3: Instructions
Impossible Pizza Pie with a Golden Self-Made Crust Step-by-step instructions
- Prep
- Cook
- Total
- Serves
- 6
Before you start
Pull out a 9-inch pie pan or round cake pan, a large skillet, a mixing bowl and a whisk, and grease the pan lightly. Shred the mozzarella if starting from a block, and measure the baking mix, milk, sauce and pepperoni before the skillet goes on the heat — the batter comes together in under two minutes, and everything moves quickly once the beef is browned.
Let the ground beef sit at room temperature for no more than 30 minutes while the oven heats to 400°F (200°C); anything longer belongs back in the refrigerator. Set a wire rack where the finished pie can rest, and have an instant-read thermometer ready to check the beef.
Ingredients at a glance (7)
- 1 lb ground beef
- 1 cup pizza sauce
- 2 cups shredded mozzarella
- 3 oz pepperoni slices
- 1 cup baking mix
- 1 cup milk
- 2 eggs
Instructions
Brown and season the beef
- Heat the oven and the panSet a rack in the center of the oven and heat it to 400°F (200°C). Lightly grease a 9-inch pie pan or round cake pan with butter or oil. A well-greased pan keeps the tender crust from sticking and helps the edges turn deep golden instead of pale and dry.Look for The oven reads a steady 400°F on the thermometer before the pan goes in.Tip Glass pie pans brown the crust a little faster than dark metal pans, so start checking five minutes early.
- Brown the ground beefCrumble the ground beef into a large skillet set over medium-high heat. Cook, breaking it up with a spatula, until no pink remains and the bits are deeply browned, 6 to 8 minutes. The meat is done when it reaches an internal temperature of 160°F (71°C) on an instant-read thermometer.Look for Every crumb is browned with no pink spots and the meat reads 160°F (71°C).Safe temperature 160°F (71°C) internal temperature (ground meat)Tip Let the beef sit undisturbed for a minute at a time so it browns instead of steaming.
- Drain and sauce the beefTip the skillet and spoon off all but about a teaspoon of fat. Pour in the pizza sauce and stir, scraping the browned bits from the bottom of the pan. Let the mixture bubble gently for 2 minutes so the sauce clings to the meat and the flavors settle together.Look for The sauce thickens slightly and coats the spatula rather than pooling watery.Tip Draining well is the single most important move here; extra fat will soak into the crust as it bakes.
The beef is crumbled, deeply browned and fully cooked to 160°F (71°C), with every trace of excess fat spooned off. After the sauce goes in, the mixture should look thick and glossy, coating the meat rather than pooling around it — if sauce still runs loose in the pan, bubble it another minute.
The kitchen smells like pizza already: browned meat, tomato and a little garlic sweetness from the sauce. Before moving on, taste the sauce once and adjust salt only if it needs it, since pepperoni and cheese bring plenty on their own.
Layer and batter
- Layer the fillingSpread the saucy beef evenly over the bottom of the greased pan. Scatter 1 cup of the mozzarella over the beef, then arrange the pepperoni slices in a single layer on top. Keep the layers even so every slice pulls out with sauce, cheese and pepperoni in each bite.Look for The bottom of the pan is covered edge to edge with no bare patches.Tip Shingle the pepperoni slightly overlapping; it curls as it bakes and holds the cheese in place.
- Whisk the batterIn a mixing bowl, whisk the eggs with the milk until completely smooth. Add the baking mix and whisk just until no dry streaks remain; a few small lumps are fine. The batter should pour easily, like pancake batter, thin enough to seep into the corners of the pan.Look for The batter pours in a smooth ribbon and no dry mix clings to the whisk.Tip Overmixing makes the crust tough, so stop whisking the moment everything is combined.
- Pour and topSlowly pour the batter over the filling, tipping the pan so it seeps into all the edges. Sprinkle the remaining 1 cup of mozzarella evenly over the top. Work gently so the layers below stay put; the batter will find its own way around the filling as it bakes.Look for The filling is covered by a thin, even layer of batter with cheese scattered across it.Tip Pour the batter in a spiral, starting from the center, so it spreads without disturbing the beef layer.
The pan now holds three tidy layers: saucy beef edge to edge, melted-looking cheese, and pepperoni shingled on top, all under a thin, even pour of batter with the last of the mozzarella scattered across it. The batter should have seeped into every corner of the pan — tilt it and check that no dry gap shows at the rim. Nothing should float or shift when the pan is nudged gently. If the batter pools heavily in the center, spread it outward with the back of a spoon before the pan goes into the oven.
Bake and rest
- Bake until puffed and goldenBake on the center rack for 30 to 35 minutes, until the top is deeply golden and the center is set. The crust puffs as it bakes and settles slightly as it cools. The surface should look dry and matte in the middle, not glossy or wet, before the pan comes out.Look for The top is golden brown and the center no longer shines or wobbles when the pan is nudged.Tip Rotate the pan once at the 20-minute mark if your oven browns one side faster than the other.
- Rest, slice and serveSet the pan on a wire rack and let the pie rest for 10 minutes. The crust firms up as it cools, which is what lets each slice lift cleanly with a spatula. Cut into 6 wedges and serve warm, straight from the pan, while the cheese still stretches with the first bite.Look for Slices hold their shape when lifted, with a thick cheese pull and wisps of steam.Tip A thin spatula slid all the way under the crust releases the first slice without tearing it.
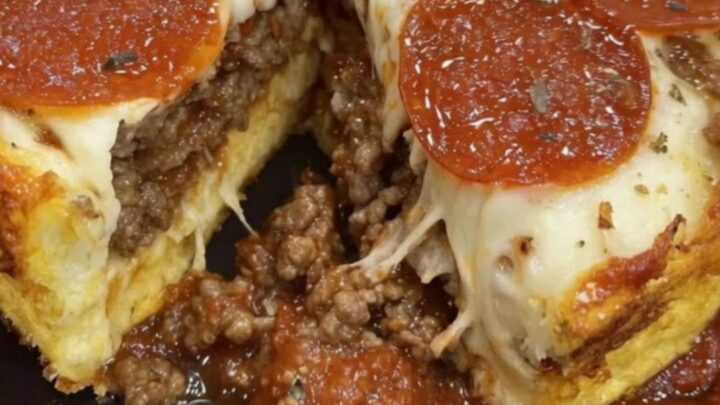
Out of the oven, the pie is puffed and deep golden, with crisp pepperoni cups holding pockets of melted cheese. The center looks dry and matte, and a knife near the middle comes out clean. As it rests 10 minutes on the rack, the puff settles slightly and the crust firms — that rest is not optional, it is what makes clean slices possible. When a thin spatula lifts the first wedge without tearing the base, and the cheese stretches in a slow pull, the pie is ready to serve warm.
Common mistakes
The most common failure is skipping the drain step. Ground beef releases a surprising amount of fat, and if it rides into the pan with the sauce, the batter absorbs it and the base turns greasy instead of tender. Spoon the fat off thoroughly before the sauce goes in.
The second trap is overmixing the batter: once the baking mix hydrates, gluten develops fast, and a heavy whisk turns a tender crust into a chewy one — stir only until the dry streaks disappear. Finally, do not slice early. Straight from the oven the crust is delicate and the layers slide; a 10-minute rest on a rack lets it firm so each wedge comes out intact.
How to tell it’s done
The pie is done when the top is an even golden brown, the center looks dry and matte rather than glossy, and the middle of the crust feels set when pressed gently with a fingertip — it should spring back, not dent. A knife inserted near the center should come out clean, with no wet batter clinging to it.
The beef underneath is already fully cooked to 160°F (71°C) before baking, so the bake itself is about the crust: if the top colors before the center sets, lay a loose piece of foil over the pan and continue a few minutes longer. Resting 10 minutes out of the oven finishes the set, so slices lift cleanly.
- Ground meat: 160°F (71°C) in the thickest part
Up next · Part 3 of 3
4 variations · storage & make-ahead · 5 answers · printable card
Tips, FAQ & printable recipe (Part 3)← Back to the ingredients (Part 1)