Breakfast · Part 2 of 3: Instructions
Impossible Bacon Swiss Pie: Crustless, One Dish, Weekend Easy Step-by-step instructions
- Prep
- Cook
- Total
- Serves
- 6
Before you start
Set up before anything touches the stove: one skillet for the bacon and onion, one bowl for the batter, one 2-quart rectangular baking dish, and a rimmed baking sheet to carry it into the oven.
Dice the onion first so it is ready the moment the bacon leaves the pan, and shred the Swiss while the bacon cooks — assembly moves quickly once the oven is hot. Set the rack to the center position and preheat to 350°F (175°C) before starting the filling, so the dish goes in the minute it is loaded.
Ingredients at a glance (8)
- 12 slices bacon, cooked until crisp and crumbled
- 1 medium white onion, diced
- 4 large eggs
- 2 cups whole milk
- 1 cup baking mix (all-purpose baking mix)
- 1/2 tsp kosher salt
- 1/4 tsp freshly ground black pepper
- 1 1/2 cups shredded Swiss cheese
Instructions
Build the filling
- Crisp the baconCut the bacon crosswise into half-inch pieces and cook it in a large skillet over medium heat, stirring now and then, until the fat has rendered and the pieces are deeply crisped, 8 to 10 minutes. Lift the bacon out with a slotted spoon and let it drain briefly on a paper-towel-lined plate.Look for The pieces stop bubbling hard and turn mahogany at the edges, with a shallow layer of clear fat in the pan.Tip Start the bacon in a cold pan; the fat renders more evenly and the pieces stay meaty instead of shrinking to chips.
- Soften the onionPour off all but about a tablespoon of bacon fat. Add the diced onion to the skillet and cook over medium heat, stirring occasionally, until it turns translucent and just tender at the edges, about 4 minutes. Do not brown it; a pale, sweet onion keeps the pie's flavor clean.Look for The dice loses its chalky white look and turns glossy, with the edges softened but not colored.Tip The trace of bacon fat left in the pan carries a gentle smokiness through the onion, so resist rinsing the skillet between steps.
- Heat the oven and load the dishHeat the oven to 350°F (175°C). Grease a 2-quart rectangular ceramic baking dish lightly. Scatter the crisp bacon and the softened onion evenly across the bottom of the dish, filling gaps so every future square gets some of both. Set the dish on a rimmed baking sheet to catch any bubbling.Look for The bottom of the dish is covered edge to edge, with no bare ceramic showing through the bacon and onion layer.Tip An even layer matters more than a thick one; a patchy bottom bakes into patchy slices, and the corners end up with all the bacon.
At the end of this phase the oven should already be heating to 350°F (175°C) and the dish should be loaded. The bacon is deeply crisped and mahogany, drained on paper towels; the onion is translucent and glossy, softened in a thin film of bacon fat but never browned.
Both are scattered edge to edge across the greased dish in an even layer, with no bare ceramic showing through. Before moving on, confirm the oven has come fully to temperature — the batter should meet a hot oven so it sets and lifts right away rather than sitting and soaking.
Batter and cheese
- Whisk the batterIn a medium bowl, whisk the eggs until uniformly beaten and lightly frothy. Whisk in the milk, then add the baking mix, salt and pepper and whisk until the batter is smooth, 30 to 45 seconds. A few small specks of flour are fine; large dry pockets are not. The batter should pour like thin pancake batter.Look for No streaks of dry mix remain and the surface of the batter holds a fine layer of small bubbles.Tip Whisk the eggs alone first; they break up far more easily on their own than in a full bowl of milk and flour.
- Pour the batter overPour the batter slowly and evenly over the bacon and onion, starting in the center and working toward the corners so the layer stays level. Tilt the dish gently if needed to settle the batter into the corners. The bacon and onion should sit beneath the batter, mostly covered.Look for The batter reaches within about half an inch of the rim and sits level, with the filling peeking through in places.Tip Pouring from low height keeps the batter from displacing the bacon; hold the bowl close and let it flow rather than splash.
- Top with SwissShower the shredded Swiss evenly over the batter, letting it fall in a fine rain rather than dropping it in clumps. Cover the corners and edges too; those areas brown first and benefit most from the cheese. Leave the surface loose — do not press the cheese into the batter.Look for The batter is no longer visible in most spots, with an even, open-textured blanket of shredded cheese on top.Tip Shred the cheese from a block if time allows; block-shredded Swiss melts in longer, stretchier ribbons than pre-shredded.
The batter is smooth, thin and pourable, like pancake batter, with no dry pockets of mix and a fine froth of bubbles on the surface. It has been poured gently over the filling, reaching within about half an inch of the rim and sitting level. The Swiss blankets the top evenly, corners included, in a loose open layer — not pressed down, not piled in clumps. The dish now sits on its rimmed baking sheet, ready for the center rack.
Bake and rest
- Bake until puffed and goldenBake on the center rack until the pie is puffed, deep golden on top and bubbling gently at the edges, 35 to 40 minutes. The center should rise with the rest of the pie rather than staying sunken. Check at 30 minutes; if the top colors too fast, lay a sheet of foil loosely over the dish.Look for The top is evenly golden, the edges have pulled slightly from the sides of the dish, and a knife inserted in the center comes out clean.Safe temperature 160°F (71°C) internal temperature (egg dishes)Tip Rotate the dish once at the 20-minute mark so the corners brown evenly; most home ovens run hotter toward the back.
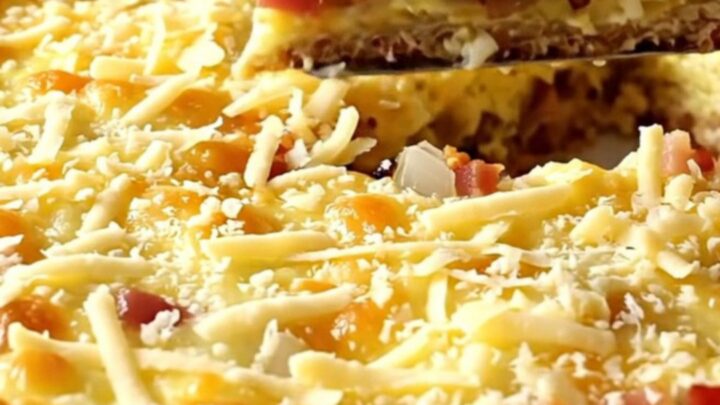
- Rest, then cut into squaresTake the dish out of the oven and let the pie rest at least 10 minutes. It will settle from its puffed peak and firm up enough to cut. Slice into squares right in the dish, lifting each piece out with a thin spatula so the bacon-and-onion layer stays intact underneath the set egg and melted Swiss.Look for The pie no longer looks inflated; the surface is level, and a cut square holds its edges with no pooling in the dish.Tip Serve it warm rather than hot — the flavor of the Swiss comes forward as the pie cools, and the squares cut far more cleanly.
The pie comes out puffed and deep golden, bubbling gently at the edges, with a knife in the center coming out clean and an internal temperature of at least 160°F (71°C). After a 10-minute rest it has settled to a level surface and cuts into clean squares: crisp bacon and tender onion set into the bottom layer, a creamy egg middle, and melted Swiss above and below.
Common mistakes
The most common slip is undercooking the bacon, which leaves chewy pieces in the finished pie — cook it to a genuine crisp, since it will not crisp further in the oven. Pouring off too much bacon fat before softening the onion is another; a tablespoon of that fat carries the smoky note through the filling.
Overfilling the dish is a classic error: the batter should sit about half an inch below the rim, or it will bubble over. Pulling the pie at the first sign of color shortchanges the center, so trust the knife and the thermometer over the clock.
How to tell it’s done
The pie is done when it is puffed and deep golden across the whole top, bubbling gently at the edges, and a knife inserted in the center comes out clean with no batter clinging to it.
For certainty, check the internal temperature with an instant-read thermometer in the middle of the pie: it should read at least 160°F (71°C), the temperature at which the eggs are fully cooked through. The surface will fall slightly as the pie rests, which is normal.
- Egg dishes: 160°F (71°C) in the thickest part
Up next · Part 3 of 3
4 variations · storage & make-ahead · 5 answers · printable card
Tips, FAQ & printable recipe (Part 3)← Back to the ingredients (Part 1)