Desserts · Part 2 of 3: Instructions
Hot Chocolate Pudding Cake with Molten Fudge Sauce in One Dish Step-by-step instructions
- Prep
- Cook
- Total
- Serves
- 8
Before you start
Heat the oven to 350°F (175°C) and set a rack in the center. Butter an 8-inch round glass baking dish, or line an 8-inch metal pan if that is what the cupboard offers. Measure every ingredient before starting: this recipe moves quickly once the water boils, and the topping must go on while the batter is still fresh in the dish.
Boil the water in a kettle or a small saucepan first so it is ready the moment the topping is scattered — pouring water that has cooled even a little weakens the sauce. Keep a fine-mesh sieve and the dusting cocoa by the stove for the finish, and put a rimmed baking sheet on the counter to carry the dish to the oven.
Ingredients at a glance (12)
- 1 cup all-purpose flour
- 1/4 cup unsweetened cocoa powder
- 3/4 cup granulated sugar
- 2 tsp baking powder
- 1/2 tsp kosher salt
- 1/2 cup whole milk
- 2 tbsp unsalted butter, melted
- 1 tsp vanilla extract
- 3/4 cup packed brown sugar
- 1/4 cup unsweetened cocoa powder
- 1 1/2 cups boiling water
- Unsweetened cocoa powder, for dusting, to taste
Instructions
Batter in the dish
- Build the chocolate batterHeat the oven to 350°F (175°C) and butter an 8-inch round glass baking dish. In a medium bowl, whisk the flour, cocoa powder, granulated sugar, baking powder and salt until no streaks remain. Pour in the milk, melted butter and vanilla, and whisk just until a smooth, thick batter forms.Look for The batter should be thick like brownie batter and uniformly dark, with no dry pockets at the bottom of the bowl.Tip Scrape the bowl once with the whisk so no hidden flour survives at the base.
- Spread the batter in the dishScrape the batter into the buttered dish and spread it level with the back of a spoon, nudging it into the corners. A small offset spatula works too. Keep the layer even, because an uneven surface bakes unevenly and the crust will crack in the wrong places.Look for The surface should look flat and glossy, reaching the edges of the dish with no bare spots.Tip Wet the spoon lightly; the batter releases more easily and stays level.
At the end of the first phase the oven is hot, the dish is buttered, and a thick, glossy chocolate batter sits level in the dish, reaching every edge. It should look like brownie batter — dark, smooth and slow to settle — with no dry flour visible anywhere. If the batter looks streaky or pale, whisk ten more seconds; if it looks thin and pourable, too much milk went in and a tablespoon of flour will steady it. Nothing should be bubbling yet; this phase is entirely about an even, lump-free base in the right dish, ready to receive the topping.
Topping and water on top
- Mix the fudge toppingWhisk the brown sugar and cocoa powder together in a small bowl, breaking up every lump of brown sugar with the back of the whisk. Lumps that survive here become hard pockets in the finished sauce, so take the extra thirty seconds now.Look for The mixture should look like uniformly dark, loose sand with no visible sugar clumps.Tip Sifting the cocoa into the bowl first makes this step nearly instant.
- Sprinkle the topping over the batterScatter the sugar-cocoa mixture evenly over the surface of the batter, covering it completely from edge to edge. Do not stir. Resist the urge to swirl; the magic of this dessert depends on the topping staying dry on top of the wet batter until the oven does the rest.Look for Every inch of batter should be hidden under the dry topping before the water goes on.Tip Sprinkle from a low height so the topping settles instead of blowing off the edges.
- Pour the boiling water overSlowly pour the boiling water over the topping, aiming for the center but letting it spread naturally. The water will look like it is flooding the dish, and the batter may show through in places. That is exactly right. Do not stir, do not panic, and do not add more water.Look for The liquid should sit about half an inch deep over the topping, with dry topping still visible in patches.Tip Pour along the back of a spoon to soften the flow and avoid gouging the batter.
The second phase ends with the dish looking, frankly, wrong — and that is the sign it is right. The batter is completely hidden under an even layer of dark sugar and cocoa, and roughly half an inch of cloudy water sits over it, with dry topping still peeking through in patches. No stirring has happened, the water has not been absorbed, and the surface shows no gouges from a heavy pour. If the topping slid to one side, nudge it back with a spoon tip before the dish goes into the oven. Everything from here is the oven's job.
Bake, dust and scoop
- Bake until the crust setsBake for 30 to 35 minutes, until the top is set and crackly and the edges bubble steadily at the rim. The center may still tremble faintly when the dish is nudged, but the surface should not look wet. Rotate the dish once halfway through for even browning.Look for Bubbles creep up the sides and the top turns matte, dry to a light fingertip touch near the edge.Tip Place the dish on a rimmed baking sheet; a stray bubble overflow is easier to clean there.
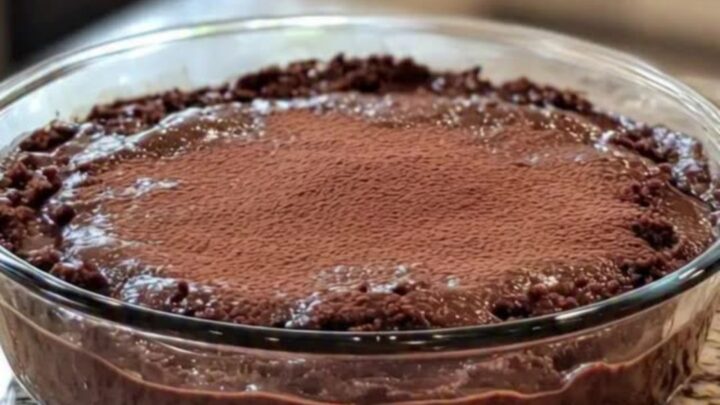
- Dust with cocoa and restSet the dish on a wire rack and dust the top lightly with cocoa powder through a fine-mesh sieve while it is still hot, so the powder clings to the warm crust. Let the cake rest for 10 minutes; the sauce beneath thickens slightly as it settles, which makes serving cleaner.Look for The dusted surface looks velvety and dark, and faint steam rises when the crust is broken.Tip Rest longer than 10 minutes and the sauce keeps thickening; it is still delicious, just denser.
- Scoop through the crustServe warm, straight from the dish, scooping all the way to the bottom with a large spoon so each portion breaks through the cake layer and lifts a share of the molten fudge sauce below. The contrast of set cake over glossy sauce is the whole point, so dig deep.Look for The spoon should meet slight resistance at the crust, then sink easily into the sauce beneath.Tip Warm the serving bowls briefly; cold bowls set the sauce too fast on contact.
The finished cake has a matte, crackly top that gives slight resistance to a spoon before sinking into the glossy sauce beneath. The edges bubble at the rim, steam rises the moment the crust breaks, and the cocoa dust clings to the warm surface in an even velvety layer.
The sauce should be pourable, not watery and not pasty — it coats a spoon and flows slowly. After the 10-minute rest the layers hold their separation cleanly, so a scoop lifts cake and fudge together. If the top still looks wet anywhere, return the dish to the oven for five more minutes before resting.
Common mistakes
The three most common problems all come from impatience at the topping stage. Lumpy brown sugar turns into hard candy pockets in the finished sauce, so whisk the topping until it is uniformly sandy. Stirring after the water is poured blends the layers and you lose the sauce entirely — pour and walk away.
And water that is not fully boiling dissolves the sugar too slowly, leaving a gritty layer instead of a glossy one. A fourth trap: opening the oven repeatedly drops the temperature and stalls the crust. Check through the door light, rotate once, and trust the clock.
How to tell it’s done
The cake is done when the top is set, crackly and dry to a light touch near the edges, and the sauce bubbles steadily around the rim of the dish. A nudge of the dish should show a surface that holds together, with perhaps a faint tremble at the very center from the sauce below — that is correct.
Total bake time runs 30 to 35 minutes at 350°F (175°C) in a glass dish, and a few minutes less in dark metal. Underbaking leaves the cake layer dense and the sauce thin; overbaking thickens the sauce into a paste and dries the sponge. When in doubt, pull the dish at the first sign of steady edge bubbling and let the 10-minute rest finish the set.
Up next · Part 3 of 3
4 variations · storage & make-ahead · 5 answers · printable card
Tips, FAQ & printable recipe (Part 3)← Back to the ingredients (Part 1)