Dinner · Part 2 of 3: Instructions
Honeycomb Turkish Mantı Dumplings with Garlic Yogurt and Sizzling Butter Step-by-step instructions
- Prep
- Cook
- Total
- Serves
- 6
Before you start
Before you start, clear a large work surface and have a honeycomb dumpling mold ready. Make the dough first and let it rest while you prepare the filling. Keep the filling in the refrigerator until you are ready to fill the mold.
Bring a large pot of salted water to a boil just before you begin shaping, so it is ready when the dumplings are formed. Have a slotted spoon and a shallow serving bowl nearby. The yogurt and garlic can be mixed ahead and kept cool, and the butter sauce can be prepared just before serving so it stays sizzling.
Ingredients at a glance (14)
- 2 1/2 cups all-purpose flour
- 1 large egg
- 1/2 cup water, plus more as needed
- 1/2 tsp salt
- 1/2 lb ground beef
- 1/4 cup finely grated onion
- 2 tbsp chopped fresh parsley
- 1/2 tsp salt
- 1/4 tsp black pepper
- 1 cup plain whole-milk yogurt
- 2 cloves garlic, minced
- 4 tbsp unsalted butter
- 1 tsp sweet paprika
- 1 tsp dried mint
Instructions
Phase 1: Dough and Filling
- Make the dough and fillingIn a large bowl, whisk together the flour and salt. Make a well in the center and add the egg and 1/2 cup water. Stir with a fork until a shaggy dough forms, then turn out onto a lightly floured surface and knead for 8 to 10 minutes, until smooth and elastic. Add a splash more water if the dough feels dry. Cover with a damp towel and rest for 30 minutes.Look for The dough should be smooth, not sticky, and springs back when pressed.Tip Kneading develops gluten for a silky, pliable dough that rolls thin without tearing.
- Make the fillingIn a small bowl, combine the ground beef, grated onion, parsley, salt, and black pepper. Mix with a fork until just combined. Set aside in the refrigerator while you roll the dough.Look for The filling should be well mixed but not overworked, so it stays tender.Tip Grating the onion adds moisture without chunky pieces; squeeze out excess liquid if needed.
The dough should be smooth, elastic, and rested. The filling should be well combined and chilled. The kitchen smells of fresh dough and seasoned meat. Before moving on, make sure the dough rolls out without springing back and the filling is not too wet. If the dough tears, knead it a little longer and let it rest again.
Phase 2: Shaping the Honeycomb
- Roll the dough paper-thinDivide the rested dough into two equal balls. On a lightly floured surface, roll one ball into a very thin circle, about 1/16 inch thick. The dough should be almost translucent. Drape the rolled dough over the honeycomb mold, pressing gently into the hexagonal indentations without tearing.Look for The dough should be thin enough to see your hand through, but still strong enough to hold the filling.Tip Roll from the center outward, turning the dough frequently to keep it even.
- Fill the honeycomb cellsSpoon about 1/2 teaspoon of the beef filling into each honeycomb indentation, pressing it down lightly. Fill all the cells evenly. The filling should sit below the top edge of the dough.Look for Each cell should be filled but not overflowing, so the top dough seals cleanly.Tip Use a small spoon or piping bag for neat, even portions.
- Cover and cut the dumplingsRoll the second dough ball into another thin circle. Drape it over the filled mold. Use a rolling pin to press firmly across the top, cutting the dumplings cleanly along the edges of the honeycomb cells. Remove the excess dough scraps and gently push the dumplings out of the mold.Look for The dumplings separate into neat, tiny pillows with sealed edges.Tip Roll firmly but evenly; too much pressure can tear the dough.
The honeycomb mold is filled with neat little mounds of beef, covered with a second dough sheet, and cut into clean pillows. The dumplings should separate easily from the mold, with sealed edges.
The kitchen is quiet, with the satisfying sound of the rolling pin cutting through dough. Check that the dumplings are sealed tightly so they don't open during boiling.
Phase 3: Cooking and Saucing
- Boil the dumplingsBring a large pot of salted water to a rolling boil. Carefully drop in the mantı in batches. Boil for 6 minutes, until the dumplings float to the surface and are tender. Use a slotted spoon to transfer them to a shallow serving bowl, reserving about 1/2 cup of the cooking water.Look for The dumplings float and look slightly puffed; the dough is tender but not mushy.Safe temperature 160°F (71°C) internal temperature (ground meat)Tip Boil in batches to avoid crowding; keep the water at a gentle boil.
- Make the garlic yogurtIn a small bowl, stir together the yogurt and minced garlic. If the yogurt is very thick, thin it with a tablespoon or two of the reserved cooking water until it is pourable. Set aside.Look for The yogurt should be smooth and pourable but still thick enough to coat a spoon.Tip Let the yogurt come to room temperature so it doesn't chill the dumplings.
- Sizzle the paprika mint butterIn a small skillet, melt the butter over medium heat. Add the paprika and dried mint, swirling to combine. Cook for 30 to 60 seconds, until the butter is foamy and fragrant and the paprika has turned a deep red. Remove from heat.Look for The butter sizzles and smells nutty and spicy; the paprika blooms into a vivid red oil.Tip Do not let the butter brown too much; it should be fragrant, not burnt.
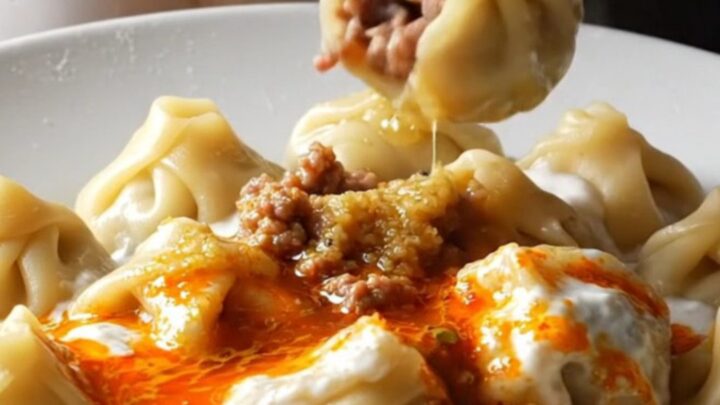
- Assemble and serveSpoon the garlic yogurt generously over the warm dumplings. Drizzle the sizzling paprika mint butter over the top, letting it swirl into the yogurt. Serve immediately, while the butter is still hot and the dumplings are steaming.Look for The red butter creates a beautiful marbled pattern over the white yogurt and golden dumplings.Tip For the best texture, serve right away; the dumplings soften as they sit.
The dumplings float in the boiling water, tender and glistening. The garlic yogurt is smooth and the butter sizzles with paprika and mint, filling the kitchen with a warm, spicy aroma. The final dish is a beautiful mosaic of white, red, and golden tones. Check that the dumplings are cooked through and the butter is not burnt before serving.
Common mistakes
The most common issue is dough that tears when rolling or filling. If the dough is too dry, it will crack; add a little water and knead again. If it is too sticky, dust with flour. When filling the mold, do not overfill the cells, or the top dough will not seal properly.
Press the rolling pin firmly but gently to cut the dumplings; too much force can squish the filling. Boiling too many dumplings at once can cause them to stick; cook in batches. Finally, do not skip the resting time for the dough — it is essential for elasticity.
How to tell it’s done
The dumplings are done when they float to the surface of the boiling water and the dough is tender but still holds its shape. Cut one open to check that the beef filling is cooked through; the internal temperature should reach 160°F (71°C).
The dough should be translucent and silky, not raw or doughy. The yogurt sauce should be smooth and pourable, and the butter should be fragrant with paprika and mint, with the paprika having bloomed into a deep red color. Serve immediately for the best texture and temperature contrast.
- Ground meat: 160°F (71°C) in the thickest part
Up next · Part 3 of 3
4 variations · storage & make-ahead · 5 answers · printable card
Tips, FAQ & printable recipe (Part 3)← Back to the ingredients (Part 1)