Desserts · Part 2 of 3: Instructions
Honeycomb Sesame Bark with Dark Chocolate Bars: Crisp, Nutty and Ready in One Tray Step-by-step instructions
- Prep
- Cook
- Total
- Serves
- 12
Before you start
Gather everything before you melt any chocolate, because the bark has to be assembled while the chocolate is still warm. Set out the honeycomb, the whole almonds, walnuts and pecans, and the sesame seeds, then line the metal baking tray with parchment paper so it fits flat, leaving a little overhang on the sides to lift the set sheet later.
Have the small heatproof bowl, the stainless steel box grater and the small glass pitcher within reach. Chill the block of dark chocolate for about 10 minutes so it grates cleanly and does not smear across the grater. Chop the nuts roughly and break the honeycomb into bite-sized pieces on the wooden board, spreading them out so you can grab handfuls quickly. A clear workspace and ready ingredients make the assembly calm and quick.
Ingredients at a glance (7)
- 8 oz dark chocolate, chopped, plus a block for grating
- 6 oz honeycomb, broken into bite-sized pieces
- 1/2 cup whole almonds, chopped
- 1/2 cup walnuts, chopped
- 1/2 cup pecans, chopped
- 3 tbsp sesame seeds, divided
- 2 tbsp honey, for drizzling
Instructions
Build the bark base
- Prepare the honeycomb and nutsBreak the honeycomb into bite-sized pieces with a large chef's knife on a wooden cutting board. Chop the whole almonds, walnuts and pecans, then scatter them across the board with the honeycomb so every ingredient is within reach.Look for Honeycomb in irregular bite-sized pieces, nuts roughly chopped and spread out.Tip Keep the honeycomb pieces mostly intact so they stay crisp and glassy in the bark.
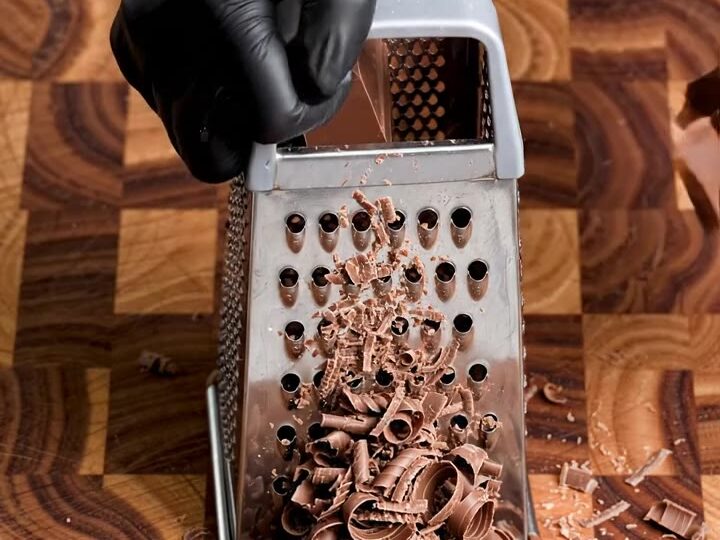
- Grate the dark chocolateGrate a block of dark chocolate over a stainless steel box grater onto the board. Aim for a generous pile of fine curls and shavings to scatter over the bark for texture.Look for A soft mound of fine chocolate curls and shavings collects on the board.Tip Chill the block for 10 minutes first so it grates cleanly without smearing.
The honeycomb and nuts are broken and chopped, and the chocolate is grated into a pile of fine curls on the board. The chocolate you melted should be glossy and smooth when stirred, with no lumps. Spread it evenly across the parchment so it covers the whole tray with a consistent depth.
Check that no pale patches remain and that the chocolate is still warm and easy to spread before you add anything on top. If it begins to thicken, gently rewarm it over barely simmering water, stirring constantly, and keep the bowl away from direct heat so it stays silky.
Press in the honeycomb
- Melt and spread the chocolateMelt the chopped dark chocolate in a small heatproof bowl over barely simmering water, stirring until smooth. Spread it in an even layer across parchment paper lining a metal baking tray.Look for Chocolate is glossy and smooth with no lumps when stirred.Tip Keep the bowl off direct heat and avoid any water touching the chocolate.
- Press in the honeycomb and nutsWhile the chocolate is still warm, press the honeycomb pieces into it, then add the chopped almonds, walnuts and pecans. Scatter 2 tablespoons of the sesame seeds over the top.Look for Honeycomb and nuts stay anchored in the warm chocolate without sliding.Tip Work quickly while the chocolate is warm so the pieces bed in firmly.
- Add the honey and grated chocolatePour the honey into a small glass pitcher and drizzle it over the arrangement for a glossy amber sheen. Sprinkle the grated chocolate curls over the top.Look for Honey coats the surface in amber streaks and looks glossy.Tip Drizzle slowly from a height so the honey spreads in ribbons.
The honeycomb pieces, chopped nuts and sesame seeds should sit in the warm chocolate without sliding, and the surface should look speckled with golden shards and nut pieces. Press each piece gently with your fingertips so it is partly embedded in the chocolate, which keeps it anchored once the bark sets. Check that the nuts are spread evenly across the tray, not clustered in one corner, and that the chocolate has not begun to firm up. Add the honey and the grated curls only after this layer is settled, so the drizzle sits on top instead of sinking in.
Finish and set the sheet
- Set the bark until firmLeave the tray at cool room temperature until the chocolate is completely firm, about 1 hour. Use the refrigerator only if the kitchen is warm.Look for The surface is firm and the bark holds its shape when lightly pressed.Tip Avoid moving the tray until the chocolate is fully set.
- Cut the bark into barsLift the set sheet from the tray using the parchment. Cut it into rectangular bars with a sharp knife, then toast the remaining 1 tablespoon of sesame seeds in a dry pan until golden and sprinkle them over the bars.Look for Bars snap cleanly, with a crisp chocolate shell and visible nuts and honeycomb.Tip Warm the knife slightly under hot water and wipe it dry for cleaner cuts.
The honey should coat the surface in amber streaks with a glossy sheen, and the grated chocolate should cover the top in soft curls. Leave the tray undisturbed at cool room temperature until the chocolate is completely firm, about 1 hour, and check that the surface no longer marks under a light touch. Only then lift the parchment, cut the sheet into rectangular bars with a sharp knife and scatter the toasted sesame seeds over the top. Look for bars that snap cleanly and show a crisp chocolate shell with visible honeycomb and nut pieces inside.
Common mistakes
The most common mistake is adding the honeycomb to chocolate that has already set, which leaves the pieces sitting loosely on top and falling off when you cut. Work while the chocolate is warm, and rewarm it briefly if it firms up during assembly.
Overheating the chocolate is the second risk: if the bowl is over direct heat or any water touches it, the chocolate can seize into a thick, dull paste that will not spread. Melt it gently and keep it smooth. Do not cut the bark too early, because it will crumble and smear. Finally, avoid drizzling the honey before the nuts are in place, since it can pool and make the surface sticky rather than glossy.
How to tell it’s done
The bark is ready when the chocolate is completely firm and holds its shape. Press a corner lightly: it should feel solid, not soft or tacky, and the surface should resist a fingertip without marking. The honey should look set and glossy rather than wet. When you cut or break a piece, it should snap cleanly with a crisp chocolate shell and a crunchy honeycomb and nut interior.
If the surface still feels soft after an hour, leave it to set a little longer at cool room temperature, or move it to the refrigerator for about 15 minutes if the kitchen is warm. Because this recipe contains no meat, poultry, fish or eggs, there is no cooking temperature to reach.
Up next · Part 3 of 3
4 variations · storage & make-ahead · 5 answers · printable card
Tips, FAQ & printable recipe (Part 3)← Back to the ingredients (Part 1)