Dinner · Part 2 of 3: Instructions
Honey Chipotle Garlic Crispy Chicken Sandwich with Buttermilk Ranch Step-by-step instructions
- Prep
- Cook
- Total
- Serves
- 4
Before you start
Before you start, set up your breading station: one dish with beaten eggs, another with the panko mixture, and a plate for the coated chicken. Pat the chicken breasts dry with paper towels, then pound them to an even thickness.
Measure out all the glaze ingredients and have the buns and toppings ready. Heat the oil in a large skillet while you bread the chicken, so it is ready when you are.
Ingredients at a glance (15)
- 4 boneless, skinless chicken breasts
- 2 large eggs
- 2 cups panko breadcrumbs
- 1 tsp garlic powder
- 1 tsp smoked paprika
- 1 tsp kosher salt
- 1/2 tsp black pepper
- 1 cup vegetable oil, for frying
- 1/3 cup honey
- 2 tbsp chipotle hot sauce
- 3 cloves garlic, minced
- 4 brioche burger buns
- 2 tbsp unsalted butter, melted
- 1/2 cup buttermilk ranch dressing
- 1/2 cup dill pickle slices
Instructions
Crisp the chicken
- Pound and bread the chickenPlace each chicken breast between two sheets of plastic wrap and pound to an even 1/2-inch thickness. Set up a breading station: beat the eggs in one dish; in another, combine the panko, garlic powder, smoked paprika, salt, and black pepper. Dip each breast in the egg wash, letting excess drip off, then press firmly into the panko mixture, coating both sides evenly.Look for The coating adheres completely and feels dry to the touch.Tip Pounding to an even thickness ensures the chicken cooks through before the crust burns.
- Shallow fry the cutletsHeat the vegetable oil in a large skillet over medium-high heat until shimmering, about 350°F (175°C). Carefully lay two breaded chicken breasts in the hot oil. Fry for 3 to 4 minutes per side, turning once, until deeply golden brown and the internal temperature reaches 165°F (74°C). Transfer to a wire rack and repeat with the remaining breasts.Look for The crust is deep golden brown and the chicken is cooked through.Safe temperature 165°F (74°C) internal temperature (poultry)Tip Keep the oil at a steady temperature; if it drops too low, the crust absorbs oil and turns soggy.
The chicken cutlets are golden brown and crisp, with a craggy panko crust that crackles when pressed. The internal temperature has reached 165°F (74°C). The oil is still hot, and the coating is dry and crunchy, not greasy. The chicken is ready to be glazed.
Glaze and toast
- Make the glazeIn a small saucepan, combine the honey, chipotle hot sauce, and minced garlic. Cook over medium heat, stirring occasionally, until the mixture is warm, bubbling gently, and slightly thickened, about 2 to 3 minutes. Remove from heat and set aside.Look for The glaze is glossy and coats the back of a spoon.Tip Do not boil for too long, or the honey will become too thick and sticky.
- Glaze the fried chickenUsing a pastry brush, generously brush the warm honey chipotle glaze over each fried chicken cutlet, covering both sides. The glaze should cling to the crispy crust. Let the glazed cutlets rest on the wire rack while you toast the buns.Look for The glaze is evenly distributed and sticky.Tip Brush the glaze while the chicken is still hot so it melts into the crust.
The glaze is warm, glossy, and slightly thickened, with a sweet-spicy aroma. Each cutlet is evenly coated, the glaze clinging to the crust. The brioche buns are toasted to a light golden brown, with a buttery sheen and a soft, pillowy interior.
Stack and serve
- Toast the brioche bunsBrush the cut sides of the brioche buns with the melted butter. Heat a clean skillet or griddle over medium heat. Place the buns cut-side down and toast until golden brown and fragrant, about 1 to 2 minutes. Remove from the skillet and set aside.Look for The buns are golden and lightly crisp on the cut sides.Tip Toasting the buns adds a buttery crunch and prevents them from getting soggy.
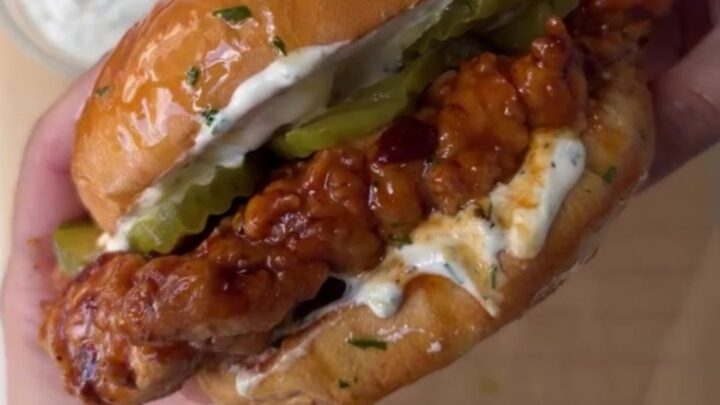
- Assemble the sandwichesSpread about 2 tablespoons of buttermilk ranch dressing on the bottom half of each toasted brioche bun. Top with a few dill pickle slices, then place a glazed chicken cutlet on top. Add the top bun and press down gently. Serve immediately.Look for The sandwich is stacked high with the glaze and ranch visible.Tip Press down lightly to let the flavors meld, but keep the crust crisp.
The sandwiches are assembled with ranch, pickles, and glazed chicken. When you press down, the crust crackles audibly. The ranch is cool and creamy, the pickles add a bright crunch, and the glaze is sticky and sweet with a kick of heat. Serve immediately.
Common mistakes
One common mistake is overcrowding the skillet, which drops the oil temperature and makes the crust greasy. Fry in batches, if needed.
Another is skipping the resting time after frying—let the chicken rest on a wire rack for a minute before glazing, so the crust stays crisp.
Do not add too much glaze, or the coating will become soggy. Finally, do not skip toasting the buns; it adds a crucial textural contrast.
How to tell it’s done
The chicken is done when the crust is deep golden brown and an instant-read thermometer inserted into the thickest part reads 165°F (74°C).
The glaze should be warm and bubbling, and the buns toasted to a golden brown. The sandwich is ready to serve immediately, while the crust is still crisp and the glaze is sticky.
- Poultry: 165°F (74°C) in the thickest part
- Egg dishes: 160°F (71°C) in the thickest part
Up next · Part 3 of 3
4 variations · storage & make-ahead · 5 answers · printable card
Tips, FAQ & printable recipe (Part 3)← Back to the ingredients (Part 1)