Desserts · Part 2 of 3: Instructions
Hazelnut Chocolate Cheesecake with Glossy Ganache Step-by-step instructions
- Prep
- Cook
- Total
- Serves
- 12
Before you start
Gather all the ingredients and equipment before you start, so the process flows smoothly. Set the cream cheese, sour cream and eggs out at room temperature for about one hour, so they blend without lumps. Preheat the oven to 325°F (163°C) and position a rack in the center.
Toast the hazelnuts in a dry skillet, let them cool, and chop them roughly, keeping a small handful whole for the rim. Crush the wafer cookies and measure the melted butter. Lightly grease or line the bottom of the dark 9-inch springform pan, and wrap the outside in foil if you plan to set it in a water bath. Have a box grater, a bowl for the ganache and a sheet pan ready nearby.
Ingredients at a glance (10)
- 1 cup toasted hazelnuts, divided, roughly chopped
- 8 oz chocolate wafer cookies, finely crushed
- 5 tbsp unsalted butter, melted
- 32 oz cream cheese, softened
- 3/4 cup granulated sugar
- 3 large eggs, at room temperature
- 1/2 cup sour cream
- 1 tsp vanilla extract
- 6 oz dark chocolate, chopped, plus 2 oz block for grating into curls
- 1/2 cup heavy cream
Instructions
Crust, filling and bake
- Toast and chop the hazelnutsToast the hazelnuts in a dry skillet over medium heat until fragrant and lightly browned, then cool them. Chop them roughly on a wooden board with a large knife, keeping a small handful whole for the rim.Look for Hazelnuts smell nutty and the skins begin to crack and loosen.Tip Rub the warm nuts in a towel to remove loose skins before chopping.
- Crush the wafers and bind the crustCrush the chocolate wafer cookies finely and combine them with the melted butter until evenly damp. Add the chopped chocolate bar pieces so they melt slightly into the crumbs.Look for The crumbs hold together when pinched and look uniformly moist.Tip A food processor makes quick, even crumbs; a bag and rolling pin works well too.
- Press the crust into the panPress the crumb mixture firmly and evenly into the bottom and about 1 inch up the sides of a dark 9-inch springform pan. Chill it while you prepare the filling.Look for The surface is flat and compact with no loose crumbs at the edges.Tip Use the flat bottom of a measuring cup to press the crumbs evenly.
At the end of this phase the crust is pressed firmly and evenly into the base and sides of the pan, and the cheesecake filling is smooth, thick and pale with no lumps. The top of the cheesecake sets in the oven, with the edges firm and the center only slightly loose when the pan is nudged.
The kitchen smells gently sweet and toasty. Before going on, check that the cheesecake has cooled at room temperature and then chilled until firm, because the ganache needs a fully set base to pour over cleanly.
Ganache and chocolate curls
- Beat the cheesecake fillingBeat the softened cream cheese and sugar until smooth. Add the eggs one at a time, mixing on low speed after each, then blend in the sour cream and vanilla until just combined.Look for The filling is smooth, thick and uniformly pale with no lumps.Safe temperature 160°F (71°C) internal temperature (egg dishes)Tip Scrape the bowl often so no cream cheese hides at the bottom.
- Layer and bake the cheesecakeSpread the filling over the chilled crust. Bake in a 325°F (163°C) oven for about 55 to 60 minutes, until the edges are set and the center barely jiggles, then cool and chill until firm.Look for The edges are set and the center looks just slightly loose when the pan is nudged.Safe temperature 160°F (71°C) internal temperature (egg dishes)Tip Place the springform pan on a baking sheet to catch any leaks.
- Prepare the chocolate ganacheHeat the heavy cream until steaming, then pour it over the chopped dark chocolate. Let it sit for a minute, then stir gently until smooth and glossy.Look for The ganache is smooth, glossy and pourable with no visible chocolate pieces.Tip Let the ganache cool for a few minutes so it thickens slightly before pouring.
At the end of this phase the ganache is smooth, glossy and pourable, with no visible chocolate pieces left unmelted. The grated chocolate forms fine, delicate curls on the plate, ready for garnish. The aroma is rich and dark. Before going on, check that the ganache has cooled slightly so it thickens enough to coat the top without running off the sides too quickly, and that the cheesecake remains cold and firm in the refrigerator.
Pour, garnish and set
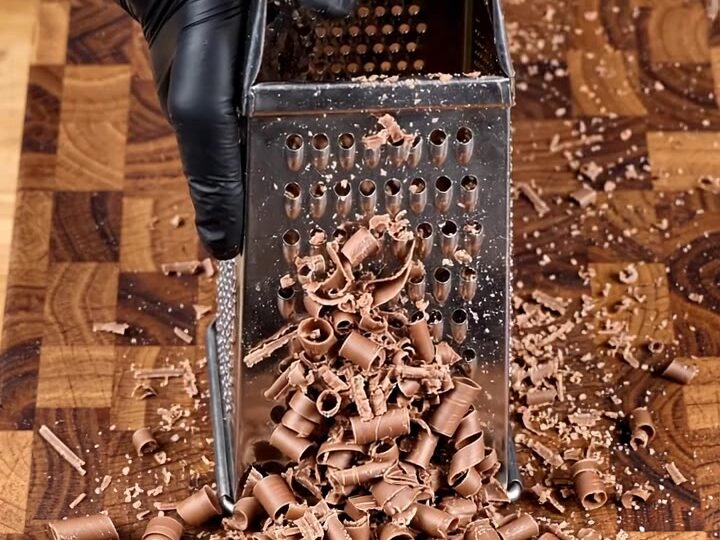
- Grate chocolate curls for garnishGrate the block of chocolate over a box grater, letting the fine curls fall onto a plate. Set them aside for sprinkling over the finished cheesecake.Look for Fine, delicate curls collect on the plate.Tip Chill the chocolate block briefly so it grates into finer curls.
- Pour and swirl the ganachePour the ganache over the set cheesecake and spread it into a smooth, even layer that drips slightly down the sides. Scatter the chopped hazelnuts over the top and arrange the reserved whole hazelnuts around the rim.Look for The top is smooth and glossy, and chocolate runs in soft drips down the sides.Tip Chill the cheesecake for at least 5 hours so the ganache sets firmly.
- Finish and slice the cheesecakeSprinkle the chocolate curls over the top. Refrigerate until the ganache is set, then release the springform ring, slice with a thin hot knife and serve cold.Look for The ganache is firm to the touch and the slices hold clean edges.Tip Wipe the knife between cuts for neat, layered slices.
At the end of this phase the ganache covers the top in a smooth, glossy layer, with soft chocolate drips down the sides. The chopped and whole hazelnuts sit neatly on top and around the rim, and the chocolate curls are scattered over the surface. The ganache is firm to the touch after chilling and the cheesecake holds a clean shape. Before slicing, check that the ganache is fully set and that the springform ring releases easily, so each slice keeps its layers intact.
Common mistakes
The most common mistake is overbaking the filling, which cracks the surface and leaves the texture dry and grainy instead of creamy. Watch the center rather than the clock, and remove the cheesecake while it still jiggles slightly in the middle, since it will continue to set as it cools.
Another frequent problem is pouring the ganache onto a warm cheesecake, which makes the chocolate slide off and blur the layers. Chill the cheesecake fully first. Using cold cream cheese in the filling creates lumps that are impossible to smooth, so bring it to room temperature before mixing. Finally, avoid overmixing once the eggs go in, since the extra air can cause puffing and cracking in the oven.
How to tell it’s done
The cheesecake is done when the outer edges are set and firm, the surface looks matte, and the center moves only slightly when the pan is gently shaken. Because the filling contains eggs, it must reach 160°F (71°C) in the center to be cooked through.
A reliable check is an instant-read thermometer inserted into the center without touching the crust, which should read 160°F (71°C). The ganache is ready when it is smooth and glossy and sets firm to the touch after chilling for several hours. A properly chilled cheesecake holds clean slices and shows the distinct layers when cut with a thin, hot knife.
- Egg dishes: 160°F (71°C) in the thickest part
Up next · Part 3 of 3
4 variations · storage & make-ahead · 5 answers · printable card
Tips, FAQ & printable recipe (Part 3)← Back to the ingredients (Part 1)