Desserts · Part 2 of 3: Instructions
Gooey Levain-Style Chocolate Chip Cookies in 10 Minutes Step-by-step instructions
- Prep
- Cook
- Total
- Serves
- 6
Before you start
Before starting, make sure all ingredients are measured and ready. Cube the cold butter and keep it in the refrigerator until the last minute. Crack the eggs into a small bowl and keep them cold. Line a large baking sheet with parchment paper so it is ready to go.
Preheat the oven to 410°F (210°C) at least 15 minutes before baking to ensure it is fully hot. If the kitchen is warm, chill the mixing bowl and paddle attachment for 10 minutes before creaming. This helps keep the butter cold, which is essential for tall cookies.
Ingredients at a glance (10)
- 1 cup cold unsalted butter, cubed
- 3/4 cup packed brown sugar
- 1/2 cup white sugar
- 2 large cold eggs
- 1 tsp vanilla extract
- 2 cups all-purpose flour
- 1/2 tsp baking powder
- 1/2 tsp baking soda
- 1 tsp kosher salt
- 2 cups semisweet chocolate chips
Instructions
Mixing the Dough
- Cream the Cold Butter and SugarsHeat the oven to 410°F (210°C). Line a large baking sheet with parchment paper. Place the cubed cold butter, brown sugar, and white sugar in the bowl of a stand mixer fitted with the paddle attachment. Mix on medium-low speed just until the butter is broken up and the mixture looks sandy, about 1 minute. Scrape down the bowl. Add the cold eggs and vanilla extract, then mix on medium speed until the eggs are fully incorporated and the mixture is smooth, about 30 seconds.Look for The mixture will look like wet sand with small butter bits; no large butter chunks remain.Safe temperature 160°F (71°C) internal temperature (egg dishes)Tip Cold butter is key — it creates steam pockets in the oven that make the cookies tall and craggy.
- Add the Dry IngredientsIn a separate bowl, whisk together the flour, baking powder, baking soda, and kosher salt. With the mixer on low speed, add the flour mixture to the butter mixture in two additions, mixing just until no dry streaks remain. Scrape down the sides and bottom of the bowl to ensure everything is evenly combined. The dough will be thick and slightly sticky. Fold in the chocolate chips with a spatula until they are evenly distributed throughout the dough.Look for The dough holds together when pressed; no flour pockets remain.Tip Do not overmix once the flour goes in — overworking develops gluten and makes cookies tough.
The dough will look like a thick, slightly sticky mass with small butter bits still visible. It should not be fluffy or pale. The sugars are just combined with the butter, and the eggs are fully incorporated.
When you press the dough together, it holds its shape. The dough smells sweet and buttery, with a faint vanilla aroma. Before moving on, make sure there are no flour pockets in the bottom of the bowl.
Baking the Cookies
- Portion the Dough into Tall RoundsUse a 1/3-cup ice cream scoop or a measuring cup to portion the dough into 6 equal mounds. Gently shape each mound into a tall, rough ball, about 2 1/2 inches tall. Do not flatten them; the height is what creates the craggy exterior and gooey center. Place 3 dough balls on the prepared baking sheet, spacing them at least 3 inches apart. Keep the remaining dough in the refrigerator while the first batch bakes.Look for The dough balls stand tall and slightly uneven on top, like mini mountains.Tip Chilling the second batch while the first bakes keeps the butter cold and the cookies tall.
- Bake Hot for Exactly 10 MinutesPlace the baking sheet on the center rack of the oven. Bake at 410°F (210°C) for exactly 10 minutes. The edges will look set and lightly browned, while the centers will still appear pale and slightly underdone. Do not open the oven door during baking. After 10 minutes, remove the sheet from the oven. Let the cookies cool on the baking sheet for 5 minutes; they will continue to set as they cool.Look for The edges are golden and crispy; the centers look soft and slightly puffed.Safe temperature 160°F (71°C) internal temperature (egg dishes)Tip The 10-minute mark is non-negotiable — even 1 extra minute will cook the centers through.
- Transfer to a Cooling RackAfter the cookies have rested on the baking sheet for 5 minutes, carefully transfer them to a wire cooling rack using a thin spatula. The cookies will be soft and may crack slightly — that is perfect. Let them cool for another 5 minutes on the rack. The centers will still be molten, so handle gently. If baking the second batch, repeat the portioning and baking steps with the remaining dough.Look for The cookies have a craggy, cracked top and are still warm to the touch.Tip A thin spatula helps lift the cookies without breaking them apart.
The kitchen will smell like toasted butter and caramel. The cookies have spread slightly but remain tall. The edges are golden brown and crisp, while the centers are pale and soft. The tops have developed a few cracks, and the chocolate chips are just beginning to melt. The cookies look slightly underdone in the center, which is correct. They should be removed from the oven exactly at the 10-minute mark.
Cooling and Serving
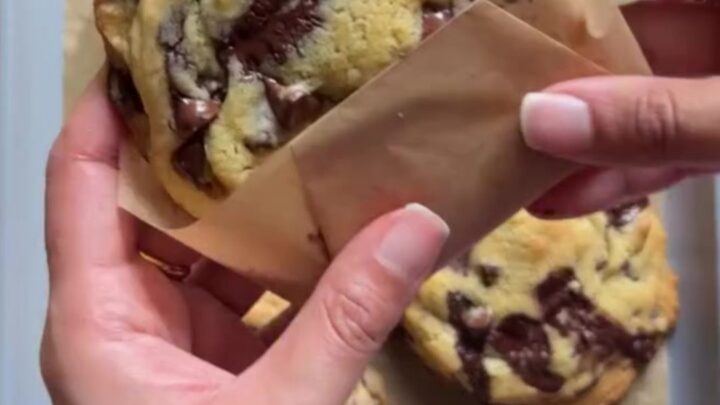
- Break Open and Serve the Molten CenterTo serve, gently break a warm cookie in half or cut it with a knife. The center should be gooey and molten, with chocolate flowing out in thick ribbons. Serve immediately while warm. If the cookies have cooled completely, reheat them in a 350°F (175°C) oven for 3–4 minutes to restore the molten center before serving.Look for The inside is glossy and molten; the outside is crisp and caramelized.Tip Warm cookies are best — the chocolate is most flowing right after baking.
After cooling for 5 minutes on the baking sheet, the cookies are firm enough to lift but still soft. When broken open, the center is moist and glossy, with chocolate flowing out in ribbons. The exterior is crisp and caramelized, providing a satisfying crunch. The cookies are best served warm, with the molten center contrasting against the crunchy edges. If the center looks dry, the cookies were overbaked.
Common mistakes
One common mistake is overmixing the dough, which leads to tough cookies. Mix just until the flour disappears. Another mistake is flattening the dough balls — they must stay tall to create the craggy texture. Skipping the parchment paper can cause the cookies to stick and spread unevenly.
Also, do not open the oven door during baking; the temperature drop can affect the rise. Finally, resist the urge to bake longer than 10 minutes, even if the centers look underdone — that is exactly what you want.
How to tell it’s done
The cookies are done when the edges are set and lightly browned, and the centers look slightly puffy and pale. The top should have a few cracks, and the cookies should feel firm at the edges but soft in the center when gently pressed.
Because the eggs are fully cooked at 160°F (71°C) — the center of the cookie reaches this temperature during baking — the cookies are safe to eat. The center will continue to set as the cookies cool on the baking sheet, so do not overbake. If the centers look completely dry, they are overdone.
- Egg dishes: 160°F (71°C) in the thickest part
Up next · Part 3 of 3
4 variations · storage & make-ahead · 5 answers · printable card
Tips, FAQ & printable recipe (Part 3)← Back to the ingredients (Part 1)