Desserts · Part 1 of 3: Ingredients
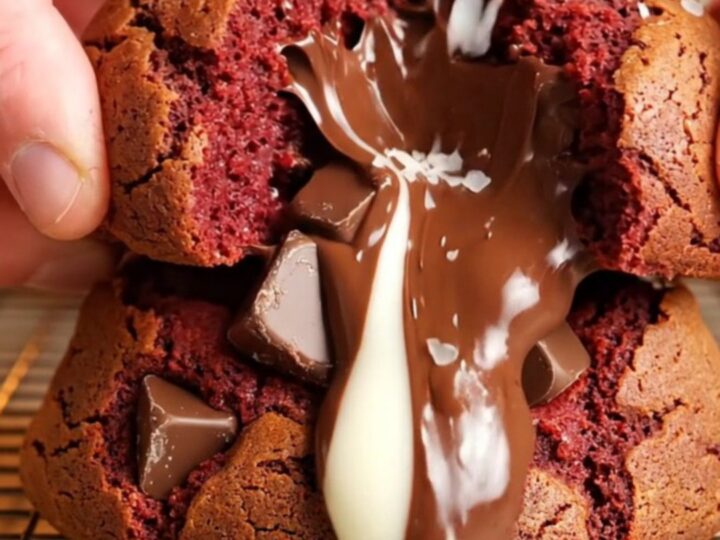
Giant Red Velvet Chocolate Chunk Cookies
- Prep
- Cook
- Total
- Serves
- 8
Imagine pulling a giant, bakery-style cookie from the oven, its edges crackled and crisp, the center soft and fudgy. As you break it open, a deep crimson crumb stretches with pools of melted white and dark chocolate.
These red velvet chocolate chunk cookies deliver that perfect contrast of textures: a slight chew at the edges, a tender, almost brownie-like middle, and generous chocolate in every bite. They’re showstoppers for any occasion, yet surprisingly simple to make at home.
These giant red velvet chocolate chunk cookies are everything you love about a classic bakery cookie, but with a festive crimson twist. The dough is enriched with Dutch cocoa and red food coloring, giving it that signature red velvet flavor and striking color. Chilled, tall mounds of dough bake into thick, fudgy-centered cookies with crisp, caramelized edges.
Loaded with both white chocolate chips and rough-chopped dark chocolate, each bite offers a molten, chocolatey surprise. Perfect for holiday cookie exchanges, weekend baking, or whenever a serious chocolate craving hits, these cookies are sure to become a favorite.
Ingredients
- 1 cup cold unsalted butter, cubed
- 1 cup dark brown sugar, packed
- 1/2 cup granulated sugar
- 2 large cold eggs
- 2 tsp vanilla extract
- 1 tbsp red food coloring
- 2 1/4 cups all-purpose flour
- 1/4 cup Dutch cocoa powder
- 1 tbsp cornstarch
- 1 tsp baking soda
- 1/2 tsp salt
- 1 cup white chocolate chips
- 1 1/4 cups rough-chopped dark chocolate chunks
Why this recipe works
The method behind these cookies is all about achieving that coveted bakery-style texture: crisp edges and a soft, fudgy center. Starting with cold butter and cold eggs helps the dough stay thick and spread less during baking.
This is crucial because a thicker dough means a taller, softer center that remains gooey after baking. Additionally, the combination of brown sugar and granulated sugar provides the right balance of moisture and structure, while the cornstarch adds a tender crumb.
Chilling the dough is another key step. It solidifies the butter, which prevents the cookies from spreading too much in the oven. This allows the edges to set and caramelize while the centers stay soft and underbaked, creating that irresistible contrast. The high oven temperature of 380°F also helps achieve this by setting the edges quickly while leaving the middle slightly underdone. The result is a cookie that looks and tastes like it came from a professional bakery.
Notes and substitutions
For the best flavor, use Dutch cocoa powder, which has a smoother, less acidic taste than regular cocoa. If you only have regular cocoa, it will still work, but the color may be slightly less deep. The red food coloring is what gives these cookies their vibrant hue; using a gel-based coloring provides a more intense color without adding extra liquid. Make sure to use cold butter straight from the fridge—this is essential for the texture.
When it comes to chocolate, a mix of white chocolate chips and rough-chopped dark chocolate creates the best flavor and texture. The white chocolate adds sweetness and creamy pockets, while the dark chocolate provides a rich, slightly bitter contrast.
You can use any good-quality chocolate you like. For a truly bakery-style look, chop a dark chocolate bar into chunks rather than using chips; the irregular pieces melt into beautiful pools. The dough can be made ahead and refrigerated for up to 3 days, or frozen for longer storage.
- Dutch cocoa powder: Regular unsweetened cocoa powder can be used; the color will be slightly less deep, but the flavor will still be rich.
- White chocolate chips: Use any white chocolate bar chopped into chunks for larger pools of melted white chocolate.
- Dark chocolate chunks: Semi-sweet or bittersweet chocolate chips work well if you don't have a bar to chop.
- Red food coloring: For a natural alternative, use beet powder mixed with a little water, though the color will be less vibrant.
Equipment
- Stand mixer or hand mixer
- Large mixing bowls
- Whisk
- Rubber spatula
- Baking sheets
- Parchment paper
- Wire rack
Up next · Part 2 of 3
8 steps · 11 min of cooking · what to look for at each stage
Step-by-step instructions (Part 2)