Dinner · Part 2 of 3: Instructions
Garlic Herb Pork Chop Skillet with Baby Potatoes Step-by-step instructions
- Prep
- Cook
- Total
- Serves
- 2
Before you start
Before starting the heat, gather and prepare all the ingredients to ensure a smooth cooking process. Pat the pork chops completely dry with paper towels to facilitate a superior sear.
Wash and halve the baby potatoes, making sure they are dry before they hit the pan. Mince the garlic cloves and measure out the butter and fresh herbs so they are ready to be added to the skillet at the precise moment.
Ingredients at a glance (5)
- 2 thick-cut bone-in pork chops (about 1 pound total)
- 12 oz baby potatoes, halved
- 4 tbsp butter
- 4 cloves garlic, minced
- 1 tbsp chopped fresh herbs
Instructions
Searing the Pork Chops
- Prep the Pork ChopsPat the 2 thick-cut bone-in pork chops dry with paper towels. Let them sit at room temperature for no more than 15 to 20 minutes before cooking to ensure an even sear.Look for The meat surface should look completely dry.Tip Drying the meat is essential to get a deep, golden crust rather than steaming.
- Sear the Pork ChopsHeat a heavy 12-inch cast-iron skillet over medium-high heat. Add the pork chops directly to the dry skillet and sear without moving them for 4 to 5 minutes, allowing their natural fats to render and form a deep golden-brown crust. Flip and sear the other side for an additional 3 to 4 minutes. Transfer the chops to a plate and set aside.Look for A rich, golden-brown crust should form on the seared surfaces.Tip Press down gently on the chops with tongs to ensure complete surface contact with the pan.
At the end of this phase, the pork chops will have a deep, golden-brown crust on both sides. The skillet will be hot, filled with the rich aroma of seared meat, and a layer of flavorful rendered fat will have formed on the bottom of the pan. The chops will not be fully cooked through yet, which is expected since they will finish cooking later during the basting step.
Roasting the Baby Potatoes
- Cook the Baby PotatoesReduce the skillet heat to medium. Add the 12 oz halved baby potatoes to the hot skillet, cut-side down, tossing them in the rendered pan juices. Cook for 10 to 12 minutes, stirring occasionally, until the potatoes are fork-tender and the edges are beautifully browned and crispy.Look for The potatoes should be easily pierced with a fork and have a golden-brown exterior.Tip Keep the cut sides down for the first few minutes to get maximum crispiness.
The baby potatoes should be fork-tender with beautifully browned, crispy edges. They will have absorbed the savory pork fat and pan drippings, turning glistening and golden. The kitchen will smell intensely savory, and the potatoes will be slightly shrunk and wrinkled, indicating they are fully cooked through. Check that they are tender in the center before moving on.
Butter Basting and Finishing
- Baste the Pork ChopsReturn the pork chops and any accumulated juices to the skillet, nesting them among the potatoes. Reduce the heat to medium-low. Add 4 tbsp butter, 4 minced garlic cloves, and 1 tbsp chopped fresh herbs to the pan. As the butter melts and foams, tilt the skillet slightly and use a metal spoon to continuously ladle the hot garlic-herb butter over the pork chops.Look for The butter should be foaming and bubbling, releasing a rich garlic and herb aroma.Tip Work quickly so the garlic does not burn in the hot butter.
- Finish and RestContinue basting for 2 to 3 minutes until the pork chops reach a safe internal temperature of 145°F (63°C). Remove the skillet from the heat, transfer the pork chops to a warm plate, and let them rest for at least 3 minutes before slicing. Spoon the remaining garlic-herb butter and crispy potatoes over the chops for serving.Look for The meat thermometer must read 145°F (63°C) in the thickest part of the chops.Safe temperature 145°F (63°C) internal temperature (steaks, chops and roasts)Tip Resting the meat is essential to keep the juices from running out when sliced.
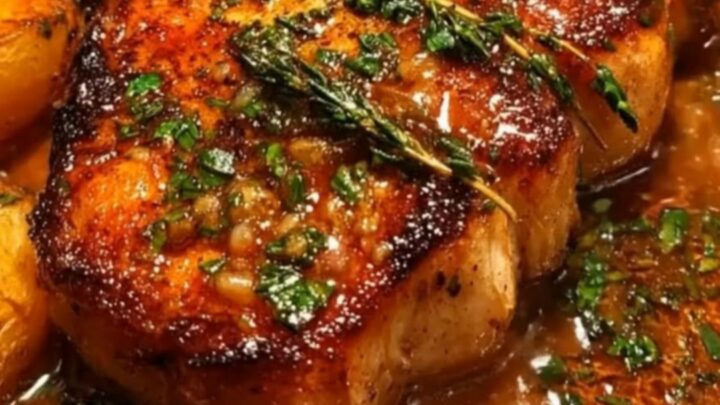
The skillet will bubble with a golden, foaming pool of melted butter speckled with fragrant minced garlic and toasted herb leaves.
The pork chops will be glistening with a rich glaze, and their internal temperature will have reached the safe threshold of 145°F (63°C). The aroma of roasted garlic, caramelized butter, and woody herbs will fill the air, signaling the dish is complete.
Common mistakes
A common mistake is adding the butter too early in the cooking process. Butter has a low smoke point due to its milk solids, and subjecting it to the high heat required for searing the pork chops will cause it to burn, turning bitter and black.
Always sear the meat first to render its natural fats, and only introduce the butter, garlic, and herbs during the final minutes of cooking over reduced heat to create a sweet, nutty, and aromatic basting sauce.
How to tell it’s done
To determine perfect doneness, insert an instant-read digital meat thermometer into the thickest part of the pork chop, avoiding the bone. The pork chops are done when they reach an internal temperature of 145°F (63°C).
Once this temperature is achieved, immediately transfer the chops to a warm plate and let them rest for at least 3 minutes; this resting period allows the juices to redistribute throughout the meat, ensuring a tender and succulent bite.
- Steaks, chops and roasts: 145°F (63°C) in the thickest part, then a 3-minute rest
Up next · Part 3 of 3
2 variations · storage & make-ahead · 3 answers · printable card
Tips, FAQ & printable recipe (Part 3)← Back to the ingredients (Part 1)