Dinner · Part 2 of 3: Instructions
Garlic Herb Glazed Meatloaf with Roasted Potatoes Step-by-step instructions
- Prep
- Cook
- Total
- Serves
- 6
Before you start
Before starting, ensure your oven is preheated to the correct temperature. Gather all ingredients and chop the fresh herbs and garlic finely to distribute the flavor evenly throughout the meat.
Have your baking dishes ready to go so the transition from mixing to baking is seamless. Keep your work area clean and organized, as this will make the assembly process much faster and more enjoyable for the cook.
Ingredients at a glance (6)
- 2 lb ground meat
- 3 cloves garlic, minced
- 2 tbsp fresh herbs, chopped
- 1/3 cup ketchup
- 1 1/2 lb potatoes, cubed
- 2 tbsp olive oil
Instructions
Meatloaf Assembly
- Prepare and Bake MeatloafPreheat oven to 375°F (190°C). In a large bowl, combine ground meat, garlic, and fresh herbs. Mix well and shape into a loaf in a baking dish. Bake for 45 minutes until the internal temperature reaches 160°F (71°C).Look for The meatloaf should be firm to the touch and browned on the outside.Safe temperature 160°F (71°C) internal temperature (ground meat)Tip Avoid overmixing the meat to ensure the final texture remains tender and juicy.
The meatloaf should be shaped into a uniform, compact loaf inside the baking dish. The surface should be smooth and ready for the oven. Ensure the garlic and herbs are evenly incorporated throughout the meat to avoid pockets of flavorless beef. The loaf should look sturdy and ready to hold its shape during the long baking process.
Glazing and Roasting
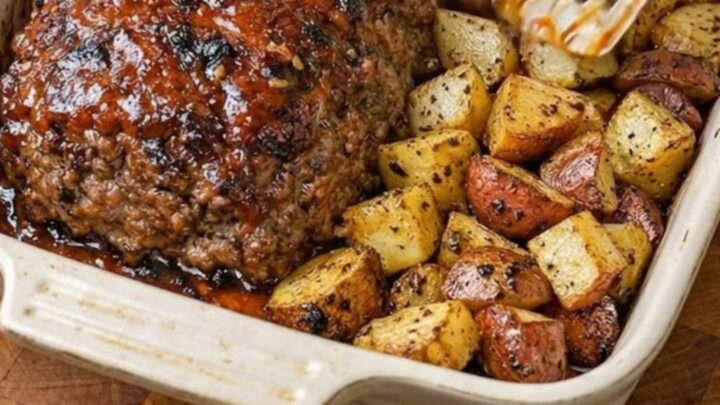
- Glaze and Roast PotatoesRemove the meatloaf from the oven and brush the top with ketchup glaze. Return to the oven for 10 minutes to caramelize. Meanwhile, toss potato cubes in olive oil and roast on a separate baking sheet or pan until golden brown and tender.Look for The glaze should be bubbly and glossy, and potatoes should have crispy edges.Tip Use a pastry brush for an even coating of the glaze across the entire meatloaf surface.
The meatloaf should be beautifully browned and the potatoes should be sizzling in the oil. The glaze should be applied in a thin, even layer. As it roasts, the ketchup will darken and become sticky, creating a rich, caramelized layer that smells sweet and savory. Check that the potatoes are turning a deep golden hue.
Resting and Slicing
- Rest and ServeRemove the meatloaf from the oven and let it rest for 10 minutes before slicing. Transfer the roasted potatoes to the serving board alongside the sliced meatloaf. Serve immediately while warm.Look for The juices should be settled within the meat, ensuring a moist slice every time.Tip Resting allows the meat fibers to relax, which keeps the juices inside instead of running onto the board.
The meatloaf should feel slightly firm after resting. The juices should be contained within the loaf, keeping it tender. When slicing, use a sharp knife to ensure clean cuts.
The potatoes should be arranged neatly around the meatloaf, ready for serving. The final presentation should be warm, inviting, and ready for immediate enjoyment at the table.
Common mistakes
A common mistake is overworking the meat mixture, which leads to a dense and tough texture. Mix the ingredients just until they are combined.
Another error is failing to let the meatloaf rest; slicing too soon causes the juices to escape, resulting in a dry slice. Finally, do not overcrowd the potato pan, as this causes them to steam rather than roast, preventing that desirable crispy texture.
How to tell it’s done
The meatloaf is done when the internal temperature reaches 160°F (71°C) at the center. Use an instant-read meat thermometer to verify this. The exterior should be deeply browned and the glaze should be set and glossy.
The potatoes are done when they are fork-tender and have achieved a deep golden-brown color on all sides, indicating they are crispy and fully cooked through.
- Ground meat: 160°F (71°C) in the thickest part
Up next · Part 3 of 3
2 variations · storage & make-ahead · 3 answers · printable card
Tips, FAQ & printable recipe (Part 3)← Back to the ingredients (Part 1)