Desserts · Part 2 of 3: Instructions
Fudgy Double Chocolate Banana Bread Recipe Step-by-step instructions
- Prep
- Cook
- Total
- Serves
- 10
Before you start
Before starting, preheat the oven to 350°F (175°C) and line a 9x5-inch loaf pan with parchment paper. Make sure the bananas are very ripe and the butter is melted and slightly cooled.
Measure all ingredients before beginning to ensure a smooth process. This recipe comes together quickly, so having everything ready will make mixing and baking a breeze.
Ingredients at a glance (10)
- 3 ripe bananas, mashed
- 1 large egg
- 1/2 cup unsalted butter, melted
- 3/4 cup dark brown sugar, packed
- 1 tsp pure vanilla extract
- 1 1/2 cups all-purpose flour
- 1/2 cup Dutch cocoa powder
- 1 tsp baking soda
- 1 cup semi-sweet chocolate chips
- 1/4 cup semi-sweet chocolate chips, for topping
Instructions
Mixing the Batter
- Mash and Mix Wet IngredientsPreheat the oven to 350°F (175°C). Line a 9x5-inch loaf pan with parchment paper, leaving some overhang on the long sides. In a large bowl, mash the ripe bananas with a fork until mostly smooth. Add the egg, melted butter, dark brown sugar, and vanilla extract. Whisk until the mixture is well combined and smooth.Look for The mixture should be glossy and well blended, with no streaks of egg or butter.Tip Use bananas that are heavily speckled or even black for the most flavor and sweetness.
- Sift Dry IngredientsIn a separate bowl, sift together the all-purpose flour, Dutch cocoa powder, and baking soda. Sifting removes any lumps from the cocoa and ensures the leavening is evenly distributed. This step is crucial for a smooth, even crumb.Look for The dry ingredients should be well combined and free of lumps.Tip If you don't have a sifter, whisk the dry ingredients together for at least 30 seconds.
- Combine Wet and DryAdd the dry ingredients to the wet mixture. Use a rubber spatula to fold everything together gently, just until no streaks of flour remain. Be careful not to overmix, as this can make the bread tough. Fold in 1 cup of semi-sweet chocolate chips until evenly distributed.Look for The batter should be thick and fudgy, with no dry pockets of flour.Tip Overmixing develops gluten, which can make the bread dense instead of tender.
At the end of this phase, you should have a smooth, glossy wet mixture and a dry mixture that is well combined.
Once folded together, the batter should be thick and fudgy, with no dry streaks. The chocolate chips should be evenly distributed throughout the batter, ready to be poured into the pan.
Baking the Bread
- Pour Batter into PanScrape the batter into the prepared loaf pan and smooth the top with a spatula. Sprinkle the remaining 1/4 cup of chocolate chips evenly over the surface, pressing them gently into the batter so they stick during baking.Look for The batter should be evenly distributed in the pan, with the top covered in chocolate chips.Tip Pressing the chips lightly helps them stay on top rather than sinking completely into the batter.
- Bake the BreadPlace the pan in the preheated oven and bake for 50 minutes, or until a toothpick inserted into the center comes out with a few moist crumbs (no raw batter). The top should be domed and set. If the top is browning too quickly, tent loosely with foil during the last 15 minutes.Look for The bread should be domed, and the edges will start to pull away from the pan.Safe temperature 160°F (71°C) internal temperature (egg dishes)Tip Oven temperatures vary; start checking at 45 minutes to avoid overbaking.
After baking, the bread should be domed and set, with a toothpick inserted into the center coming out with just a few moist crumbs. The top will be crackly and the edges will pull away from the pan. The kitchen will smell intensely of chocolate and banana.
Cooling and Serving
- Cool in PanRemove the pan from the oven and place it on a cooling rack. Let the bread cool in the pan for 10 minutes. This allows the structure to set and makes it easier to remove without breaking.Look for The bread should be firm to the touch but still warm.Tip Cooling in the pan helps the bread finish setting; don't skip this step.
- Remove and Cool CompletelyUsing the parchment overhang, lift the bread out of the pan and transfer it to a wire rack. Allow it to cool completely before slicing, about 1 hour. For the best texture, wait until fully cooled; warm bread tends to crumble when sliced.Look for The bread should be cool to the touch and firm enough to slice cleanly.Tip For cleaner slices, use a serrated knife and a gentle sawing motion.
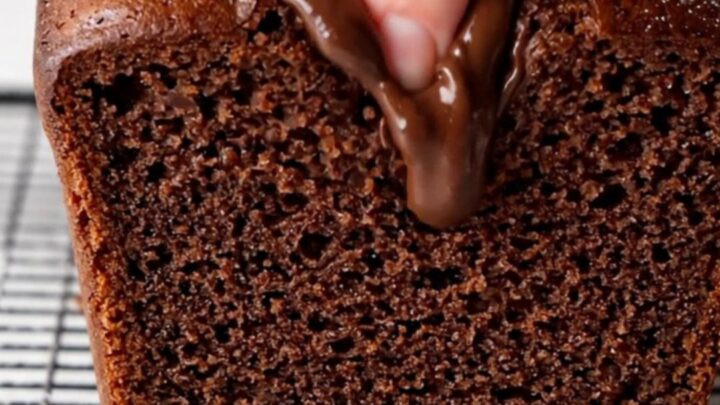
- Slice and ServeOnce cooled, slice the bread into thick slices. The interior should be moist and fudgy with melted chocolate pockets throughout. Serve as is, or warm slices slightly for an extra gooey texture.Look for The center should be moist and fudgy, not dry or crumbly.Tip Warm slices in the microwave for 10-15 seconds to melt the chocolate chips for an extra indulgent treat.
Once cooled, the bread should be firm enough to slice without crumbling. The interior should be moist, fudgy, and studded with melted chocolate pockets. The texture should be tender and rich, almost like a brownie combined with banana bread.
Common mistakes
One common mistake is overmixing the batter, which can make the bread tough and dense. Mix just until the flour is incorporated. Another is underbaking—since the bread is dark, it can be hard to tell when it's done.
Always use a toothpick test to check the center. Also, be sure to let the bread cool completely before slicing, as cutting it too early can cause it to crumble.
How to tell it’s done
The bread is done when a toothpick inserted into the center comes out with a few moist crumbs, not wet batter. The top should be domed and spring back when lightly pressed.
The internal temperature should reach at least 200°F (93°C) for a fully baked loaf. If the top browns too quickly, cover loosely with foil for the last 15 minutes of baking.
- Egg dishes: 160°F (71°C) in the thickest part
Up next · Part 3 of 3
4 variations · storage & make-ahead · 5 answers · printable card
Tips, FAQ & printable recipe (Part 3)← Back to the ingredients (Part 1)