Breakfast · Part 2 of 3: Instructions
Flower-Shaped Turkish Brioche Buns, Pillowy Soft Step-by-step instructions
- Prep
- Cook
- Total
- Serves
- 8
Before you start
Before starting, measure all ingredients accurately. Bring the water and milk to a warm temperature—about 110°F (43°C)—so the yeast activates properly. Have a large mixing bowl, a wooden spoon, a clean kitchen towel, and a baking sheet lined with parchment paper ready.
Clear a flat surface for kneading and shaping. If using instant yeast, no need to proof it; just add it to the dry ingredients. For the egg wash, separate the yolk from the white and whisk it with water. Prepare the seeds in small bowls for easy sprinkling.
Ingredients at a glance (11)
- 1 cup warm water
- 1/2 cup warm milk
- 1/2 cup vegetable oil
- 1 large egg
- 2 tbsp granulated sugar
- 1 packet instant yeast (about 2 1/4 tsp)
- 5 cups all-purpose flour
- 1 egg yolk
- 1 tbsp water
- 2 tbsp white sesame seeds
- 1 tbsp nigella seeds
Instructions
Mixing and Rising
- Mix the DoughIn a large glass bowl, combine the warm water, warm milk, vegetable oil, egg, sugar, and instant yeast. Stir briefly to dissolve the sugar and yeast. Add the all-purpose flour and stir with a wooden spoon until a soft, shaggy dough forms. Turn the dough out onto a lightly floured surface and knead for 6 to 8 minutes, until smooth, silky, and no longer sticky. If the dough is too wet, add a little more flour, a tablespoon at a time.Look for The dough is smooth, soft, and slightly tacky but not sticky.Tip Kneading on a lightly oiled surface can help prevent sticking without adding too much flour.
- First RisePlace the dough back into the bowl, cover with a clean kitchen towel or plastic wrap, and let it rise in a warm, draft-free spot for about 1 hour, or until doubled in size. The dough should be puffy and airy when ready. If your kitchen is cool, place the bowl in a slightly warm oven (turned off) with the door closed, or near a sunny window. The rise time can vary, so rely on the visual cue rather than the clock.Look for The dough has doubled in volume and springs back slowly when poked.Tip To test if the dough is ready, press a finger into it; if the indentation remains, it's risen enough.
After mixing, the dough should be soft, slightly sticky, and come together into a smooth ball. During the rise, it will double in size and feel airy when poked.
The kitchen will smell faintly of yeast and bread. If the dough hasn't risen after an hour, place it in a warmer spot and wait a little longer. The dough should be full of air and easy to punch down.
Shaping and Topping
- Shape the FlowersTurn the risen dough out onto a lightly floured surface and divide it into 8 equal pieces. Shape each piece into a smooth ball. Roll one ball into a circle about 8 inches in diameter. Using a sharp knife or bench scraper, make 8 cuts from the edge toward the center, leaving the center intact to create petals. Gently lift each petal and twist it slightly, then press the end into the center to form a flower shape. Repeat with the remaining dough balls.Look for Each piece is shaped like a flower with distinct petals and a defined center.Tip Keep the cuts evenly spaced for a uniform flower. Use a bench scraper for clean cuts.
- Egg Wash and Seed ToppingIn a small bowl, whisk together the egg yolk and water to make an egg wash. Using a pastry brush, generously brush the top of each flower-shaped bun with the egg wash, making sure to cover the petals and the center. Sprinkle the white sesame seeds and nigella seeds over the tops, focusing on the tips of the petals for a beautiful contrast. The egg wash will give the buns a shiny, golden crust as they bake.Look for The buns are well-coated with egg wash and seeds cling to the surface.Tip Brushing the egg wash gently avoids deflating the dough. Let any excess drip off the brush.
The shaped flowers should hold their form, with distinct petals and a defined center. When brushed with egg wash, the dough will look glossy and golden. The seeds should stick to the surface without falling off. The buns may puff slightly during the rest, which is normal. Ensure they are evenly spaced on the baking sheet to allow for expansion.
Baking and Cooling
- Bake the BunsPreheat the oven to 375°F (190°C). Place the baking sheet with the shaped and topped buns in the oven. Bake for 18 to 20 minutes, or until the buns are deep golden brown and sound hollow when tapped on the bottom. The internal temperature of the buns should reach 190°F (88°C) to ensure they are fully baked. If the tops are browning too quickly, loosely tent with aluminum foil for the last 5 minutes.Look for The buns are golden brown, fragrant, and the petals have pulled apart slightly.Safe temperature 160°F (71°C) internal temperature (egg dishes)Tip Rotate the baking sheet halfway through for even browning. Ovens vary, so check at 15 minutes.
- Cool and Test SoftnessRemove the baking sheet from the oven and let the buns cool on the sheet for 5 minutes. Then transfer them to a wire rack to cool completely, or serve warm. To test the softness, press a finger gently on the side of a bun; it should spring back immediately, leaving no indentation. The crumb should be pillowy and tender, with a slight pull-apart texture. If any buns are stuck together, gently separate them along the petals. Serve warm or at room temperature.Look for The buns spring back when pressed and are soft to the touch.Tip Cooling on a rack prevents soggy bottoms. Serve within a few hours for best texture.
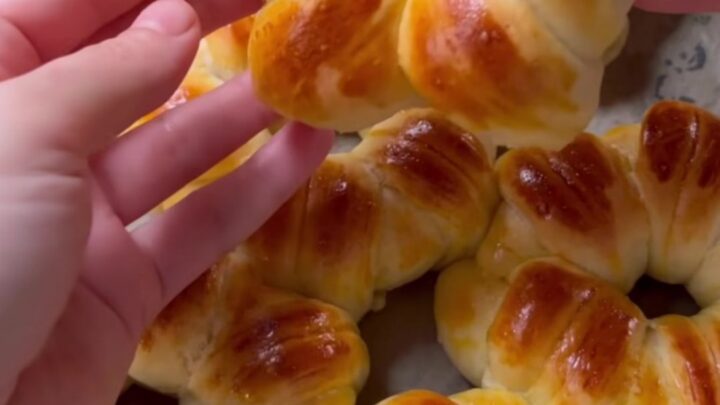
The buns will rise in the oven, turning a deep golden brown. The petals will separate slightly, creating a beautiful flower effect. The aroma of baked bread fills the kitchen. When tapped on the bottom, they should sound hollow. After cooling for a few minutes, the buns should spring back when pressed, indicating a soft, tender crumb.
Common mistakes
One common mistake is using liquids that are too hot or too cold, which can kill the yeast or prevent it from activating. Another is over-kneading the dough, which can make it tough; stop as soon as it feels smooth and elastic.
When shaping the flowers, avoid making the cuts too deep, or the petals may separate during baking. Skipping the second rest before baking can cause the buns to deflate in the oven. Also, be careful not to over-brush the egg wash, as excess can pool and create dark spots.
How to tell it’s done
The buns are done when they are deep golden brown on top and sound hollow when tapped on the bottom. An instant-read thermometer inserted into the center of a bun should register at least 190°F (88°C) for a fully baked bread.
The internal temperature of the eggs in the dough reaches 160°F (71°C) well before the bread finishes, ensuring safety. Press the side of a bun gently; it should spring back immediately, indicating a soft, airy crumb. Let them cool slightly before serving to allow the structure to set.
- Egg dishes: 160°F (71°C) in the thickest part
Up next · Part 3 of 3
4 variations · storage & make-ahead · 5 answers · printable card
Tips, FAQ & printable recipe (Part 3)← Back to the ingredients (Part 1)