Drinks · Part 2 of 3: Instructions
Emerald Honeydew Kiwi Mint Cream Smoothie Cooler Step-by-step instructions
- Prep
- Cook
- Total
- Serves
- 2
Before you start
Before starting, peel and cube the honeydew, peel and slice the kiwis, and grate the white chocolate into curls. Measure the condensed milk and have the ice ready.
Chill the serving glasses in the freezer for at least 15 minutes if you want an extra-cold drink. All ingredients should be cold for the best texture.
Ingredients at a glance (6)
- 2 cups honeydew melon, peeled, seeded, and cubed
- 3 green kiwis, peeled and sliced
- 1/2 cup sweetened condensed milk
- 1 cup ice cubes
- 2 oz lime white chocolate, grated into curls
- Fresh mint leaves, for garnish, to taste
Instructions
Prep the Fruit and Chocolate
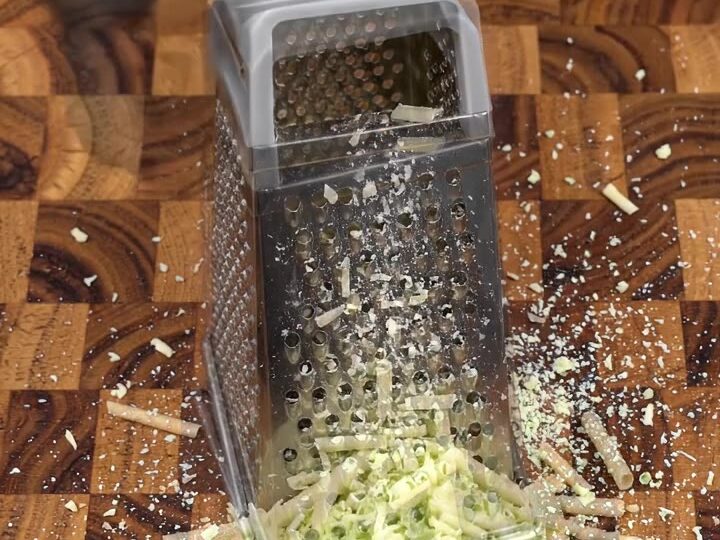
- Prep the fruit and chocolatePeel the honeydew melon, remove the seeds, and cut the flesh into 1/2-inch cubes. Peel the green kiwis and slice them into thin wheels. Grate the block of lime white chocolate on the large holes of a box grater to create fluffy curls; set aside.Look for Fruit pieces are uniform for even blending; chocolate curls are light and airy.Tip Chill the chocolate in the freezer for 5 minutes before grating for cleaner curls.
- Measure the remaining ingredientsMeasure the sweetened condensed milk and have the ice cubes ready. Keep all ingredients cold until blending.Look for All ingredients are measured and within reach.Tip Use full-fat condensed milk for the creamiest texture.
At this stage, the honeydew is cubed, the kiwi is sliced, and the white chocolate is grated into a pile of curls. The fruit pieces are uniform in size, which ensures even blending. The chocolate curls are light and airy, ready to garnish. Everything is measured and ready for the blender.
Blend the Smoothie
- Combine in blenderAdd the honeydew cubes, kiwi slices, sweetened condensed milk, and ice cubes to a glass blender pitcher in that order.Look for The pitcher is about two-thirds full.Tip Adding ice last helps push the fruit down toward the blades.
- Blend until smoothLock the lid securely and blend on high speed for 30 to 45 seconds, stopping to scrape down the sides if needed, until the mixture is thick and swirling with no visible chunks.Look for The mixture is uniformly green, thick, and moves in a vortex.Tip If the blender stalls, add a tablespoon of cold water to help it along.
After blending, the mixture is a thick, swirling vortex of bright green. It should be smooth and creamy, with no visible chunks.
The blender pitcher is filled with a luscious, frosty liquid that moves slowly when tilted. The aroma is sweet and fruity with a hint of vanilla from the condensed milk.
Serve and Garnish
- Serve immediatelyPour the smoothie into chilled glasses immediately. Garnish each glass with a generous pile of white chocolate curls and a fresh mint leaf, if desired.Look for The smoothie is thick and creamy; curls sit on top without sinking.Tip Serve right away to enjoy the best texture and cold temperature.
The smoothie is poured into chilled glasses, topped with a generous pile of white chocolate curls and a fresh mint leaf. The curls sit on top, gradually melting into the drink. The presentation is vibrant and inviting, with the green smoothie contrasting against the white curls and green mint.
Common mistakes
Avoid over-blending, which can make the smoothie too thin and watery. Start with a short blend and pulse if needed. If the blender struggles, add a tablespoon of cold water at a time, but do not add too much or the drink will become diluted.
Also, do not skip grating the chocolate into curls—chopped chocolate will sink and not look as elegant. Use a box grater for the fluffiest curls.
How to tell it’s done
The smoothie is done when it is completely smooth, thick, and pours easily but holds a slight mound when spooned. There should be no visible chunks of fruit or ice.
The color will be a uniform, vibrant green. Since there are no raw proteins, no internal temperature check is needed. Serve immediately for the best texture and temperature.
Up next · Part 3 of 3
4 variations · storage & make-ahead · 5 answers · printable card
Tips, FAQ & printable recipe (Part 3)← Back to the ingredients (Part 1)