Desserts · Part 2 of 3: Instructions
Easy Peanut Butter Crunch Lasagna for Dessert Step-by-step instructions
- Prep
- Cook
- Total
- Serves
- 8
Before you start
Before beginning the assembly, ensure all ingredients are at room temperature, especially the cream cheese, which is crucial for achieving a smooth, lump-free filling. Prepare your 9x9 inch square baking dish by lightly greasing it or lining it with parchment paper to facilitate easy removal.
Have your spatula and electric mixer ready on the counter, and ensure you have enough space in your refrigerator to hold the dish flat during the chilling process. Organizing these elements beforehand will make the assembly process seamless and efficient.
Ingredients at a glance (5)
- 16 oz cream cheese, softened
- 1 cup creamy peanut butter
- 1 cup semi-sweet chocolate chips
- 1/4 cup peanut butter chips
- 1/4 cup crushed peanuts
Instructions
Mixing the filling
- Prepare the peanut butter fillingIn a large mixing bowl, beat the softened cream cheese until smooth. Add the creamy peanut butter and mix until the consistency is light and fluffy, ensuring the mixture is uniform.Look for The mixture should be pale and uniform in texture.Tip Ensure the cream cheese is at room temperature for the smoothest possible filling.
At the end of this phase, the filling should be pale, light, and completely smooth. Check for any unincorporated streaks of peanut butter by scraping the bottom of the bowl with your spatula. The mixture should be thick enough to hold its shape when lifted with the beaters, indicating it is aerated enough for the layering process.
Layering the base
- Assemble the lasagna layersSpread the prepared peanut butter mixture evenly into the bottom of a 9x9 inch baking dish. Use a silicone spatula to smooth the surface perfectly flat to ensure an even base for the chocolate topping.Look for The layer should reach all four corners of the dish.Tip Dampen the spatula slightly to prevent the filling from sticking during the spreading process.
The peanut butter layer should look uniform and smooth across the bottom of the baking dish. Verify that the layer is level by tilting the dish slightly and observing the surface. If there are any gaps or uneven spots, use your spatula to redistribute the filling until the surface is completely flat and ready for the chocolate layer.
Topping the lasagna
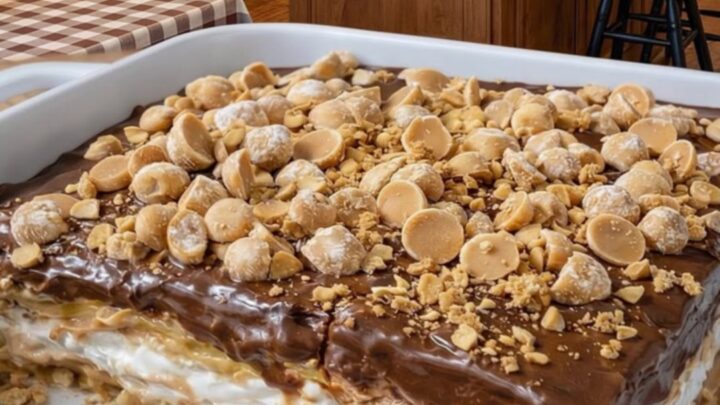
- Add the chocolate and crunch toppingsMelt the semi-sweet chocolate chips and pour them over the peanut butter layer, spreading carefully to cover the surface. Immediately sprinkle the peanut butter chips and crushed peanuts over the warm chocolate before it sets.Look for The toppings should be evenly distributed across the entire surface.Tip Work quickly once the chocolate is poured so the chips adhere properly to the surface.
The final assembly should look glossy and inviting, with a generous distribution of peanut butter chips and crushed peanuts over the chocolate.
Ensure the toppings are pressed lightly into the chocolate while it is still soft, so they remain secure as the chocolate hardens during the cooling phase. The dish should look clean and ready for the refrigerator.
Common mistakes
A common mistake is failing to whip the cream cheese long enough, which results in a dense, heavy filling instead of the desired airy texture. Another error is pouring the melted chocolate while it is too hot, which can cause the peanut butter layer underneath to melt and mix with the chocolate, ruining the distinct layers.
Always allow the melted chocolate to cool slightly until it reaches a pourable but thickened state before applying it to the top of the dessert.
How to tell it’s done
The lasagna is ready once the chocolate topping has fully set and the filling is firm to the touch. Gently press the center with a clean finger; it should hold its shape without any indentation or stickiness.
Because this is a no-bake dessert, the firmness is entirely dependent on the chilling time in the refrigerator, which allows the fats in the cream cheese and chocolate to solidify properly. Do not attempt to slice it before the recommended resting time is complete.
Up next · Part 3 of 3
2 variations · storage & make-ahead · 3 answers · printable card
Tips, FAQ & printable recipe (Part 3)← Back to the ingredients (Part 1)