Desserts · Part 2 of 3: Instructions
Easy Peanut Butter Chocolate Banana Bites Step-by-step instructions
- Prep
- Cook
- Total
- Serves
- 12
Before you start
Before beginning, ensure your workspace is clean and clear of clutter. Prepare a baking sheet with a sheet of parchment paper cut to size. Have your bananas peeled and sliced into consistent rounds, approximately half an inch thick.
Ensure your peanut butter and chocolate chips are measured and ready to use, as the assembly process moves quickly once you start. Having everything within reach will help you maintain a steady rhythm and ensure the chocolate stays at the ideal consistency for coating.
Ingredients at a glance (3)
- 2 medium bananas, sliced into coins
- 3 tbsp creamy peanut butter
- 1/2 cup milk chocolate chips, melted
Instructions
Setting up the base
- Prepare the banana coinsLine a baking sheet with parchment paper to prevent sticking. Peel the bananas and slice them into uniform, thick coins. Arrange the banana slices in even rows on the prepared baking sheet so they are ready for the toppings.Look for The banana slices should be of equal thickness to ensure they set properly and look uniform once finished.Tip Using a sharp knife makes clean cuts through the banana without squashing the fruit.
The banana slices should be arranged in neat, orderly rows on the parchment. Ensure each slice is flat against the surface. At this stage, the bananas should look fresh, vibrant, and uniform in size, providing the perfect foundation for the subsequent layers of peanut butter and chocolate.
Layering the flavors
- Add peanut butter and chocolatePlace a small dollop of creamy peanut butter onto the center of each banana coin. Gently melt the milk chocolate in a microwave-safe bowl using short bursts until smooth. Spoon the melted chocolate over each peanut-butter-topped banana coin, ensuring the edges are coated.Look for The chocolate should be glossy and smooth, flowing easily off the spoon to coat the peanut butter dollops.Tip If the chocolate is too thick, stir in a tiny drop of vegetable oil to loosen it.
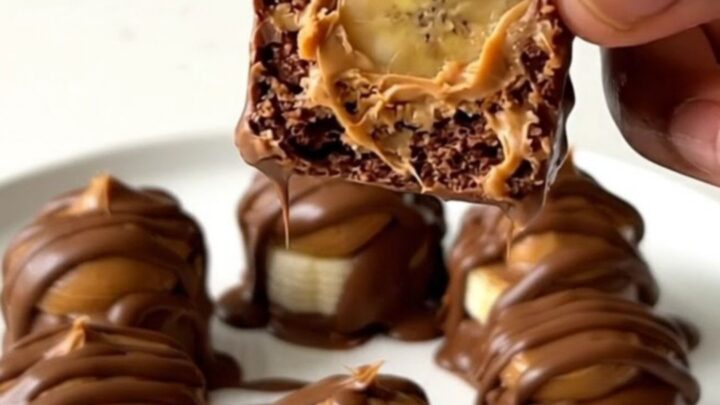
Each banana coin should have a neat dollop of peanut butter topped with an even layer of melted chocolate. The chocolate should reach the edges of the banana, creating a uniform coating. Check that no large gaps of peanut butter are exposed, as this ensures a clean, professional finish.
Final chilling process
- Chill and servePlace the baking sheet into the refrigerator and allow the bites to set until the chocolate is firm to the touch. Once completely set, remove the bites from the parchment paper and arrange them on a clean serving plate to enjoy.Look for The chocolate shell will look matte and feel solid when touched, indicating the bites are ready to serve.Tip Do not skip the chilling step, as it is essential for the chocolate to harden properly.
The bites should look set, with the chocolate appearing matte and firm. When you gently touch the edge of a bite, it should feel solid and cool. The entire assembly should be stable enough to lift and transfer to a serving plate without losing its shape.
Common mistakes
A common mistake is using bananas that are too ripe, which can make the bites structurally unstable and difficult to coat.
Another error is failing to let the chocolate cool slightly before applying it to the peanut butter; if the chocolate is too hot, it will melt the peanut butter and cause the layers to slide.
Finally, rushing the chilling process often leads to messy bites; allow sufficient time in the refrigerator so the chocolate can properly solidify and bond with the other ingredients.
How to tell it’s done
The bites are finished when the chocolate coating is completely firm and no longer tacky to the touch. When you lift a piece from the parchment, it should detach cleanly without leaving residue behind.
The peanut butter should be fully encased by the hardened chocolate shell, creating a smooth, glossy finish that maintains its shape even when handled at room temperature for a short time. There is no internal temperature to monitor, as no raw proteins are involved in this assembly.
Up next · Part 3 of 3
2 variations · storage & make-ahead · 3 answers · printable card
Tips, FAQ & printable recipe (Part 3)← Back to the ingredients (Part 1)