Dinner · Part 3 of 3: Tips & recipe card
Easy Hot Ham and Cheese Baked Sandwiches Tips, FAQ & printable recipe

- Prep
- Cook
- Total
- Serves
- 4
Tips for success
To achieve an extra level of flavor, sprinkle a tiny pinch of garlic powder or dried herbs over the tops of the bread before baking. This adds a subtle aromatic quality that complements the salty ham and savory cheese perfectly. Ensure the herbs are dried, as fresh ones may burn under the high heat of the oven during the 15-minute baking time.
If the sandwiches seem to be browning too quickly on top before the cheese has fully melted, you can loosely cover the dish with a piece of aluminum foil for the final few minutes of baking.
This protects the crust while allowing the internal heat to continue working on the cheese, ensuring a perfect result every time you prepare this comforting meal.
Variations
- Savory Herb Crust: Sprinkle a teaspoon of dried Italian seasoning over the bread before baking to add a fragrant, herbal note to the crust.
- Spicy Kick: Add a thin layer of spicy brown mustard or a few slices of pickled jalapeños inside the sandwich to provide a sharp, tangy contrast to the rich cheese.
Storage and make-ahead
- Fridge
- Keep in an airtight container for up to 3 days.
- Reheat
- Reheat in a 350°F oven for 5 to 8 minutes until warmed through and crisp.
Store any leftovers in an airtight container once they have cooled to room temperature. They can be kept in the refrigerator for up to 3 days.
To maintain the best texture, avoid storing them in a way that compresses the sandwiches, as this will destroy the light, airy quality of the toasted bread. It is best to place a small piece of parchment between them if stacking.
You can assemble the sandwiches up to 2 hours before baking, provided they are kept in the refrigerator. For the best results, ensure the dish is covered tightly to prevent the bread from drying out before the baking process begins. This allows for a quick transition from the refrigerator to the oven when you are ready to eat.
Serving ideas
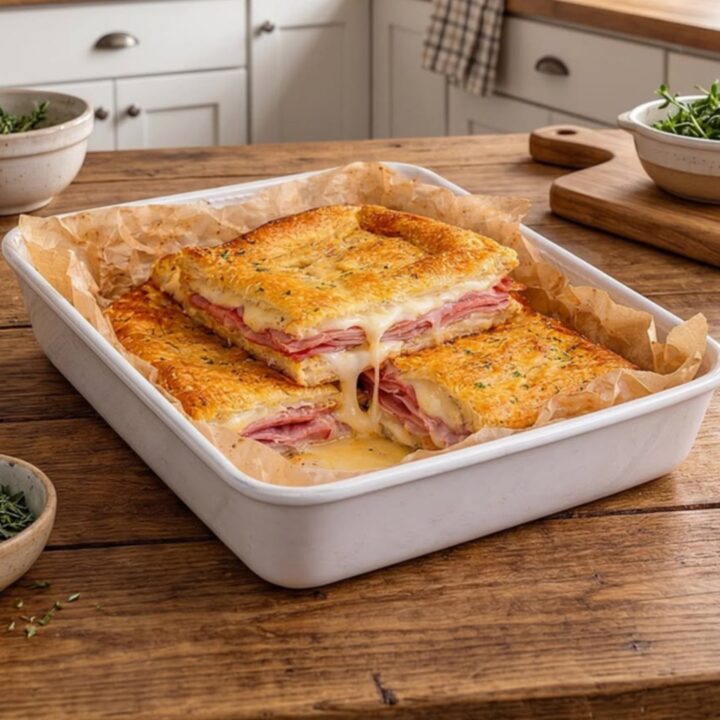
These sandwiches are best served warm, straight from the oven, when the cheese is at its peak meltiness.
They pair wonderfully with a side of fresh pickles, a light green salad with vinaigrette, or a bowl of creamy tomato soup to balance the savory flavors of the ham and melted cheese. The contrast of textures between the crunchy bread and the soft filling is the highlight of the dish.
When serving, use a sharp serrated knife to cut the sandwiches diagonally. This reveals the beautiful layers of ham and cheese and makes them easier to eat.
Arrange them on a platter or individual plates, ensuring each guest receives a portion that has been allowed to rest for the required time. The visual appeal of the melted cheese pull is best enjoyed when served immediately after the short resting period.
Frequently asked questions
Can these be made ahead of time?
What is the best type of bread to use?
Why should the sandwiches rest after baking?
Easy Hot Ham and Cheese Baked Sandwiches
Ingredients
- 8 slices sandwich bread
- 8 slices deli ham
- 8 slices cheddar cheese
Instructions
- Preheat the oven to 375°F (190°C). Line a square or rectangular baking dish with a sheet of parchment paper, ensuring it covers the bottom and sides to prevent sticking and allow for easy removal of the baked sandwiches later.
- Place four slices of bread in the prepared baking dish. Top each slice with two layers of deli ham and two slices of cheddar cheese. Place the remaining four slices of bread on top to close the sandwiches.
- Place the baking dish into the preheated oven. Bake for 12 to 15 minutes until the bread is toasted and the cheese is fully melted. Remove from the oven and allow the sandwiches to rest for 5 minutes before lifting them out with a spatula to serve warm.
Estimated nutrition per serving
- Calories
- 380
- Protein
- 18 g
- Carbohydrates
- 32 g
- Fat
- 19 g
Next recipe

Cheesy Chili Dog Crescent Rolls: Easy Baked Appetizer
See the recipe → →This recipe is based on a short cooking video and is published under the pen name Clara Weller. It was checked before publication, but errors can slip through. Nutrition, when shown, is an estimate. Read more in our editorial policy and on our food safety page.
More recipes to try

Hearty Ground Beef and Vegetable Pot Pie with Flaky Crust
Total time: 1 h 15 min
Spicy Braised Lamb Shanks for Tender Fall-Apart Results
Total time: 2 h 55 min
Cheesy Chicken Crescent Rolls for Quick Weeknight Comfort
Total time: 40 min
Easy Cheesy Chicken Noodle Casserole
Total time: 50 min
Creamy No-Peek Chicken and Herb Rice Bake
Total time: 1 h