Desserts · Part 2 of 3: Instructions
Easy Green Potion Pudding Cups for Fun Parties Step-by-step instructions
- Prep
- Cook
- Total
- Serves
- 6
Before you start
Before you begin, make sure your work area is clean and that you have all your components ready. Ensure the pistachio pudding is chilled, as it will be much easier to handle and will hold its shape better in the cups.
Have your serving cups lined up on a baking sheet to streamline the assembly line. If you are crushing your own cookies, do this in advance and set them in a bowl for easy access. Keep the candy eyes in a small container to avoid losing them during the assembly.
Ingredients at a glance (3)
- 2 cups prepared pistachio pudding (contains tree nuts)
- 1/2 cup crushed chocolate cookie crumbs
- 12 candy eyes
Instructions
Pudding base assembly
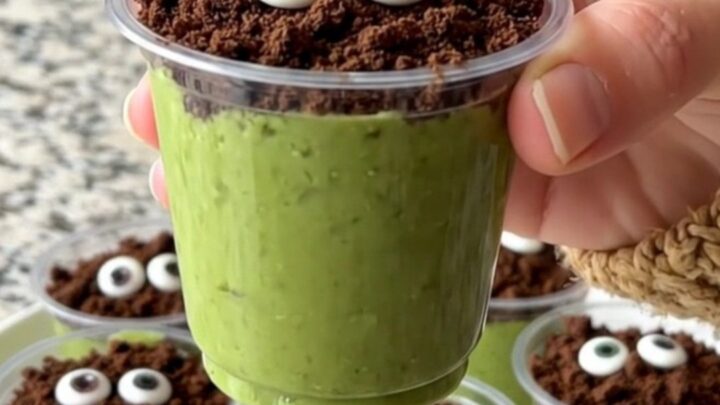
- Prepare the pudding baseArrange the small clear serving cups on a clean parchment-lined baking sheet to keep the workspace tidy. Carefully spoon the prepared pistachio pudding into each cup until they are filled to your desired level, leaving a small space at the top for the toppings.Look for Pudding should be smooth and evenly distributed across all serving cups.Tip Use a piping bag to fill the cups cleanly without getting pudding on the sides.
The pudding should be smooth and consistently filled in each cup. Ensure there are no large air bubbles trapped in the pudding, and check that the surface is relatively level before moving on to the next step. If you notice any spills on the sides of the cups, wipe them clean now for a professional look.
Adding the cookie layer
- Add the crunchy layerGently sprinkle the crushed chocolate cookie crumbs over the surface of the green pudding in each cup. Ensure the crumbs create an even layer that covers the top of the pudding, adding a nice texture contrast to the creamy base.Look for The pudding surface should be completely covered by the dark cookie crumbs.Tip Crush the cookies finely for a uniform look, or leave some larger chunks for extra crunch.
The cookie crumbs should form a uniform, dark layer that completely obscures the green pudding beneath. Ensure that the crumbs are spread evenly to the edges of the cup. If the crumbs look patchy, add a little more until the surface is fully covered, creating a clean, dark base for the final decorations.
Final decoration
- Decorate the cupsCarefully place two candy eyes on top of the cookie crumb layer in each cup, positioning them to look like little potion monsters. Once decorated, transfer the cups to a serving plate and keep them chilled until you are ready to serve them to guests.Look for Candy eyes should be clearly visible and sitting securely on the cookie crumbs.Tip Use tweezers to place the eyes precisely if you want them perfectly centered.
The candy eyes should be placed securely on the surface of the crumbs. Verify that each cup has two eyes and that they are positioned in a way that is visible from the front. Once the eyes are in place, the dessert is ready to be moved to the refrigerator for the final setting period.
Common mistakes
One common mistake is overfilling the cups, which can lead to spills when adding the toppings. Aim to leave a small amount of space at the top of each cup.
Another issue is adding the cookie crumbs while the pudding is still warm, which can cause the crumbs to become soggy; always ensure the pudding is thoroughly chilled first.
Finally, be careful not to press the candy eyes too deeply into the pudding, as this might cause them to sink and lose their intended appearance.
How to tell it’s done
The dessert is considered done once the cups are filled, topped, and decorated. Since this is a no-bake recipe, there is no internal temperature to reach. You will know it is complete when the pudding is level, the cookie crumbs form a solid layer, and the candy eyes are firmly set on top.
Ensure the cups have been refrigerated for at least thirty minutes before serving to allow the pudding to set properly and the flavors to meld together perfectly.
Up next · Part 3 of 3
2 variations · storage & make-ahead · 3 answers · printable card
Tips, FAQ & printable recipe (Part 3)← Back to the ingredients (Part 1)