Desserts · Part 2 of 3: Instructions
Easy Crockpot Sweet Potato Pecan Dump Cake Step-by-step instructions
- Prep
- Cook
- Total
- Serves
- 8
Before you start
Before beginning, ensure that your slow cooker insert is clean and dry. Prepare the sweet potatoes by mashing them until smooth; if using cooked sweet potatoes, allow them to cool slightly before adding to the cooker.
Have all other ingredients measured and ready, especially the butter, which should be sliced into uniform thin pieces for even distribution. Ensure you have an appropriate serving spoon and heat-resistant bowls ready for when the cake is finished cooking, as it is best enjoyed while still warm from the slow cooker.
Ingredients at a glance (4)
- 3 cups mashed sweet potatoes
- 1 box dry yellow cake mix
- 1 cup chopped pecans
- 1 cup unsalted butter, sliced
Instructions
Base Layering
- Prepare the BaseSpread the mashed sweet potatoes evenly across the bottom of the slow cooker insert. Ensure the layer is smooth to provide a consistent foundation for the cake mix.Look for The sweet potatoes should cover the base of the insert completely.Tip Use a room temperature sweet potato mash for easier spreading.
The sweet potato base should be spread evenly across the bottom of the slow cooker. It should look like a smooth, uniform layer that covers the entire surface area of the insert. This layer serves as the moisture source for the cake mix above, so ensure there are no significant gaps or uneven mounds before proceeding to add the dry ingredients.
Assembly of Toppings
- Assemble the LayersPour the dry yellow cake mix over the sweet potatoes, spreading it out to reach the edges. Scatter the chopped pecans over the cake mix, then place the butter slices evenly across the top of the pecans.Look for The butter slices should be spaced out to ensure even melting.Tip Do not stir the ingredients; the layering is essential for the dump cake texture.
The assembly phase is complete when the cake mix forms an even blanket over the sweet potatoes, topped with a scattering of pecans and a layer of butter slices.
The butter should be distributed across the entire surface to ensure that every part of the cake mix receives moisture during the cooking cycle, preventing dry, powdery sections in the final product.
Cooking and Finishing
- Cook and ServeCover the slow cooker and cook on high for 3 hours. Once finished, turn off the heat and let the cake rest for 10 minutes before serving warm directly from the bowl.Look for The cake is done when the edges are golden and the center is bubbly.Tip Check the edges after two hours to ensure the cake is not browning too quickly.
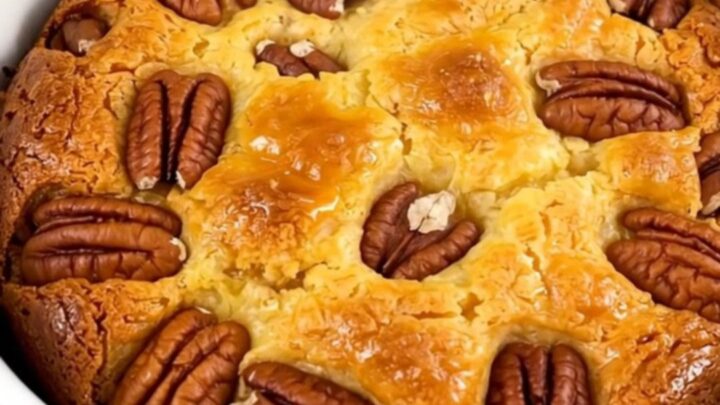
At the end of the cooking phase, the cake should look golden and smell fragrant. The edges should be slightly caramelized, and the center should be bubbling with melted butter and sweet potato juices. It is ready to serve once the heat is turned off and the cake has been allowed to settle for 10 minutes, ensuring the textures are properly set.
Common mistakes
A common mistake is stirring the ingredients together; this must be avoided as it ruins the intentional layering that gives the cake its unique texture. Another error is using butter that is too cold or in large, thick chunks, which prevents it from spreading evenly across the cake mix.
Ensure the butter slices are thin and spread out to avoid dry spots in the cake. Finally, failing to let the dish rest for at least 10 minutes can result in an overly soft texture that lacks structural integrity.
How to tell it’s done
The dump cake is considered done when the edges appear golden brown and the center is bubbly and firm to the touch. The cake mix should be fully hydrated by the melted butter, showing no dry patches on the surface.
Because this recipe does not contain raw proteins, there is no specific internal temperature required for safety. Simply look for the characteristic bubbling of the butter and juices around the perimeter of the slow cooker insert, which indicates that the flavors have adequately melded.
Up next · Part 3 of 3
2 variations · storage & make-ahead · 3 answers · printable card
Tips, FAQ & printable recipe (Part 3)← Back to the ingredients (Part 1)