Dinner · Part 2 of 3: Instructions
Easy Cheesy Beef Sliders for a Crowd Step-by-step instructions
- Prep
- Cook
- Total
- Serves
- 12
Before you start
Before you begin, ensure you have all your ingredients measured and ready. Preheat your oven to 350°F (175°C) so it is ready for the assembly phase. Have a large, clean workspace cleared for preparing the slider buns.
Having your baking dish ready and greased if necessary will make the assembly process move much more smoothly. Ensure your meat thermometer is calibrated and within reach to verify the internal temperature of the beef once it is browned in the skillet.
Ingredients at a glance (4)
- 1 lb ground beef
- 12 slider buns
- 6 slices cheddar cheese
- 3 tbsp melted butter
Instructions
Browning the beef
- Cook the beefHeat a large skillet over medium-high heat. Add the ground beef and cook, breaking it apart with a spatula, until it is fully browned and no longer pink. Ensure the beef reaches an internal temperature of 160°F (71°C). Drain any excess grease from the pan to prevent soggy buns.Look for The beef should be browned throughout and sizzling in the pan.Safe temperature 160°F (71°C) internal temperature (ground meat)Tip Use a meat thermometer to ensure the beef is cooked through to the correct temperature.
The beef should be thoroughly browned, with a rich, savory aroma filling the kitchen. Ensure there is no pink remaining in the meat and that the texture is uniform. Before moving on to the assembly, drain the skillet of any excess fat to ensure the sliders remain perfectly balanced and not overly oily.
Assembling the sliders
- Assemble the slidersSlice the slider buns in half horizontally. Place the bottom halves in a baking dish. Spread the cooked ground beef evenly over the bottom buns. Layer the cheddar cheese slices on top of the beef, then place the top halves of the buns over the cheese layer.Look for The sliders should be tightly packed in the baking dish for better structural integrity.Tip Keep the buns together as a single slab to make assembly faster and easier.
The sliders should be arranged snugly in the baking dish, creating a uniform layer. Ensure the beef is spread evenly across the surface of the bottom buns and that the cheese slices cover the meat completely to guarantee a consistent melt.
The buns should be aligned neatly to ensure they bake evenly during the final stage.
Baking until golden
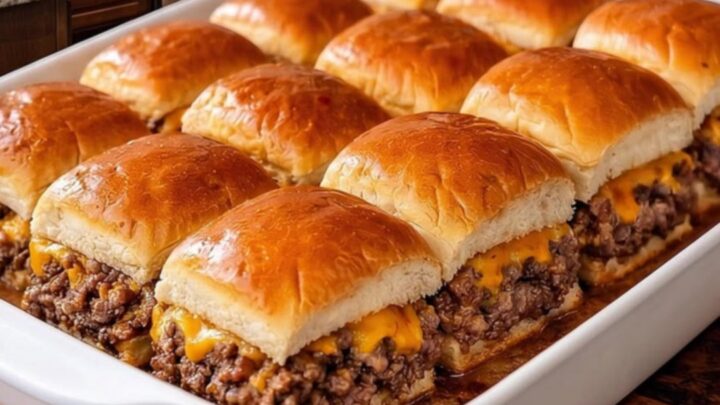
- Bake and finishBrush the tops of the slider buns generously with the melted butter. Bake in a preheated oven at 350°F (175°C) until the cheese is bubbling and the buns are golden brown. Remove from the oven and allow them to rest for 5 minutes before serving.Look for The cheese should be completely melted and the tops of the buns should be glossy and golden.Tip Cover the dish with foil if the buns start browning too quickly before the cheese melts.
The final product should feature perfectly toasted, golden-brown bun tops and a bubbling, melted cheese layer. The aroma of toasted bread and warm, savory beef should be prominent. The sliders should be firm enough to lift from the dish without losing their structure, indicating they are ready to be served.
Common mistakes
Avoid overcooking the ground beef in the skillet, as this can lead to a dry texture that detracts from the overall quality of the sliders. Another common mistake is adding the cheese before the beef has been properly drained, which can result in a greasy filling that makes the buns fall apart.
Finally, ensure you do not skip the resting period, as this allows the cheese to set slightly, making the sliders easier to cut and serve.
How to tell it’s done
The sliders are done when the cheese is completely melted and bubbling, and the bun tops have turned a deep, glossy golden brown.
The internal temperature of the beef filling should have reached at least 160°F (71°C) during the initial browning phase. When removing from the oven, the entire tray should look cohesive, with the cheese holding the beef and buns together securely.
- Ground meat: 160°F (71°C) in the thickest part
Up next · Part 3 of 3
2 variations · storage & make-ahead · 3 answers · printable card
Tips, FAQ & printable recipe (Part 3)← Back to the ingredients (Part 1)