Desserts · Part 2 of 3: Instructions
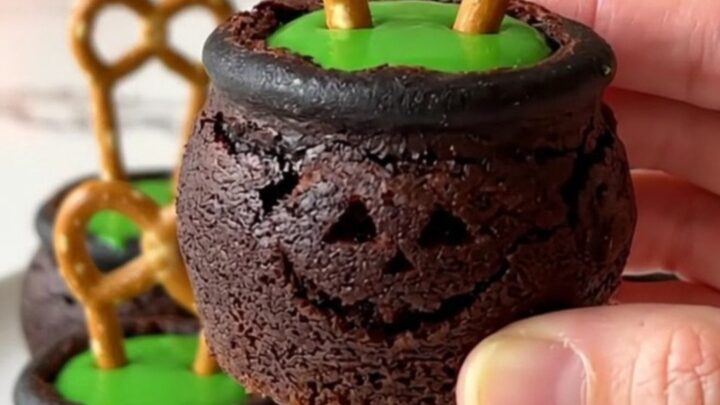
Easy Brownie Bite Cauldrons for Halloween Step-by-step instructions
- Prep
- Cook
- Total
- Serves
- 12
Before you start
Before beginning, ensure all ingredients are gathered and at room temperature for optimal handling. Prepare a clean, flat workspace and line a baking sheet with parchment paper to facilitate easy cleanup.
If using store-bought brownie bites, verify they are fresh and not overly dry, which could cause them to crumble during the assembly process. Have your melting bowl ready and ensure your spoon is the correct size to create the desired hollow shape without damaging the structural integrity of the brownies.
Ingredients at a glance (3)
- 12 brownie bites
- 1/2 cup green candy melts, melted
- 12 pretzel sticks
Instructions
Creating the brownie hollows
- Prepare the brownie basePlace the brownie bites on a parchment-lined baking sheet. Using the back of a small spoon, gently press into the center of each brownie to create a small hollow or cavity.Look for The brownie should have a clean indentation without breaking the bottom.Tip If the brownie is too firm, let it sit at room temperature for a few minutes before pressing.
The brownies should be arranged neatly in rows on the parchment paper. Each brownie should feature a clean, centered indentation that is deep enough to hold the candy but shallow enough to maintain the structural shape of the bite. Check that the edges of the brownies are intact and that the hollows are uniform in size to ensure the final presentation looks professional and cohesive before moving on to the next phase.
Filling with green candy
- Fill the cauldronsMelt the green candy according to package instructions. Carefully spoon the melted green candy into the hollow of each brownie bite, ensuring it fills the space completely to create the cauldron effect.Look for The green candy should be smooth and level with the top of the brownie.Tip Use a small piping bag or a teaspoon to control the flow and prevent spills.
The green candy should be melted to a smooth, pourable consistency without any lumps. As you fill each brownie, the candy should settle evenly into the hollow, creating a vibrant, level pool that sits just below the rim of the brownie.
Ensure there are no air bubbles trapped in the candy and that the surface is glossy and smooth. If any candy drips onto the sides, wipe it away gently before it hardens to maintain a clean aesthetic.
Inserting the pretzel handles
- Add the handleImmediately insert one pretzel stick into the edge of each brownie bite, angled slightly to resemble the handle of a cauldron before the candy sets completely.Look for The pretzel should stand upright or at a slight angle securely.Tip Work quickly while the candy is still warm so the pretzel sticks to the brownie.
The pretzel sticks should be positioned firmly into the edge of each brownie bite, standing securely without leaning or falling over. The candy should begin to set around the base of the pretzel, anchoring it in place.
Once all pretzels are inserted, the cauldrons should look like finished, miniature pots. Check that all pretzels are at a consistent angle and that the candy remains undisturbed while it finishes the final cooling and setting process.
Common mistakes
A common mistake is attempting to press the hollow into the brownie too forcefully, which can crack the sides or cause the brownie to collapse. Use a gentle, twisting motion with the spoon to create the cavity slowly.
Another error is waiting too long to insert the pretzel handle; the candy must be warm enough to act as a glue but cool enough to support the weight of the pretzel. Ensure the candy is not overheated, as this can cause it to separate and lose its smooth finish.
How to tell it’s done
The brownie cauldrons are considered complete once the candy filling has firmed up significantly and is no longer tacky to the touch. The green candy should appear smooth and glossy, with a solid, set texture that holds the pretzel handle securely in place. If the candy remains soft or runny after ten minutes, move the baking sheet to a cooler area or the refrigerator for a brief period to encourage the candy to set completely.
Up next · Part 3 of 3
2 variations · storage & make-ahead · 3 answers · printable card
Tips, FAQ & printable recipe (Part 3)← Back to the ingredients (Part 1)